If you want to try Ubuntu without losing Windows 10, there’s a simple solution. Learning how to dual boot Windows 10 and Ubuntu is effective. It’s one of the easiest and safest ways to achieve this. Dual booting allows both operational system to live on the same computer, giving you the choice to boot into either one at startup, without needing to erase anything.
I remember when I first considered using Ubuntu. I was nervous about leaving Windows behind but curious about the open-source world. Setting up a dual boot gave me the confidence to explore Linux while keeping everything I needed in Windows intact. Today, I regularly switch between them depending on the task-Ubuntu for development, Windows for design tools.
This beginner-friendly guide will walk you through:
- What dual booting is and why it might suit your needs
- What you need to prepare (without making risky mistakes)
- A complete, step-by-step configuration walkthrough
- Troubleshooting tips for common errors
- Post-configuration tweaks to help you get the most out of both systems
Let’s start by understanding what dual booting means and whether it’s right for you.
1. What is dual booting, and why do it?
Dual booting is a method of installing and running two different operating platforms on the same device. In this case, it means running both Windows 10 and Ubuntu on a single computer, allowing you to choose which one to use each time you power up.
1.1. Benefits of dual booting:
- Flexibility: You can switch between Windows and Ubuntu anytime without needing two computers.
- Better performance than virtual machines: Since both systems run natively, you get full hardware performance.
- Linux without risk: You can try Ubuntu without losing your Windows setup or files.
- Perfect for developers: Ubuntu supports tools and environments like Bash, Python, and Docker more natively.
1.2. Downsides to consider:
- Partitioning risks: Mistakes during setup could overwrite data if you’re not careful.
- Limited disk space: You’ll need to share your hard drive between two systems.
- Potential update conflicts: Occasionally, Windows updates may overwrite the GRUB bootloader, requiring repair.
For some users, alternatives like virtual machines (e.g., VirtualBox) or Windows Subsystem for Linux (WSL) may offer enough Linux functionality without setting up a dual boot. These are safer but don’t offer the same performance or full hardware access.
When I was learning Python and needed a real Linux environment, I didn’t want to sacrifice my existing Windows setup. Dual booting helped me avoid spending extra on a second machine or struggling with slow VMs. I’ve been running both systems side by side for years now.
Before we dive into the configuration steps, let’s go over the tools and preparations you’ll need to dual boot Windows 10 and Ubuntu safely.
2. Key requirements and preparations
Before starting the installation process, it’s essential to make sure your system is compatible and that all necessary preparations are complete. These steps help avoid errors during installation and reduce the risk of data loss.
This section outlines the hardware requirements, backup considerations, the proper Ubuntu version to download, and the tools you’ll need to begin.
2.1. System compatibility checklist
Not all systems are equally suited for dual booting. Begin by confirming these core requirements:
- CPU: A 64-bit Intel or AMD processor
- Storage: At least 50 GB of unallocated free space for Ubuntu
- RAM: 4 GB minimum (8 GB recommended for smoother performance) to ensure your system has enough memory for both system software.
- Firmware: Either Unified Extensible Firmware Interface or BIOS mode is supported by Ubuntu
To check your firmware type:
- Press Windows + R, type msinfo32, and hit Enter.
- At “BIOS Mode,” you’ll see either Unified Extensible Firmware Interface or Legacy.
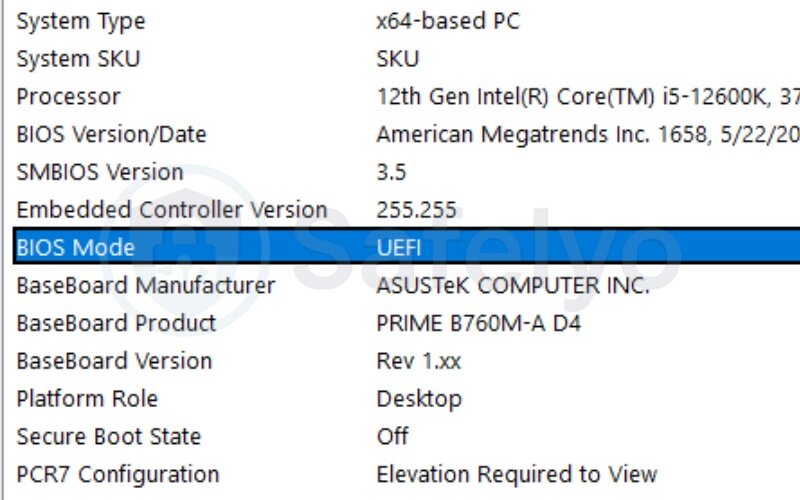
Most modern laptops use Unified Extensible Firmware Interface, and that often means Secure Boot is enabled by default. This may need to be disabled later in the process.
When I first installed Ubuntu, I assumed my system used BIOS and skipped this check. That led to confusion when the Ubuntu installer didn’t show the expected options. Verifying the firmware in advance would have saved me a lot of time.
2.2. Backup your data (and why it’s critical)
Although this guide minimizes risk by using the “Install alongside Windows” method, dual booting still involves partition changes. A system or power failure during this step can lead to data corruption or loss.
It’s highly recommended to back up:
- Personal files to an external hard drive or cloud storage
- A full Windows system image using tools like File History or Macrium Reflect, and creating a recovery media for emergencies
I once skipped creating a full backup because everything seemed fine. However, after an interrupted installation, I faced serious issues. I couldn’t boot into Windows or Ubuntu. Unfortunately, I lost two years of personal photos. Since then, backing up has always been step one.
2.3. Download the correct Ubuntu version (LTS recommended)
Go to the official Ubuntu website and download the latest Long-Term Support (LTS) version. LTS releases are more stable and receive updates for up to five years.
At the time of writing, I used Ubuntu 22.04.4 LTS. Make sure to download the 64-bit desktop ISO. After downloading, verify the ISO checksum to ensure the file isn’t corrupted. Instructions for checksum verification are available on the Ubuntu website.
2.4. Tools needed to dual-boot Windows 10 and Ubuntu
To install Ubuntu alongside Windows, you’ll need the following:
| Tool | Purpose | Notes |
| Rufus | Create a bootable USB drive | Download from rufus.ie |
| USB flash drive | Minimum 8 GB capacity, FAT32 format | Use a reliable, name-brand device |
| BIOS access | Enter firmware settings or boot menu | Key varies by device manufacturer |
Common BIOS/boot keys:
| Brand | Boot Menu Key | BIOS/UEFI Key |
| Dell | F12 | F2 |
| HP | Esc / F9 | F10 |
| Lenovo | F12 / Novo | F1 / F2 |
| ASUS | Esc / F8 | F2 / Del |
| Acer | F12 | F2 |
During my first attempt, I used a low-quality USB drive that frequently failed to boot. Replacing it with a better one solved the problem immediately.
With everything in place, you’re now ready to install Ubuntu safely alongside Windows 10. The next section walks through the process step by step, from partitioning to installing GRUB.
3. Step-by-step guide: How to dual boot Windows 10 and Ubuntu
This section covers each step required to set up a safe and fully functional dual boot system. You’ll start by resizing your Windows partition, then create a bootable USB, and finally install Ubuntu alongside Windows 10 using the graphical installer.
3.1. Step 1 – Free up disk space in Windows
Before installing Ubuntu, you need to create unallocated space on your hard drive.
- Open the Start menu, type Disk Management, and press Enter.
- Locate your main partition (usually C:), right-click it, and select Shrink Volume.
- Enter the amount of space to shrink.
Recommended: at least 40–60 GB of free space (or more if Ubuntu will be your main OS). - Click Shrink to proceed. The space will now appear as “Unallocated.”
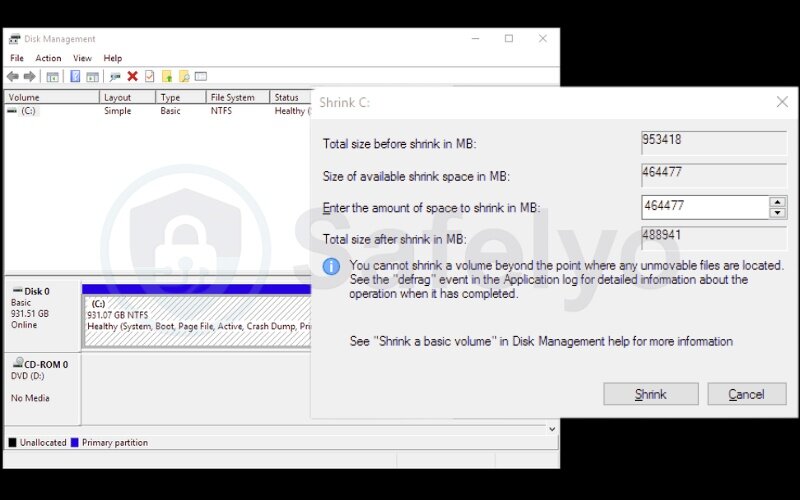
During one setup, I underestimated how much storage Ubuntu needed and quickly ran out of space. I had to repeat the entire process. Allocating enough free space at the start avoids the need to repartition later.
3.2. Step 2 – Disable Fast Startup, BitLocker, and Secure Boot (if necessary)
Certain Windows features may interfere with Ubuntu’s installer or bootloader.
- Disable Fast Startup:
- Go to Control Panel → Power Options → Choose what the power buttons do
- Click Change settings that are currently unavailable
- Uncheck Turn on fast startup → Save changes
- Suspend BitLocker (if enabled):
- Open Control Panel > BitLocker Drive Encryption
- Click Suspend Protection on your system drive
- Disable Secure Boot (only if Ubuntu fails to boot later):
- Restart your PC and enter BIOS/UEFI
- Navigate to Security or Boot tab
- Set Secure Boot to Disabled
- Save and exit
The first time I dual booted, the Ubuntu installer couldn’t see my Windows 10 installation. Disabling Secure Boot solved the issue instantly.
3.3. Step 3 – Create a bootable Ubuntu USB drive
Now you’ll create the installation media using a USB drive.
- Insert a USB (minimum 8 GB).
- Open Rufus. Under Device, select your USB drive.
- Under Boot selection, choose the downloaded Ubuntu ISO.
- Partition scheme: GPT (for Unified Extensible Firmware Interface), File system: FAT32
- Click Start and wait for completion
Using the wrong partition scheme (e.g., MBR instead of GPT) caused boot issues during one of my attempts. Double-checking this option saves time.
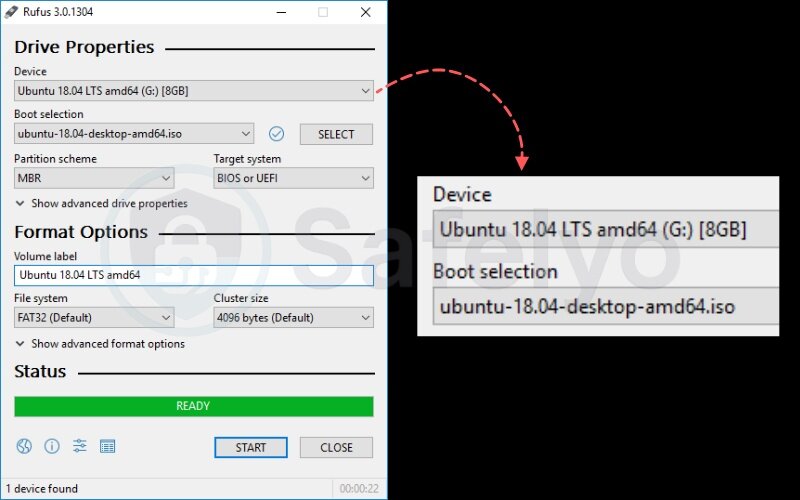
To verify that your ISO was written correctly, enable “Check device for bad blocks” in Rufus before starting the process.
3.4. Step 4 – Boot into the Ubuntu Live USB environment
With the USB ready, you’ll boot into the Ubuntu live mode.
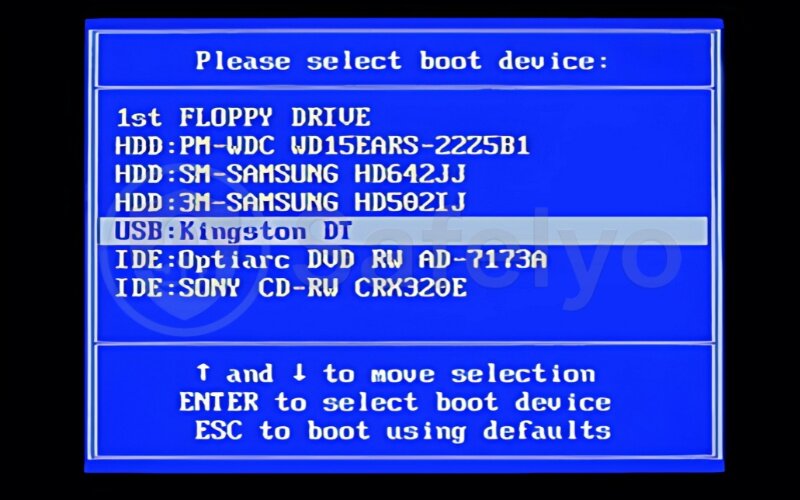
- Restart your PC and press the boot menu key (e.g., F12 for Dell, Esc/F9 for HP)
- Select your USB drive as the boot device
- On the Ubuntu welcome screen, select Try Ubuntu to load the live desktop
This step allows you to test hardware compatibility (Wi-Fi, keyboard, display) before installing. Trying Ubuntu first gave me peace of mind that all my drivers were working correctly.
3.5. Step 5 – Install Ubuntu alongside Windows 10
Once in the live environment, double-click Install Ubuntu on the desktop.
- Proceed through language, keyboard, and update screens
- When prompted for installation type:
- Choose Install Ubuntu alongside Windows Boot Manager (recommended)
- If not available, choose Something else for manual partitioning
Manual partitioning tips:
- Create at least two partitions:
- Root (/) – 30–50 GB
- Swap – 1–2x RAM (optional with newer systems, useful if your physical memory is limited)
- /home – optional, if you want to separate user files
- Make sure to install the bootloader (GRUB) on the EFI partition (usually /dev/sda or /dev/nvme0n1)
Manual partitioning offers more control, but it requires careful selection of mount points and partition types. If unsure, the guided option is safer.
3.6. Step 6 – Reboot and choose your operating system
After installation, remove the USB and reboot.
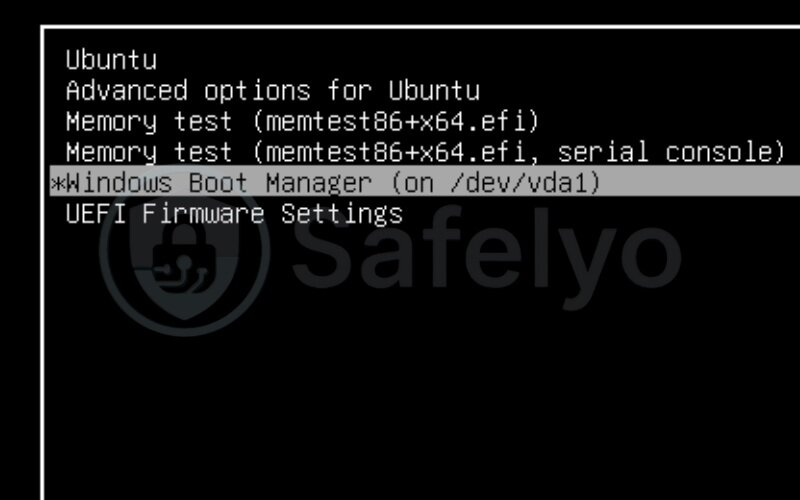
You’ll see the GRUB2 bootloader, offering options to start Ubuntu. Use the arrow keys to select and press Enter.
To make Windows the default:
1. Boot into Ubuntu
2. Open Terminal and type: sudo nano /etc/default/grub
3. Change GRUB_DEFAULT=0 to the Windows entry (usually 1 or Windows Boot Manager)
4. Save, then run: sudo update-grub
This helped me avoid confusion in a shared family PC, where others expected Windows to boot by default.
Now that you’ve installed Ubuntu alongside Windows 10, let’s look at a few helpful tweaks and post-setup adjustments to make your dual-boot environment more efficient.
>> Read more: How to change the default browser in Windows 10 quickly
4. After installation: Post-setup tweaks and tips
Once Ubuntu is installed and running, a few simple steps will ensure it’s stable, updated, and integrated smoothly with your existing Windows 10 setup. This section helps you get the most out of your dual-boot environment, especially if you’re new to Linux.
These tips improve performance, increase compatibility, and make the transition between operating platform more seamless.
4.1. Run Ubuntu system updates
The first thing to do is bring your system up to date.
Open the Terminal and run: sudo apt update && sudo apt upgrade -y
This pulls in the latest security patches, software versions, and firmware updates. If you installed from a USB created months ago, this is especially important.
I’ve had installations where Wi-Fi issues disappeared after an update. It’s one of the easiest ways to resolve hardware quirks right away.
4.2. Access Windows files from Ubuntu
Ubuntu can read and write to NTFS partitions, so you can access your Windows files directly.
- Your Windows drives should appear in the Files app sidebar
- If not, open Terminal and mount them manually:
sudo mount /dev/sdXY /mnt
Replace sdXY with your actual partition identifier (e.g., sda3). This is useful if you want to open documents or photos without rebooting.
I often edit Word docs from my Windows desktop directly inside Ubuntu using LibreOffice—no need to transfer files back and forth.
4.3. Change default operating system or GRUB timeout
You may want to boot into Windows by default, or shorten the time GRUB waits before auto-selecting the default OS.
1. Open Terminal: sudo nano /etc/default/grub
2. Change these lines:
GRUB_DEFAULT=0 (or use the name of the OS you want)GRUB_TIMEOUT=5 (set to 0 for instant boot)
3. Save and apply: sudo update-grub
Changing the GRUB timeout helped me avoid long startup delays and ensured my system booted to the right OS every time.
4.4. Install essential apps and drivers
Depending on your hardware, Ubuntu may not automatically install proprietary drivers.
- Go to Settings → Software & Updates → Additional Drivers
- Install any recommended NVIDIA or Wi-Fi drivers
You can also explore apps through Ubuntu Software or install via Terminal.
For example: sudo apt install gnome-tweaks chrome-gnome-shell
After configuration, I usually add a few essentials like Chrome, VLC, and Gnome Tweaks to personalize the experience and improve usability.
You now have a fully functional dual boot system with the essential post-install steps completed. Let’s move on to common issues and how to fix them if things don’t go as planned.
>> Read more: How to configure firewall rules in Windows 10 in 2025
5. Troubleshooting common dual-boot issues
Even with careful preparation, issues can arise after setting up a dual-boot system. Whether Ubuntu doesn’t show up at boot or Windows takes over the startup process, these are common and usually easy to fix.
This section outlines practical, beginner-friendly solutions to resolve the most frequent dual-boot errors involving GRUB, boot menus, and Secure Boot settings.
5.1. Ubuntu not showing in boot menu (boots straight into Windows)
If your system boots directly into Windows, it usually means the GRUB bootloader wasn’t installed correctly or the system defaulted to the Windows Boot Manager.
Fix it using Boot-Repair:
- Boot into Ubuntu Live USB session
- Open Terminal and run:
sudo add-apt-repository ppa:yannubuntu/boot-repair
sudo apt update
sudo apt install -y boot-repair
Boot-repair - Click Recommended Repair
- Reboot after the process completes
The first time I faced this, I thought my Ubuntu install was gone. It turned out that Windows had just overridden the boot priority. Boot-Repair restored the GRUB menu in less than 10 minutes.
5.2. GRUB loads, but Ubuntu or Windows doesn’t boot
If you see the GRUB menu, but one of the operating systems fails to load:
- Make sure the correct root partition is referenced in /etc/fstab (Ubuntu)
- Check Windows for BitLocker or hibernation status
- Use GRUB’s command line to boot manually (set root, chainloader +1, etc.)
Once, my Ubuntu wouldn’t boot because I had accidentally deleted the swap partition. Reconfiguring fstab fixed the issue. It reminded me that even small partition changes matter post-install.
5.3. Secure Boot re-enabled after Windows update
Some Windows updates re-enable Secure Boot in Unified Extensible Firmware Interface, which can block Ubuntu from booting.
Solution:
- Re-enter your BIOS or Unified Extensible Firmware Interface settings
- Navigate to Boot or Security
- Disable Secure Boot again
- Save and exit
This happened to me after a major Windows 10 update. My system went back to Secure Boot mode without warning, and Ubuntu stopped loading. Disabling it again brought things back to normal.
5.4. System clock shows the wrong time in Windows or Ubuntu
This happens because Windows uses local time and Ubuntu uses UTC by default.
To fix it in Ubuntu: timedatectl set-local-rtc 1 --adjust-system-clock
At one point, I noticed my Windows clock was always off by several hours. It was frustrating until I found this fix. Now I apply it immediately on every dual boot setup.
>> Read more: How to configure firewall rules in Windows 10
6. FAQs on dual-booting Windows and Ubuntu
This section answers the most common questions users have before or after setting up a dual boot between Windows 10 and Ubuntu. Each answer is concise, beginner-friendly, and helps clarify what to expect during and after the setup.
Will dual-booting slow down my PC?
No. Dual booting does not slow down your PC because only one operating system runs at a time. System resources are fully dedicated to whichever OS you boot into.
However, since disk space is divided between two systems, low storage on either partition can affect performance.
Can I uninstall Ubuntu later?
Yes, you can uninstall Ubuntu from a dual-boot setup without losing your Windows data. After deleting Ubuntu partitions, you must repair the Windows bootloader to restore the default boot process.
This can be done using the Windows recovery environment or the bootrec /fixmbr command.
Will Windows updates break GRUB or Ubuntu?
Occasionally, major Windows updates may reset the boot priority or overwrite the GRUB bootloader. If Ubuntu doesn’t appear after an update, it can usually be restored using Boot-Repair from a live USB session.
Can I access Windows files from Ubuntu?
Yes. Ubuntu can read and write to NTFS partitions used by Windows. Most Windows drives will appear in the Ubuntu file manager automatically, or they can be manually mounted.
Do I need antivirus software on Ubuntu?
For personal use, Ubuntu does not typically require antivirus software due to its strong permission-based system. However, if you’re exchanging files with Windows or running a server, installing antivirus can add extra security.
Can I dual-boot with other Linux distributions instead of Ubuntu?
Yes. Most major Linux distributions (like Fedora, Debian, or Linux Mint) support dual booting with Windows using a similar process. Just make sure the distribution supports UEFI if your system uses it.
Is dual-booting better than using a virtual machine?
It depends on your goals. Dual booting provides full hardware performance but requires rebooting to switch OSes. Virtual machines let you run both systems at once but with limited hardware access. See section 7 for a deeper comparison.
7. Conclusion
Setting up a dual boot with Windows 10 and Ubuntu allows you to enjoy the strengths of both operating systems on a single device. This approach gives flexibility to use Windows for familiar tasks and Ubuntu for development, learning, or experimentation.
When I first learned how to dual-boot Windows 10 and Ubuntu, I was hesitant about possibly breaking my setup or losing files. But following a step-by-step approach helped me avoid those worries. Over time, switching between Windows and Ubuntu became seamless, and I gained confidence in managing both OSes. This experience shows how important a clear and careful guide is for anyone trying dual-booting for the first time.
If you find yourself using Ubuntu more often, you might consider switching to a Linux-only setup for a simpler environment. Alternatively, virtualization tools can provide quick access to Linux without rebooting, but may sacrifice some performance.
Dual booting remains a popular choice for users who want full hardware access, adequate free space, and distinct environments. For more step-by-step guides and tips on Windows and technology, explore the other articles at Tech How-To Simplified on Safelyo.


