If you’ve ever installed a new app or hosted a local server on your PC, you’ve probably run into a firewall blocking issue.
I ran into this exact problem when I was setting up a secure VPN connection for remote work. Everything looked fine, but I couldn’t connect. After some trial and error, I realized I needed to configure custom firewall rules in Windows 10. Once I properly allowed the necessary ports and protocols, the connection stabilized instantly.
This guide walks you through exactly how to configure firewall rules in Windows 10-no guesswork, no jargon overload:
- Understand how Windows Defender Firewall works under the hood
- Learn step-by-step how to create rules via GUI, PowerShell, and Group Policy
- Export, import, troubleshoot, and monitor firewall rules like a pro
Let’s start by understanding how the Windows Firewall architecture is built, since knowing the foundation of Windows Firewall helps you make smarter, safer rule changes.
1. Understanding Windows Defender Firewall architecture
Before diving into how to configure firewall rules in Windows 10, it helps to understand how the Windows Defender Firewall is structured. This will give you the context needed to create rules that behave the way you expect.
1.1. Profiles (Domain, Private, Public)
Windows Firewall operates using three distinct network location types or profiles:
- Domain: Applied when the computer is connected to an AD domain
- Private: Meant for trusted home or office networks
- Public: Default for unsecured environments like airports or cafes
Each profile can have its own set of rules, and incorrectly applying a rule to a different profile is a frequent error. For instance, when I mistakenly configured a server rule to apply only to “Private” rather than “Domain,” users were unable to connect while on the domain network. The solution was straightforward: duplicate the rule for the Domain profile, and then everything functioned correctly.
To check the active profile: Open the Start menu, type “Windows Defender Firewall”, and open it
Each profile has separate rules, so applying them to the correct one is essential.
1.2. Default inbound/outbound behavior and rule precedence
By default:
- Inbound connections are blocked unless explicitly allowed
- Outbound connections are allowed unless explicitly blocked
However, rules can override these defaults. The rule precedence hierarchy works as follows:
- Explicit block rules override allow rules
- Specific rules override general ones
- Custom rules override default rules
Example:
You have an app running on port 8080. By default, no one can access it from outside.
You create two rules:
- Allow all inbound connections (general rule).
- Block inbound connections on port 8080 (specific rule).
Result: The specific block rule takes priority → Port 8080 remains blocked.
According to Microsoft Docs, “Block rules take precedence over allow rules regardless of the scope or profile applied.”
When I once created a rule to allow port 22 (SSH) but forgot there was a global block rule for all inbound Transmission Control Protocol, the traffic was still blocked. Understanding precedence helped me resolve the conflict by placing my allow rule higher in scope and ensuring no conflicting block rule existed.
2. Prerequisites and safety precautions
Before you configure any firewall rules, make sure you have administrative rights, and take some basic safety steps. These precautions protect your system from accidental misconfiguration or potential lockouts, especially when editing inbound rules remotely.
2.1. Creating a system restore point
Creating a system restore point ensures you can revert your system to a known good state if anything goes wrong.
Steps to create a restore point:
- Press Windows and type “Create a restore point”
- Select your system drive and click Configure
- Turn on system protection if it’s off
- Click Create, then name your restore point (e.g., “Before firewall config”)
- Wait for confirmation


I have made mistakes when I accidentally blocked RDP (Remote Desktop) on a headless machine. In some cases, misconfigured user permissions can also block certain firewall changes. Now, I create a restore point before making any significant Windows Firewall or registry changes.
2.2. Exporting the current rule set for rollback
In addition to system restore, exporting your existing firewall rule set gives you a lightweight way to recover previous configurations without affecting other system settings.
To export your current firewall rules:
netsh advfirewall export "C:\Backup\firewall-backup.wfw"Replace the path with your preferred directory. This command saves all active rules in a .wfw file, which you can later import using the netsh advfirewall import command.
One of my clients once misconfigured a Group Policy firewall rule that accidentally blocked access to their file server. Because we had a .wfw backup, we restored the rules in under two minutes, avoiding what could’ve been a major disruption.
With these safety measures in place, we’re now ready to dive into the actual steps of how to configure firewall rules in Windows 10 using the built-in tools.
3. How to configure firewall rules in Windows 10
Now that your system is backed up, it’s time to walk through the actual steps for configuring firewall rules in Windows 10. Whether you’re allowing a specific app or blocking traffic by port, the built-in GUI tools provide a powerful, user-friendly interface.
3.1. Opening the Advanced Security console (wf.msc)
The most comprehensive way to manage Windows 10 firewall rules is through the Windows Defender Firewall with Advanced Security console, also known as wf.msc. This Advanced Security console is where administrators gain the deepest level of control.
To open it:
- Press Win + R, type wf.msc, and press Enter
- You’ll see a split-pane window with rule categories on the left
- Use the incoming rules and Outbound Rules sections to view or create rules
")
From my experience, I prefer using this console instead of the basic firewall settings. It provides granular control over various aspects. I can specify which profiles the rule applies to, choose protocol type, and even define application paths.
3.2. Creating inbound and outbound rules (GUI wizard)
To create a new rule, use the step-by-step wizard in wf.msc. Here’s how:
Steps to create a rule:
- Right-click incoming rules or Outbound Rules > New Rule…
- Choose your rule type:
- Program – Applies to a specific executable
- Port – Filters based on TCP, UDP, or ICMP protocols depending on your needs.
- Predefined – Select from system apps like File Sharing, RDP
- Custom – Full control over all options, including the exact protocol type.
- Choose the type that the rule applies to all programs or a specific program
- Choose Allow, Block, or Allow if secure
- Select applicable profiles (Domain, Private, Public)
- Name the rule and finish


")

When setting up a file-sharing app, I once used the Program rule type, specifying its program path, to allow only its .exe file rather than a wide-open port rule. This minimized the attack surface and passed every vulnerability scan we later ran.
3.3. Allowing programs vs. specific ports
Choosing between allowing a program or opening a port depends on your use case. In many cases, creating application rules is safer than leaving ports open globally.
| Scenario | Recommended Rule Type |
| Trusted app like Dropbox | Program |
| Web server (port 443) | Port |
| Custom protocol or VPN client | Custom |
According to CISA, “Limiting access to specific applications rather than entire ports reduces exposure to potential exploits.”
From my testing, if the application changes paths during updates (like some Java apps), a port-based rule may be more stable. For desktop apps with a consistent .exe, go with a program-based rule.
Next, we’ll look at how to configure more advanced and scalable firewall rules using Windows PowerShell.
4. Creating advanced rules with Windows PowerShell
While the GUI (Graphical User Interface) is great for occasional configuration, PowerShell provides far more power and automation, especially when managing multiple rules or systems. PowerShell’s NetSecurity module allows you to create, audit, and deploy firewall rules programmatically.
4.1. New‑NetFirewallRule fundamentals
The New-NetFirewallRule cmdlet is the PowerShell equivalent of the GUI’s “New Rule” wizard. It lets you create inbound or outbound rules with full control over parameters like direction, profile, action, and program.
Basic syntax example:

New-NetFirewallRule -DisplayName "Allow HTTPS" `
  -Direction Inbound
  -Protocol TCP
  -LocalPort 443
  -Action Allow
  -Profile Private
  -Scope: Define the remote IP addresses this rule applies to, ensuring only trusted sources can connect.
This command allows inbound HTTPS traffic on the Private profile. I’ve used similar rules in secure lab setups where I only needed internal access to a test web server.
Common parameters:

-DisplayName: Name of the rule
-Direction: Inbound or Outbound
-Protocol: Transmission Control Protocol, UDP, ICMP (both v4 and v6), etc. For example, to allow ICMP echo requests (ping), you can create a simple inbound rule that helps with troubleshooting connectivity.
-LocalPort: Specify the local port that the rule applies to.
-Program: Full program path to the app (optional)
-Profile: Domain, Private, Public
-Action: Allow, Block
If you’re unsure of the profile names or want to apply to all, you can use -Profile Any.
4.2. Bulk‑importing rules from CSV
To manage rules at scale, especially in enterprise environments, you can import firewall rules from a CSV file.
Sample CSV structure:
| DisplayName | Direction | Protocol | LocalPort | Action | Profile |
|---|---|---|---|---|---|
| Allow_HTTP | Inbound | TCP | 80 | Allow | Private |
| Block_Torrents | Outbound | UDP | 6881-6999 | Block | Public |
Import script example:

$rules = Import-Csv "C:\Firewall\bulk-rules.csv"

foreach ($rule in $rules) {

    New-NetFirewallRule -DisplayName $rule.DisplayName `

        -Direction $rule.Direction `

        -Protocol $rule.Protocol `

        -LocalPort $rule.LocalPort `

        -Action $rule.Action `

        -Profile $rule.Profile

}
I once helped an admin apply over 150 rules across 20 systems this way. It saved hours of manual effort and ensured consistency.
4.3. Signing and auditing scripts
PowerShell scripts used for firewall configuration should be signed, especially in enterprise environments, to prevent tampering. In larger networks, admins also rely on App Control and identifiers like PolicyAppId to enforce consistency across systems. Also, auditing script execution helps track changes.
To enable script auditing:

Set-ExecutionPolicy RemoteSigned
And configure event logging via Group Policy under:
Computer Configuration > Windows Settings > Security Settings > Advanced Audit Policy Configuration > Object Access
According to Norton Cybersecurity, “Auditing script-based changes to firewall settings helps detect unauthorized modifications or malware behavior.”
When I implemented this on a client’s network, we identified a misconfigured third-party software update tool that was opening unnecessary ports – something that had gone unnoticed for weeks.
Next up: managing firewall rules at scale across multiple systems using Group Policy.
5. Managing rules via Group Policy for multiple PCs
For IT administrators managing several Windows 10 machines, Group Policy provides a centralized, scalable way to enforce consistent firewall configurations. By defining rules at the Group Policy level, you eliminate inconsistencies and reduce manual configuration errors across devices.
5.1. Linking GPOs and processing order
To manage firewall rules via Group Policy, you’ll need to create or edit a Group Policy Object (GPO) and link it to the appropriate Active Directory (AD) container, like a site, domain, or organizational unit (OU).
Steps to link a GPO:
- Open Group Policy Management Console (gpmc.msc)
- Right-click your desired OU or domain and select Link an Existing GPO…
- Choose or create a GPO containing your firewall settings
- Confirm that it appears in the Linked Group Policy Objects tab

Important: GPOs are processed in this order:
- Local Group Policy
- Site GPOs
- Domain GPOs
- OU-level GPOs
If multiple GPOs define conflicting firewall settings, the one processed last (usually closest to the object, like the OU) takes precedence – unless Block Inheritance or Enforced is configured.
I once helped a healthcare client secure endpoint devices across two floors using an OU-linked GPO. Initially, settings weren’t applying correctly because an inherited domain-level GPO was overriding it. Reordering the link precedence fixed the issue.
5.2. Targeting OUs and security groups
You can further refine firewall rule application using security filtering and WMI filters:
- Security Filtering: Apply a GPO only to specific groups, based on their security identifier (SID).
- WMI Filtering: Target specific OS versions or hardware types
Example: Some services like remote procedure call (RPC) require specific inbound rules to function correctly in enterprise environments.
To apply firewall rules only to laptops in the Sales team:
- Create a security group: Sales_Laptops
- Add relevant computers to the group
- On the GPO’s Scope tab, remove Authenticated Users and add Sales_Laptops
- Optionally, use a WMI filter to narrow by device type or OS version
This is exactly how I once enforced stricter firewall rules on mobile laptops while keeping the main office desktops on a more open profile. It reduced help desk tickets related to remote access while maintaining tighter control offsite.
Next, we’ll look at best practices to keep your firewall configuration clean, secure, and scalable.
6. Best practices: Naming, precedence & profiles
Whether you’re managing one system or hundreds, maintaining clear, effective firewall rules requires more than just technical setup. Applying a few proven best practices ensures long-term maintainability, minimizes risk, and makes troubleshooting much easier.
6.1. Least‑privilege mindset
The principle of least privilege means allowing only the minimum traffic required for a system or application to function, nothing more. Block by default, then allow only what’s necessary — for example, limit rules to specific IP addresses rather than entire ranges.
Key guidelines:
- Block by default, then allow only what’s necessary.
- Use inbound rules sparingly – outbound is safer. This ensures only trusted network services remain accessible.
- Disable unused rules, don’t just leave them in place.
When I audited a client’s rule set, I found 40+ outdated incoming rules for software that hadn’t been used in years. Once we cleaned them up and applied least-privilege principles, their network scan vulnerabilities dropped by over 60%.
According to OWASP, “Minimizing unnecessary open ports significantly reduces your attack surface.“
6.2. Consistent naming conventions & documentation
Properly naming your rules helps you (and your team) quickly understand what each rule does and why it exists.
Recommended naming format:

[App/Service]_[Direction]_[Port/Protocol]_[Profile/Location]
Example: RDP_IN_TCP_3389_Private
Also, keep a centralized log or spreadsheet of rules, with columns like:
- Display name
- Direction
- Purpose
- Creation/modification date
- Owner or responsible party
In one security review I conducted, a documented firewall rule set saved hours of investigation time during a compliance audit. Auditors specifically praised the naming clarity and change history.
6.3. When to use Domain vs. Private profiles
Windows Firewall rules apply differently depending on the network profile you are connected to.. Windows firewall profiles (Domain, Private, Public) determine how each rule applies in different environments:
- Domain: Joined to an Active Directory domain
- Private: Trusted home/work networks (not domain-joined)
- Public: Untrusted networks like cafes or hotels
Best practice:
- Use Domain for enterprise-managed machines
- Use Private for secure, known local networks
- Use Public rules sparingly; block nearly everything unless absolutely needed
I once made the mistake of allowing inbound RDP on all profiles during remote setup testing. A penetration test later flagged this as a critical risk. Since then, I have always scoped rules to Domain or Private only – never Public unless explicitly required and secured.
Next, we’ll explore how to monitor and troubleshoot firewall activity effectively using built-in tools and commands.
7. Monitoring & troubleshooting firewall activity
Even with well-crafted rules, issues can arise, such as connections blocked unexpectedly, apps failing to communicate, or logs filling with noise. Knowing how to monitor and troubleshoot Windows 10 firewall activity is critical for maintaining both functionality and security.
7.1. Viewing logs in Event Viewer & Get‑NetFirewallLog
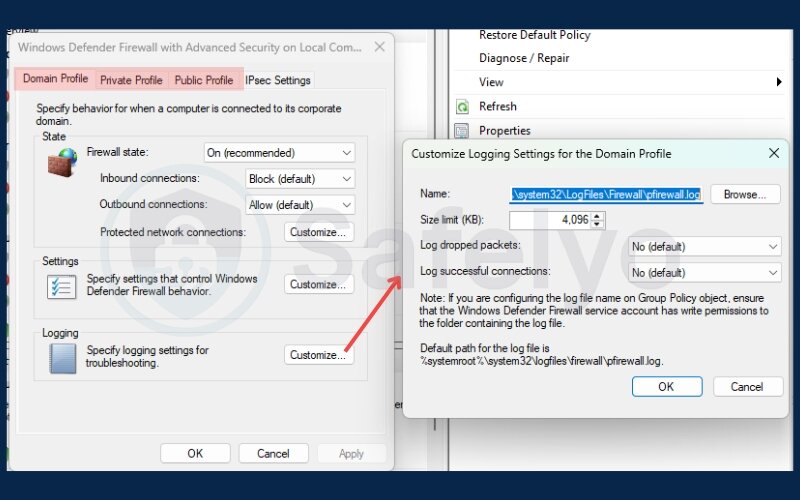
Firewall logs give insights into network traffic and network services, showing which packets are dropped or allowed. Windows Defender Firewall maintains logs that capture dropped packets and rule matches. To access and analyze them:
Enable logging:
- Open Windows Defender Firewall with Advanced Security
- Go to Properties → [Profile] → Logging
- Set a log path (e.g., C:\Windows\System32\LogFiles\Firewall\pfirewall.log)
- Enable “Log dropped packets” and “Log successful connections” as needed
You can also use PowerShell:
Get-NetFirewallProfile | Format-List Name, LogFileName, LogMaxSizeKilobytes, LogAllowed, LogBlocked
I once resolved a mystery where a third-party backup app failed silently – until I checked the log and found its outbound traffic was being dropped due to an outdated rule. Fixing the port range restored full backup functionality.
7.2. Testing connectivity with Test‑NetConnection
When diagnosing firewall-related issues, Test-NetConnection is one of my go-to tools.
Example usage:

Test-NetConnection -ComputerName 192.168.1.10 -Port 3389
This tests RDP availability. You can also test DNS, HTTP, and custom ports, as well as ICMP echo requests for simple ping checks. This method is quicker than waiting for an app to time out. It provides immediate insights, such as whether the Transmission Control Protocol was refused or if there was no response at all.
7.3. Restoring defaults vs. targeted rule removal
Sometimes it’s safer to reset everything than to chase a misconfigured rule, especially on a test machine or after malware cleanup.
To restore all settings:
- Open Control Panel → Windows Defender Firewall
- Click “Restore defaults”
- Confirm when prompted
Caution: This removes all custom rules and reverts to the default Microsoft policy.
Alternatively, you can remove specific rules by name:
Remove-NetFirewallRule -DisplayName "Old_VPN_TCP_1723"
During a remote troubleshooting session, a user’s Wi-Fi kept dropping due to a misfired outbound block rule on DHCP dynamic ports. We selectively removed it using PowerShell, avoiding a full reset and saving their local configurations.
Now that you can monitor and fix firewall issues, let’s look at how to back up and restore your firewall rule sets.
8. Exporting, importing, and backing up rule sets
Backing up your firewall configuration is a smart move, especially before major changes, OS upgrades, or when managing multiple machines. Windows 10 offers several ways to export, import, and version-control your rule sets.
8.1. Using netsh advfirewall export/import
The netsh command-line utility allows you to export and import the entire firewall policy, including all custom rules and profile settings.
To export:
netsh advfirewall export "C:\Backups\firewall_config.wfw"
To import:
netsh advfirewall import "C:\Backups\firewall_config.wfw"
Importing overwrites current settings – use with caution.
I used this method while migrating a developer’s customized firewall setup to a new laptop. By exporting the .wfw file, we had a perfect snapshot, which restored all ports, app rules, and profiles in one step.
8.2. Version‑controlling .wfw files
For environments with frequent policy changes, versioning firewall exports gives you traceability and rollback capability.
Tips for managing versions:
- Use a naming format like: fw_rules_DEV_2025-07-13.wfw
Store exports in a Git repo, cloud folder, or a secured NAS
Log associated changes in a changelog or README
In one team I worked with, we combined .wfw file versions with Git commits in a secure repository. This allowed rollback after a faulty bulk rule import, and gave us a change history for compliance audits.
>> Read more:
9. FAQs
Here are answers to some of the most frequently asked questions about how to configure firewall rules in Windows 10. These insights are aimed at helping both beginners and experienced users troubleshoot, validate, and optimize their firewall setups confidently.
How do I allow a single IP through the firewall?
To allow traffic only from specific IP addresses, create a custom inbound rule and define them under Scope.:
– Open wf.msc
– Create a new Inbound Rule → Custom
– Under Scope, set the Remote IP address to the desired IP (e.g., 192.168.1.100)
– Define the port/protocol as needed
– Name and save the rule
This is especially useful for restricting access to Remote Desktop or admin panels to only trusted machines.
Why do my rules disappear after a reboot?
This usually happens when:
– Rules are applied using temporary scripts without persistence
– A Group Policy Object (GPO) is enforcing a different rule set on startup
– Third-party security software is resetting firewall policies
Solution: Ensure rules are saved via GUI or persistent PowerShell, and verify if any GPOs or endpoint agents are managing firewall settings.
Is it safe to disable Windows Defender Firewall if I have a hardware firewall?
Generally, no. Microsoft and cybersecurity experts like Norton recommend keeping the Windows Firewall enabled even when behind a hardware firewall. This ensures:
– Per-app and per-port control
– Defense against local network threats
– Rule-based restrictions on outbound traffic
A hardware firewall protects the perimeter; Windows Firewall protects the host.
Can I copy rules from Windows 10 to Windows 11?
Yes. Most Windows 10 .wfw rule sets are compatible with Windows 11. Use: netsh advfirewall export/import
However, test them after import to confirm compatibility, especially if rule sets reference deprecated apps or services.
Does disabling notifications affect protection?
Disabling firewall notifications does not reduce security, but you may miss alerts about blocked apps or services. This can make troubleshooting more difficult.
If you prefer fewer pop-ups but still want awareness, enable logging instead of notifications.
10. Conclusion
Learning how to configure firewall rules in Windows 10 is one of the most practical ways to protect your device from unwanted access and data leaks. Every user can benefit from understanding how rules interact, what network location types and profiles mean, and how to safely allow or block apps and ports.
When I first began customizing Windows Firewall for a freelance client, I thought allowing a few apps would be enough. But when a misconfigured outbound rule let a suspicious updater run in the background, I realized the importance of using the least-privilege approach and auditing every rule. After refining the setup with logging and PowerShell scripts, the system was leaner, safer, and much easier to maintain.
The process may seem complex at first, but with the right tools and practices, configuring your Windows Firewall becomes second nature.
Looking to go further? Check out more expert-guided tutorials on Tech How-to Simplified at Safelyo, from VPN integration to advanced network defense tips. Your digital safety starts with informed action.