Your Facebook search history is more than just a list of past searches, it’s a window into your personal interests, connections, and daily online behavior. Over time, this history can reveal patterns that you might prefer to keep private. Learning how to erase search history on Facebook is a crucial step to safeguard your privacy, reduce targeted ads, and regain control over the information that Facebook retains about you.
In this comprehensive guide, you will discover:
- The reasons why clearing your Facebook search history matters for your digital privacy
- Step-by-step instructions to erase searches on desktop, mobile, and via Accounts Center
- Pro tips to manage your searches and maintain long-term privacy
Whether you’re concerned about personal security, unwanted recommendations, or simply want a cleaner Facebook experience, this guide provides clear, actionable steps. Keep reading to master how to erase search history on Facebook and take full control of your digital footprint with confidence.
1. Why you should clear your Facebook search history
Your Facebook search history contains every profile, page, or topic you have ever looked for, from friends and family to interests and hobbies. Knowing how to erase search history on Facebook is essential for maintaining control over your digital footprint and protecting your personal information.
Deleting your search history offers multiple benefits:
- Protect personal information: Anyone with access to your account or device could view your previous searches. By clearing history, you prevent others from seeing sensitive information.
- Reduce targeted ads: Facebook uses your search activity to personalize ads. Removing your search history reduces how much the platform can track and target you with ads.
- Avoid unwanted suggestions: Your past searches influence friend suggestions, page recommendations, and content that appears in your feed. Clearing history helps reset these suggestions.
Regularly managing your search history is a key step in digital hygiene, helping you maintain privacy and reduce unwanted tracking.
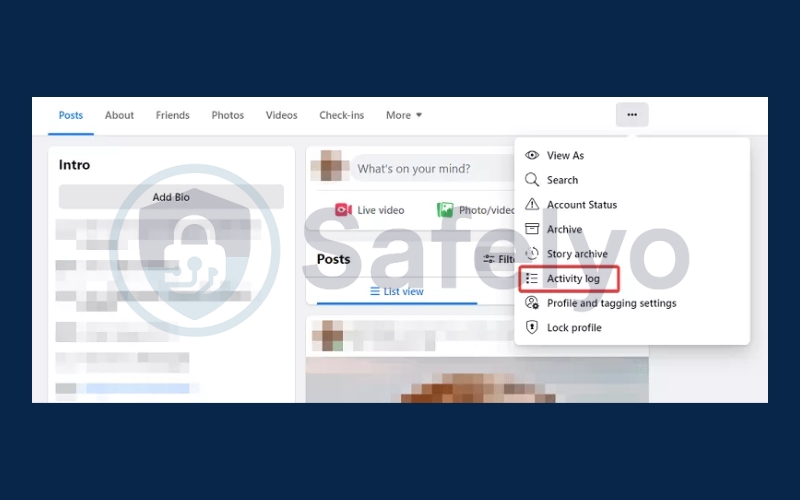
2. How to erase search history on Facebook using desktop
It’s very simple to clear your Facebook search history on desktop. Follow these steps:
Open your browser and go to www.facebook.com.
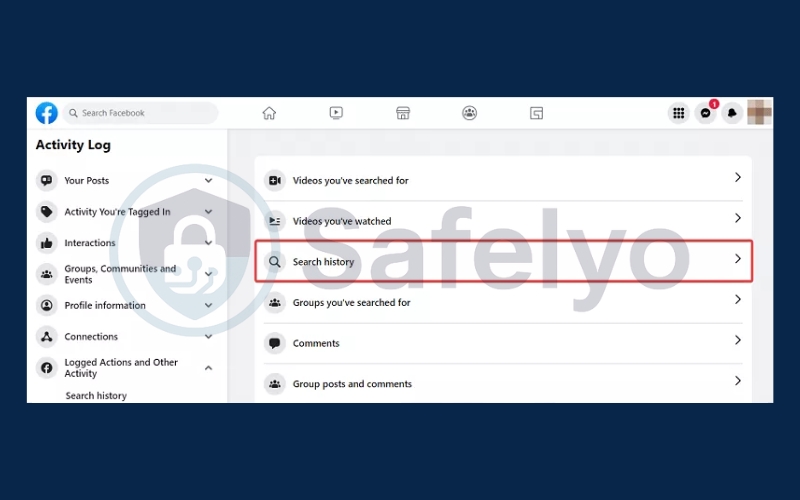
Navigate to your profile page by clicking your profile icon. Select Activity Log from the menu.
Locate and tap Search History to view all your past searches.
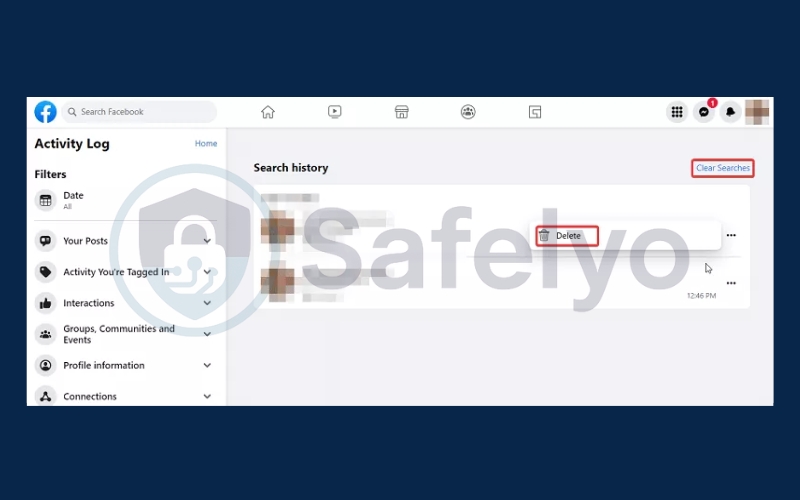
To remove searches, you can either delete individual entries by clicking the three-dot menu next to each item or remove all entries at once by tapping Clear Searches.
3. How to erase search history on Facebook using mobile (Android/iPhone)
On the Facebook mobile app, you can also clear your Facebook search history using the Activity Log. The process is similar on both Android and iOS, with only minor differences.
Tap the three-dot menu located under your profile picture to open Profile Settings.
Scroll and select Activity Log.
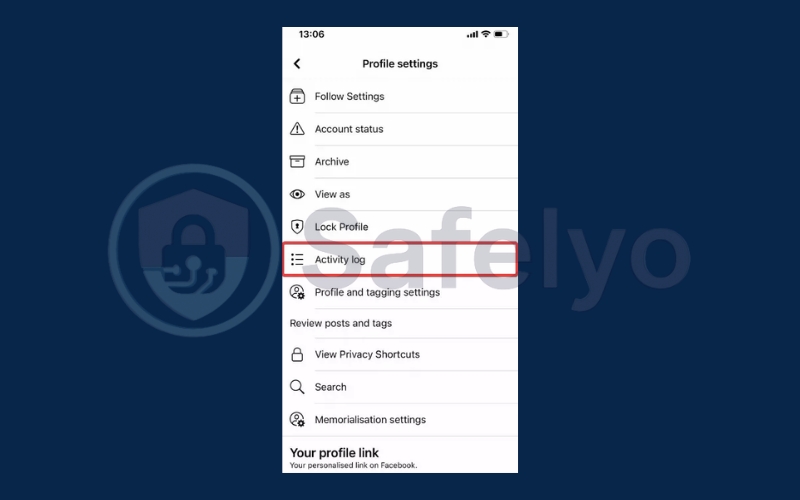
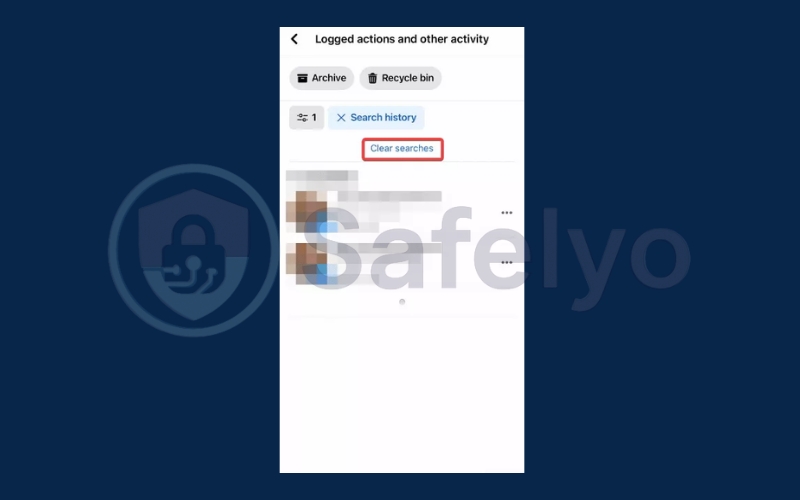
Navigate to Logged Actions and Other Activities, then tap Search History.

To remove searches, either tap Clear Searches to delete the entire history at once, or delete individual entries by tapping the three-dot menu next to each search.
4. How to clear your Facebook search history via the accounts center
The Accounts Center allows you to manage your accounts across Meta products like Facebook and Instagram. If you prefer not to use the Activity Log, you can clear your search history using Accounts Center. The steps are the same on both desktop and mobile.
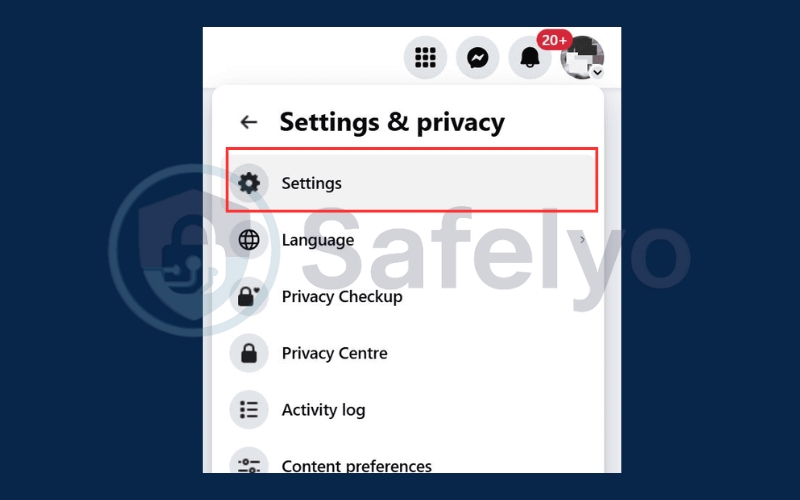
Open Facebook settings. Click your profile icon, select Settings & Privacy, and then tap Settings.
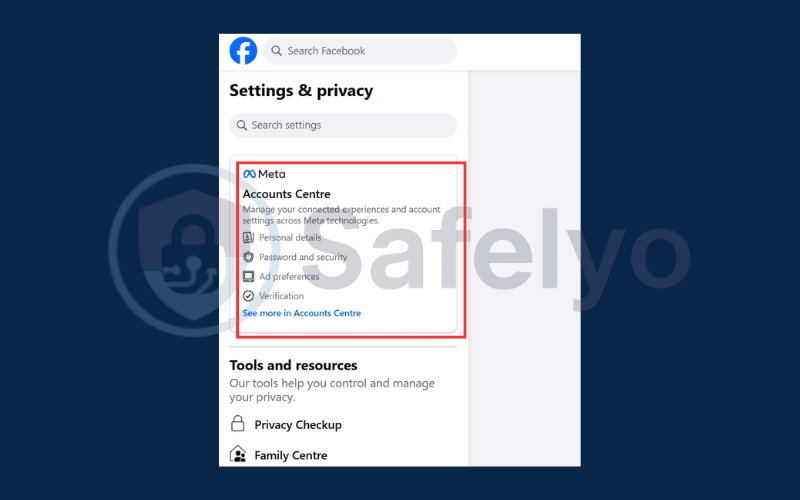
Access Accounts Center. On the left side, select Accounts Center, which appears under the Settings & Privacy section.
Go to your search history. Click Your information and permissions, then select Search history to view your search entries.

Select your Facebook profile. Choose the profile whose search history you want to manage. If you only have one profile, you can clear its history here by clicking Clear all searches.
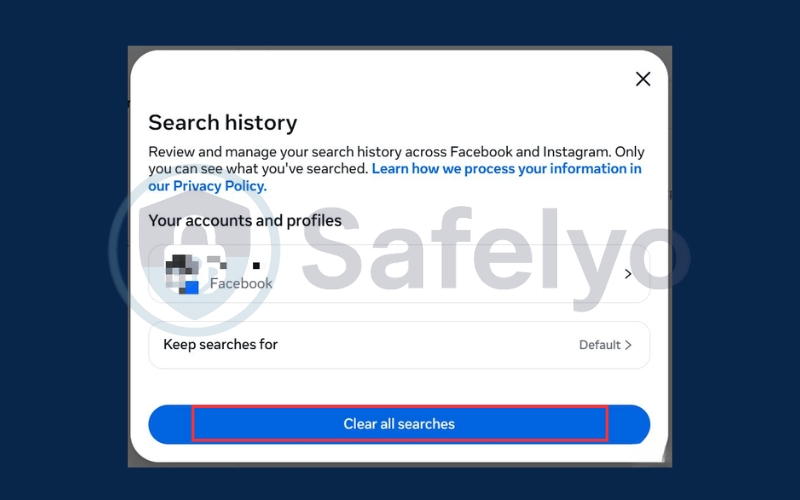
Delete searches. To remove individual searches, click the X icon next to each entry. Note that in Accounts Center, you can only delete search entries one by one.
5. Tips to keep your Facebook search history private
Deleting search history is only part of maintaining online privacy. You can further enhance your control with these tips:
- Enable Limit Ad Tracking: This reduces Facebook’s ability to use your search activity for personalized ads.
- Adjust privacy settings: Go to Settings → Privacy → Activity visibility and control who can see your actions.
- Delete search history regularly: Set a routine, weekly or monthly, to clear searches to prevent accumulation.
- Use private browsing: For searches you don’t want saved at all, use incognito or private browsing mode when logging into Facebook.
- Be mindful of saved login sessions: Shared devices can store search activity, so always log out if others use the same device.
By combining these strategies, you can maintain much stronger control over your personal data and digital footprint.
Read more:
6. FAQs on how to erase search history on Facebook
Managing your search history is essential for protecting your privacy and controlling what Facebook knows about your activity. Here are some common questions about how to erase search history on Facebook, along with detailed answers:
Can I recover my Facebook search history once erased?
No, once you clear your Facebook search history, it cannot be recovered. This includes searches from both your desktop and mobile app. Before you delete, make sure you truly want to remove this information, as Facebook does not provide a way to restore erased search entries.
Does clearing search history log me out?
No, deleting your searches only removes the activity record. Your Facebook account login remains intact, and you can continue using the platform normally. Clearing your history does not affect your posts, messages, or other account data.
Will Facebook still suggest friends based on past searches?
Yes, some friend suggestions may still appear because Facebook also considers your interactions, likes, and mutual connections. However, by regularly clearing your Facebook search history, you can significantly reduce search-based suggestions and limit Facebook’s tracking of your search behavior.
How often should I clear my search history?
For maximum privacy, it’s recommended to erase your Facebook search history at least once a month. If you perform sensitive or personal searches, consider clearing your history immediately afterward. Regularly managing your search history ensures better control over your online footprint and reduces unwanted tracking or recommendations.
7. Conclusion
Learning how to erase search history on Facebook is a simple but highly effective step to enhance your digital privacy and regain control over your online activity. By regularly managing your search history, you can prevent unwanted tracking, reduce targeted ads, and ensure your personal information stays secure.
Recap of methods to erase your Facebook search history:
- Desktop: Use the search bar → View All → Clear Searches
- Mobile: Open Activity Log → Search History → Clear Searches
- Accounts Center: Clear synced searches across Instagram, Messenger, and Facebook
Make it a habit to erase your Facebook search history regularly. Staying proactive with privacy settings helps you maintain a cleaner digital footprint, avoid unnecessary data collection, and enjoy a safer, more private Facebook experience. For more easy-to-follow guides and tips on managing your digital life, check out Tech How-To Simplified category on Safelyo.