Figuring out how to add a Webroot VPN to my Webroot account can feel surprisingly tricky, especially when the option seems to be hidden or missing from your subscription. I’ve seen countless users hit this wall, feeling frustrated as they try to activate a feature they believe they’ve already paid for.
This issue is not unique to you. The process can be genuinely confusing, but the good news is that there’s a simple path forward. As a cybersecurity specialist, I’ve navigated these exact setups for years, and the most common hurdles are almost always caused by a simple misunderstanding of the subscription plan or the installation process.
This guide is designed to eliminate that confusion for good. Here, I will walk you through everything you need to know, including:
- Confirm if your plan actually includes the VPN.
- The clear, step-by-step process to activate it on any device.
- Quick solutions for the most common errors you might encounter.
Forget the confusing support pages and outdated forum posts. Let’s get your VPN activated and running in just a few minutes.
1. Does your Webroot plan actually include a VPN?
Before you click another button or search another forum, let’s tackle the single most common roadblock. The reason many people can’t find the VPN is simple: Webroot’s VPN is not a standard feature in every antivirus plan. It’s a distinct product named Webroot Wi-Fi Security.
Typically, this service is only included in high-tier packages like Webroot Internet Security Complete or sold separately as an add-on. If you have a more basic plan, the VPN feature won’t be available in your account.
Here’s how to check your subscription in less than a minute:
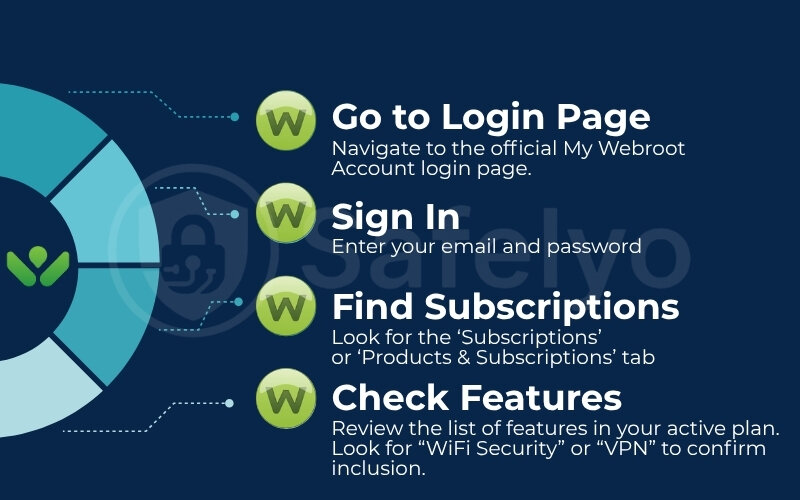
- Navigate to the official My Webroot Account login page.
- Enter your credentials (email and password) to sign in to your dashboard.
- Once you’re in, look for a tab or section labeled ‘Subscriptions’ or ‘Products & Subscriptions’.
- Carefully examine the list of features under your active plan. If your subscription includes the VPN, it will clearly state “Wi-Fi Security” or “VPN” as part of the package.
From my experience helping users with this exact issue at Safelyo, I can tell you that this one check solves the majority of “missing VPN” problems. Taking a moment to verify this now will save you a huge amount of potential frustration. If you’ve confirmed that “Wi-Fi Security” is on your list, you’re all set to proceed with the activation.
2. How to add a Webroot VPN to my Webroot account?
Great, now that you’ve confirmed the VPN is part of your package, we get to the straightforward part. Activating it is a simple process of downloading the correct application and signing in.
We’ve broken down the process for every major platform. Just follow the steps for your specific device below.
2.1. Webroot VPN activation for Windows & macOS
The good news for desktop users is that the process is nearly identical for both Windows and macOS, making it easy to get up and running.
Desktop Setup: The 30-Second Guide
- Login: Sign in to your My Webroot account on a web browser.
- Download: Navigate to the ‘Wi-Fi Security’ tab and download the installer.
- Install: Run the downloaded file and follow the on-screen instructions.
- Activate: Open the new Webroot Wi-Fi Security app and log in with your credentials.
Here is the exact process:
- Log in to your account: Using your web browser, go to the My Webroot account portal and sign in with your email and password.
- Find the VPN section: Once logged in, navigate to the Wi-Fi Security tab on your main dashboard. This is the dedicated section for your VPN service. If you don’t see this tab, it confirms your plan doesn’t include the VPN, and you should revisit the first section of this guide.
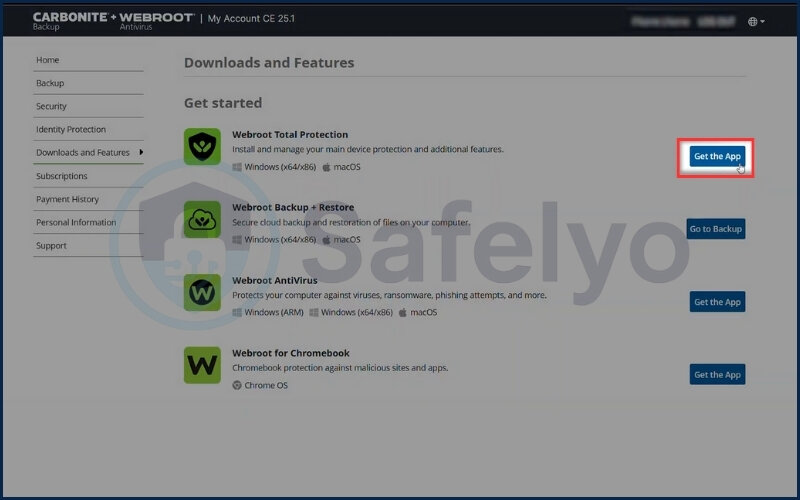
- Download the installer: Click the prominent Download or Install button that corresponds to your operating system (Windows or macOS). Your browser will begin downloading the installation file.
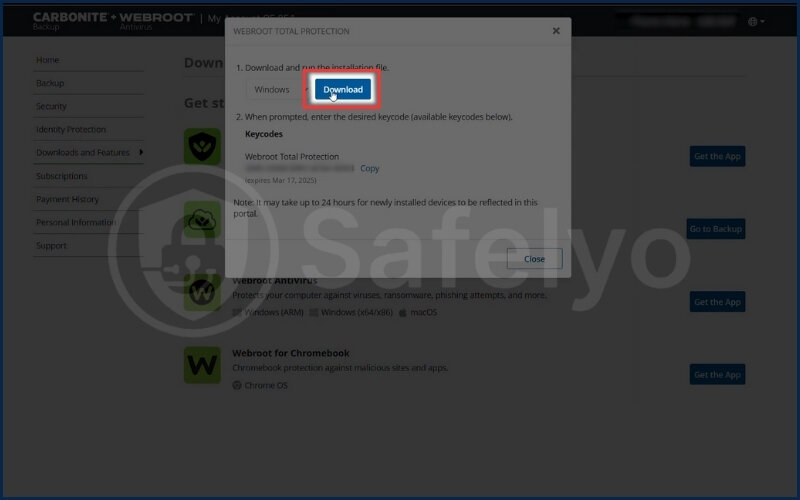
- Run the installation file: Locate the downloaded file (usually in your ‘Downloads’ folder) and double-click it to launch the installer. Follow the on-screen prompts to complete the installation.
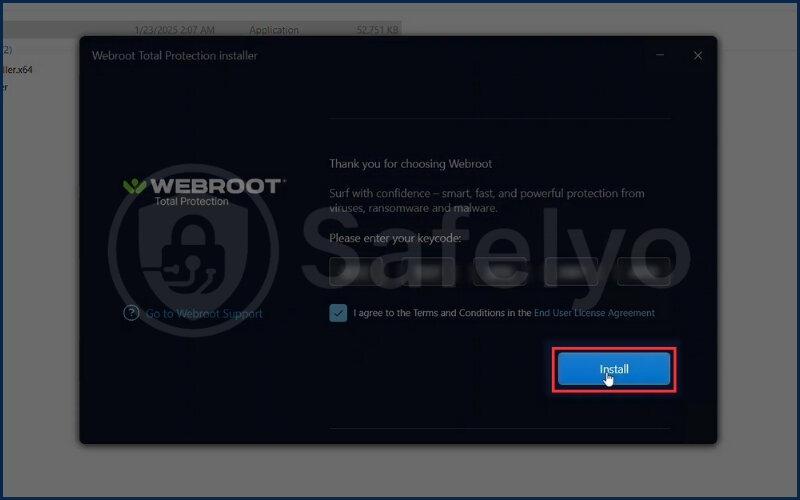
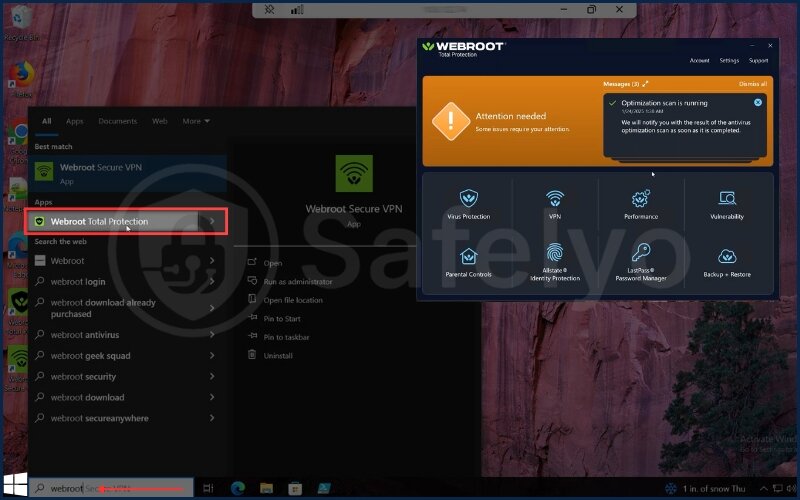
- Activate the application: Once installed, open the new Webroot Wi-Fi Security application on your computer. Note that this is a separate program from the main Webroot SecureAnywhere antivirus. The app will prompt you to sign in one last time with your Webroot credentials. This final step completes the Webroot VPN activation, linking the app directly to your subscription.
2.2. How to install Webroot Wi-Fi Security on Android & iOS
Adding the VPN to your smartphone or tablet is even simpler than on a desktop, as it involves a direct download from your device’s official app store.
Mobile Setup: The 30-Second Guide
- Find: Search for “Webroot Wi-Fi Security” in the App Store (iOS) or Play Store (Android).
- Install: Download the official app to your device.
- Login: Open the app and sign in with your main Webroot account credentials.
- Allow: Grant the VPN permission when your phone prompts you.
Follow these five steps to get protected on the go:
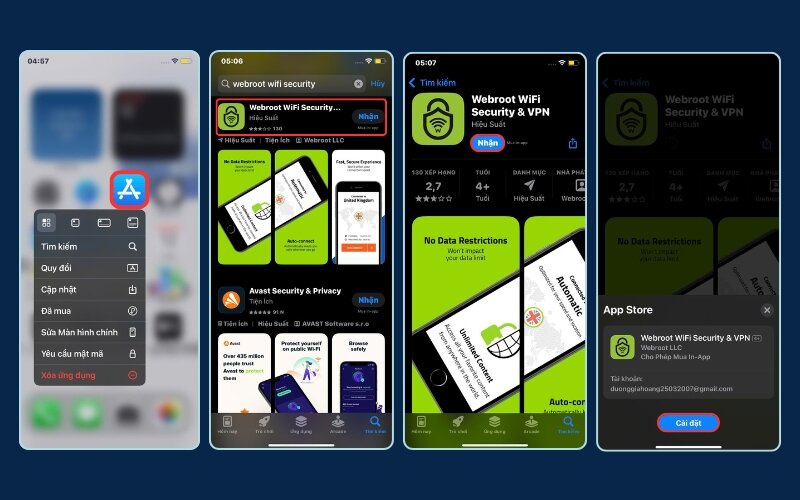
- Open your app store: On your device, tap to open the Google Play Store if you’re using Android, or the Apple App Store if you have an iPhone or iPad.
- Search for the right app: In the search bar, type “Webroot Wi-Fi Security”. It’s important to search for this exact name, not “Webroot SecureAnywhere,” as they are two different applications.
- Download and install: Tap the “Install” or “Get” button to download the application to your device.
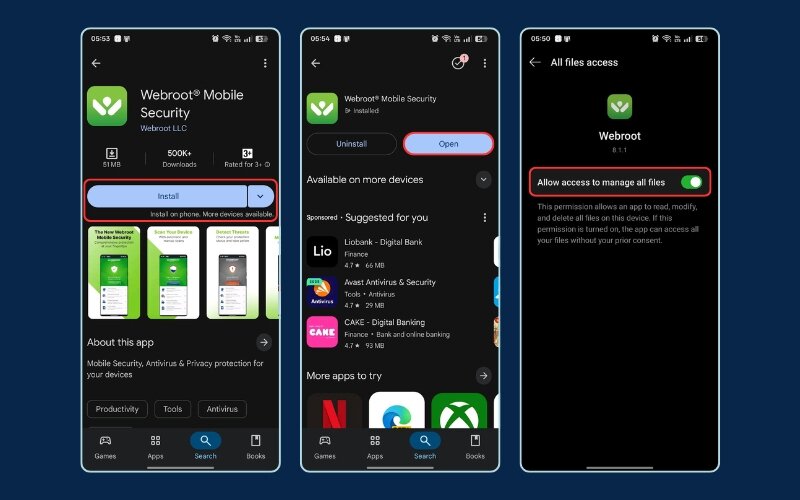
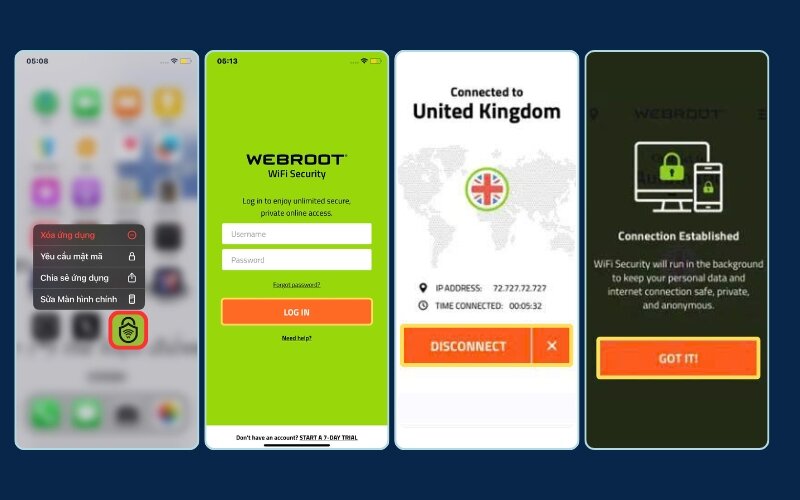
- Log in to activate: Once the installation is finished, open the Webroot Wi-Fi Security app. It will ask you to log in. Use the same email and password associated with your main Webroot account to link the app to your subscription.
- Grant VPN permissions: This is the final and most critical step on mobile. Your operating system will ask for permission to let the app manage your network traffic. For instance, on an iPhone, a pop-up will appear saying “Webroot Wi-Fi Security Would Like to Add VPN Configurations.” You must tap ‘Allow’ and may need to enter your phone’s passcode to complete the setup. On Android, you’ll see a similar connection request prompt that you need to accept.
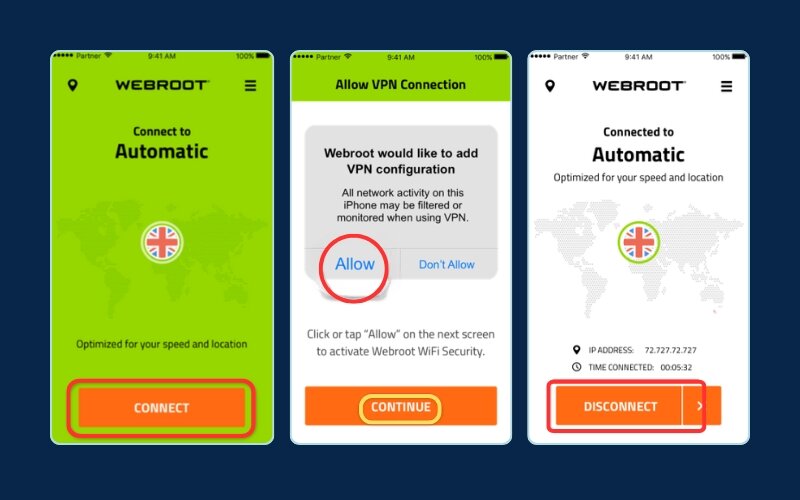
Once you’ve granted permission, your device is ready to connect securely through the VPN.
3. Troubleshooting: Common issues with Webroot VPN setup
Even with the clearest instructions, technology can sometimes have a mind of its own. If you’ve run into a snag trying to get your Webroot VPN up and running, don’t worry. This section covers the most common issues and how to resolve them quickly.
Safelyo’s Pro Tip
Before you dig into specific fixes, listen to this:
After years of troubleshooting, I can confirm that over 90% of Webroot VPN activation problems stem from one of two things.
- Your subscription plan genuinely does not include the VPN.
- You are trying to log into the Wi-Fi Security app with a different email/password than your main SecureAnywhere account.
Always double-check these two things first. It will save you a world of headaches.
3.1. The Webroot VPN is not showing up in my account
This is, by far, the most frequent issue users face. If you’ve logged into your account and can’t find the “Wi-Fi Security” tab or any mention of a VPN, the reason is almost always the one we covered earlier: Your current subscription plan does not include the VPN feature.
First, go back and carefully follow the steps in Section 1 of this guide to confirm your plan’s features. If you’ve confirmed the VPN isn’t listed, here are your options:
- Upgrade your plan: You can upgrade your Webroot subscription to a higher tier that includes it, such as Internet Security Complete.
- Purchase it as an add-on: Webroot often sells Wi-Fi Security as a standalone product. You can purchase it separately and add it to your account.
- Contact support: If you are certain your purchase was meant to include the VPN, it’s best to contact Webroot’s official support team. There could be a rare billing or account provisioning error on their end.

3.2. How to fix “Activation failed” or connection errors
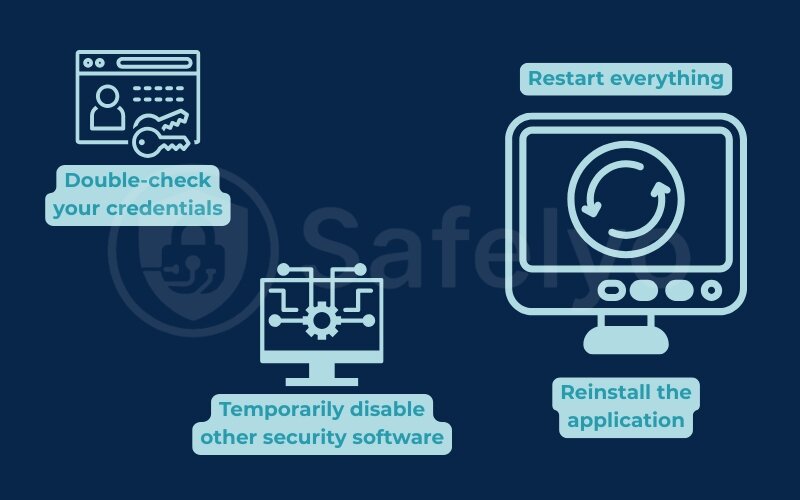
Seeing an “Activation Failed” message is frustrating, but it’s usually fixable with some basic troubleshooting. Here are the steps to take, in order:
- Double-check your credentials: Make sure you are using the exact same email and password for the Wi-Fi Security app that you use for your main My Webroot account. Typos are a common culprit.
- Temporarily disable other security software: If you have another antivirus or firewall running, it might be blocking the VPN’s connection. Temporarily disable it, try to activate the VPN, and if it works, add an exception for Webroot Wi-Fi Security in your other program.
- Restart everything: A classic for a reason. Restart your computer or mobile device to clear any temporary glitches.
- Reinstall the application: If nothing else works, uninstall Webroot Wi-Fi Security, restart your device, and then reinstall it following the steps in Section 2.
From our experience at Safelyo, a simple reinstall fixes over 50% of these unexplained activation errors. It often clears out corrupted files or configuration conflicts that a simple restart won’t.
3.3. How do I add a device to my Webroot Wi-Fi security?
This is much simpler than it sounds. Webroot allows you to use your Wi-Fi Security subscription on multiple devices (the exact number, typically 3 or 5, depends on your plan).
There is no “add device” button in your account dashboard. To add a device to your Webroot Wi-Fi Security, you simply need to repeat the installation process from Section 2 on the new device.
Just download the Webroot Wi-Fi Security app on your new computer, phone, or tablet and log in using your existing Webroot account credentials. As long as you haven’t reached your device limit, the new device will be automatically registered and protected under your existing subscription.
4. Beyond activation: Getting the most out of your Webroot VPN
Congratulations! Getting your Webroot VPN activated is the first step, but getting the most out of it is where the real value lies. Now that it’s installed, let’s quickly cover the essentials of using the app so you can browse with confidence.
Using the VPN is designed to be incredibly simple. When you open the app, you’ll see a large ‘Connect’ button. Tapping this will instantly encrypt your connection and mask your IP address, securing your data.
But to truly take control, you should know about these two key functions:
4.1. Choosing your server location
By default, the VPN will likely connect you to the fastest available VPN server, often one close to your physical location. However, you can manually change this. Look for an option labeled ‘Server Location,’ ‘Virtual Location,’ or a dropdown menu showing a country name.
Here’s a simple breakdown of when to use each connection method:
When to Use Auto-Connect (Fastest Server)
- For everyday browsing and general privacy.
- When you need the best possible connection speed.
- To secure your connection on public Wi-Fi quickly.
When to Manually Choose a Server
- To access streaming content from a specific country.
- If your auto-connection feels slow, try a different nearby server.
- To bypass local network restrictions or censorship.
4.2. Understanding the Kill Switch
One of the most important features, often found in the settings menu, is the Kill Switch. Think of it as a crucial fail-safe. If your VPN connection unexpectedly drops for any reason, the kill switch automatically blocks your device’s internet access until the secure VPN connection is restored.
Why is this important? Its IP address VPN prevents your real IP address and unencrypted data from being accidentally exposed online. For maximum security, we at Safelyo strongly recommend finding this setting and ensuring it is enabled at all times.
5. Is the Webroot VPN not enough for you? When to consider an alternative
While the Webroot Wi-Fi Security VPN is a solid choice for basic protection on public Wi-Fi and securing your everyday browsing, it’s important to be realistic about its limitations. As you start using it, you might find it doesn’t meet all your needs.
If you’re a heavy internet user who needs top-tier speed for 4K streaming, flawless access to international content libraries, or advanced security features, you might find Webroot’s VPN a bit lacking. It’s designed for simplicity, not for power users.
To help you decide, here’s a quick comparison of how Webroot’s VPN stacks up against industry-leading dedicated VPN services:
| Feature | Webroot WiFi Security | NordVPN / ExpressVPN (Leaders) |
| Primary Goal | Basic security add-on | Comprehensive privacy and performance solution |
| Connection Speed | Average, can be slow | Optimized for high-speed streaming and downloading |
| Streaming Access (Netflix/Hulu) | Limited, often blocked | Excellent, with servers dedicated to unblocking content |
| Server Network | Small, limited countries | Massive, thousands of servers in 90+ countries |
| Advanced Features | Basic (Kill Switch) | Advanced (Double VPN, Ad-blocker, Obfuscation) |
If your needs fall into the right-hand column, investing in a specialized VPN service might be a better long-term decision for your digital privacy.
>> Ready for a deeper dive? To see a full breakdown of the best options available, check out Safelyo’s comprehensive review of the Best VPNs of 2026.
6. FAQ about Webroot VPN
Does Webroot have a VPN built in?
Not exactly. Webroot offers a separate VPN product called ‘Webroot WiFi Security.’ It is not built into the basic antivirus but comes included with premium plans like Internet Security Complete or is sold as a standalone subscription.
Is Webroot Wi-Fi Security a good VPN?
It provides good, basic encryption for protecting your data on public Wi-Fi, making it suitable for casual users. However, when compared to top-tier VPN providers, it generally offers slower speeds, a smaller server network, and fewer advanced features.
Why is my Webroot VPN not connecting?
Common causes include incorrect login details, conflicts with other security software (like another firewall), or a temporary server issue. The best first steps are to restart your device, reinstall the WiFi Security app, or try connecting to a different server location.
7. Conclusion
Adding the Webroot VPN to your account doesn’t have to be a frustrating experience. As we’ve shown, the process boils down to two key stages: first, confirming your subscription actually includes the ‘Wi-Fi Security’ feature, and second, following the correct installation and activation steps for your specific device. By breaking it down, you can avoid the common pitfalls and get your connection secured.
To ensure success, always remember these key points:
- Always check your subscription first to confirm you have “Wi-Fi Security.”
- Download the correct “Webroot Wi-Fi Security” app, not SecureAnywhere.
- Use your single Webroot account login to activate the VPN on all devices.
- Don’t hesitate to reinstall the app if you face unexplained activation errors.
Successfully activating your VPN is a fantastic step toward strengthening your online privacy. Here at Safelyo, we believe that mastering your digital tools should be simple and empowering. For more easy-to-follow guides, explore our Tech How-To Simplified category and take full control of your technology.

