Ready to build your next big PHP project? Whether it’s a simple blog or a complex web application, the very first, most crucial step is learning how to set up a local development environment for PHP. This is your private sandbox, a place on your own computer where you can build, test, and break things without affecting a live website.
I know from experience that diving into this world can be dizzying. You’re faced with a sea of acronyms, such as XAMPP, MAMP, Docker, and LAMP, and every guide seems to offer a different ‘best’ way. It’s enough to make anyone feel overwhelmed before they’ve even written a single line of code.
Having spent years building PHP applications, I’ve navigated this exact journey from the simple ‘click-and-install’ days of XAMPP to crafting complex, multi-service environments with Docker. The truth is, there isn’t one ‘best’ method; there’s only the best method for you, right now.
In this definitive guide, you will learn:
- The core components that make up any PHP stack.
- A clear comparison of the top methods to help you choose wisely.
- Step-by-step instructions for each approach, from beginner-friendly to professional-grade.
- Essential tools to supercharge your development workflow.
This guide is designed to be your roadmap. Forget the confusion. Let me help you choose your path and build the perfect, secure foundation for your PHP projects, starting today.
1. Understanding the core components of a PHP environment
Before we dive into the how, it’s crucial to understand the what. A PHP environment isn’t just one program – it’s a team of software working in harmony. This team is often called a “stack.” When I first started, understanding how these parts fit together was my biggest “aha!” moment.
I like to think of it as a three-person team running a restaurant:
- The web server (The Waiter): This is the front-of-house. Its job is to listen for incoming requests from a web browser (an order from a customer) and then deliver the finished product back. The most famous names here are Apache and Nginx.
- PHP (The Chef): This is the brain of the operation. PHP takes the request from the web server and does all the heavy liftingrunning calculations, processing forms, and deciding what content to show. This is where your actual code comes to life.
- The database (The Pantry): Your application needs a place to store things like user accounts, blog posts, or product information. This is the job of a database, like MySQL or its close cousin, MariaDB. The chef (PHP) gets its ingredients (data) from here.
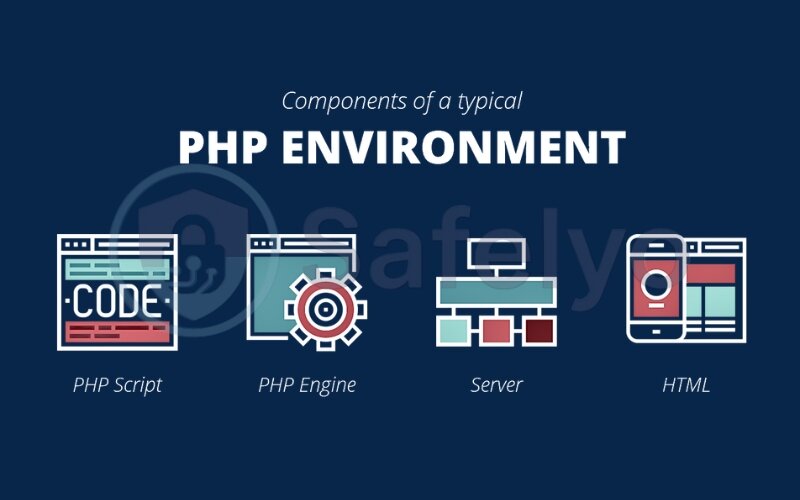
When you hear terms like LAMP (Linux, Apache, MySQL, PHP), WAMP (Windows…), or MAMP (Mac…), they’re simply describing this exact team, pre-packaged for a specific operating system (the ‘kitchen’). Understanding this trio is the key to everything that follows.
2. Choosing your path: A comparison of setup methods
Now that you know the what, it’s time to decide on the how. Choosing your setup method is like picking a vehicle for a trip. A scooter is great for a quick trip around the block, but you’ll want a sturdy truck for a cross-country haul. There’s no single “best” optiononly the right tool for your specific journey.
To help you decide, here’s a direct comparison of the three main paths:
| Method | Ease of Use | Flexibility | Best For |
|---|---|---|---|
| All-in-One (XAMPP) | ☆☆☆☆☆ Extremely Easy |
☆☆ Limited |
Beginners, students, quick prototypes. |
| Containerization (Docker) | ☆☆☆ Learning Curve |
☆☆☆☆☆ Maximum |
Professionals, teams, complex projects. |
| Manual Installation | ☆ Very Difficult |
☆☆☆☆ High |
System experts, for learning purposes. |
Let’s break down what this means for you.
All-in-one packages (like XAMPP)
The perfect first car.
Like many developers, my journey began with XAMPP. It’s a single download that installs Apache, MySQL, and PHP with a few clicks. You get a simple control panel to start and stop your servers. It’s an absolutely fantastic way to get your hands dirty with PHP without the headache of configuration.
The downside? You’re stuck with the versions they give you, and it can be tricky to manage multiple projects with different needs. You will eventually outgrow it, but it’s the perfect place to start.
>> You may also be interested in how to install and configure MySQL on Ubuntu
Containerization (Docker)
The professional's modular toolkit.
This is the industry standard today, and for good reason. Docker lets you package your entire environment, server, PHP version, and database into isolated “containers.” Think of them like Lego bricks. You build the exact environment your project needs, and it will run identically on your machine, your teammate’s machine, and the final production server. It has a learning curve, but the investment pays off with incredible consistency and flexibility, especially for managing multiple, complex projects.
Manual installation
The mechanic's deep dive.
Going the manual route is like deciding to build a car engine from scratch. You install and configure Apache, PHP, and MySQL yourself, directly on your operating system. You will gain an incredibly deep understanding of how all the pieces work together.
However, it’s complex, time-consuming, and prone to errors. I’d only recommend this path if your primary goal is to learn the system’s inner workings, not to get a project up and running quickly.
3. Method 1: The all-in-one package (XAMPP) – The beginner’s choice
If you’re just starting your PHP journey or need a simple environment up and running in minutes, XAMPP is your best friend. It stands for X (cross-platform), Apache, MariaDB (a replacement for MySQL), PHP, and Perl. Let’s get it installed.
3.1. Downloading and installing XAMPP
- Navigate to the official Apache Friends website.
- You’ll see download options for Windows, macOS, and Linux. Click the download button for your operating system. It will be a large file, so it might take a moment.
- Once downloaded, run the installer. You can safely accept the default settings for most steps. During the component selection, you can uncheck components you don’t need, like Perl, FTP Server, or Mail Server, but it’s fine to leave them all selected if you’re unsure.
- Choose an installation directory (the default is usually fine) and let the installer complete the process.
3.2. Starting servers and verifying the installation
This is where the magic of XAMPP shines.
- After installation, find and launch the XAMPP Control Panel.
- You’ll see a list of modules. For a basic PHP environment, you only need two: Apache and MySQL.
- Click the “Start” button next to both Apache and MySQL. They should turn green, indicating that they are running successfully. If your firewall prompts you for access, be sure to allow it.
- To verify everything is working, open your web browser and go to http://localhost. You should see the XAMPP dashboard welcome page. Success!
3.3. Locating your project folder (htdocs)
Your web server needs to know where to find your website’s files. With XAMPP, this special folder is called htdocs.
- To find it, open the XAMPP Control Panel and click the “Explorer” button. This will open the XAMPP installation directory.
- Inside, you will find the htdocs folder. This is your web root. Every project you create must live inside this folder. You can create subfolders here for each of your projects (e.g., htdocs/my-first-project).
3.4. Your first “Hello World” project
Let’s get that instant feeling of accomplishment. This is the moment you confirm everything is truly working.
- Inside the htdocs folder, create a new folder named my-test-app.
- Open this new folder and create a file named index.php.
Open index.php with any simple text editor (like Notepad or VS Code) and type the following code:
Generated php<?php
echo "Hello from my XAMPP Environment!";
?>
- Save the file.
- Now, go back to your web browser and navigate to http://localhost/my-test-app/.
You should see the text “Hello from my XAMPP Environment!” displayed on the page. Congratulations, you are officially a PHP developer.
Read more:
4. Method 2: The modern approach with Docker – For scalability and consistency
Welcome to the way modern development teams work. Docker is a powerful tool that packages your entire application and its dependencies into isolated “containers.” Think of them as self-contained, portable Lego kits for your environment. The beauty is that an environment built with Docker will run exactly the same on your computer, your colleague’s computer, and the live server.
It has a steeper learning curve than XAMPP, but the payoff in consistency and flexibility is immense.
4.1. Prerequisites: Installing Docker Desktop
Before you can use Docker, you need to install it.
- Go to the official Docker website.
- Download and install Docker Desktop for your operating system (Windows or Mac). For Linux users, you will need to follow the instructions to install Docker Engine and Docker Compose.
- After installation, make sure Docker Desktop is running. You should see a little whale icon in your system tray or menu bar.
4.2. Creating a basic PHP environment with Docker Compose
We will use a single file, docker-compose.yml, to define our entire environment. This file is the blueprint for our Lego kit.
- Create a new folder for your project anywhere on your computer (e.g., my-docker-project).
- Inside that folder, create a new file named docker-compose.yml. Open the file and paste the following code into it:
Generated yaml
      # This is a blueprint for our environment.

version: '3.8'

services:

      # The Web Server

webserver:
Generated yaml
image: nginx:alpine

ports:

- "8000:80" # Access via http://localhost:8000

volumes:

- ./src:/var/www/html

- ./nginx.conf:/etc/nginx/conf.d/default.conf

depends_on:

- php

# The PHP Service

php:

image: php:8.2-fpm-alpine

volumes:

- ./src:/var/www/html

# The Database

db:

image: mysql:8.0

environment:

MYSQL_ROOT_PASSWORD: rootpassword

MYSQL_DATABASE: my_database

volumes:

- db_data:/var/lib/mysql

volumes:

db_data:
- Next, in the same project folder, create a file named nginx.conf and paste this basic Nginx configuration:
Generated nginx
server {

listen 80;

index index.php index.html;

server_name localhost;

root /var/www/html;

location ~ \.php$ {

try_files $uri =404;

fastcgi_split_path_info ^(.+\.php)(/.+)$;

fastcgi_pass php:9000;

fastcgi_index index.php;

include fastcgi_params;

fastcgi_param SCRIPT_FILENAME $document_root$fastcgi_script_name;

fastcgi_param PATH_INFO $fastcgi_path_info;

}

}

Finally, create a folder named src in your project directory. This is where your PHP code will live.
This Docker Compose setup is my go-to starting point for any new PHP project. It’s clean, reliable, and separates the web server, PHP, and database into distinct, manageable services.
4.3. Running the environment
Now, let’s bring our environment to life.
- Open your terminal or Command Prompt.
- Navigate into your project folder (my-docker-project).
- Run the command: docker-compose up -d
The -d flag means “detached,” so it will run in the background. Docker will now download the necessary images and start your containers. This might take a few minutes the first time. - To check that everything is running, you can use the command: docker-compose ps. You should see three containers listed with their state as “running” or “up”.
4.4. Your first “Hello World” project
Let’s see our Docker environment in action.
- Inside the
srcfolder you created earlier, make a new file namedindex.php.
Open index.php and add the following code:
Generated php
    <?php

echo "Hello from my Docker Environment!";

?>- Save the file.
- In your web browser, navigate to http://localhost:8000. (Note: we use port 8000 because we mapped it in our docker-compose.yml file).
You should see “Hello from my Docker Environment!” on the screen. You’ve just successfully built and run a professional-grade, containerized development environment.
5. Method 3: The manual setup – For maximum control (example on Ubuntu)
Welcome to the deep end. This method is not for the faint of heart, but it is, in my opinion, a rite of passage for any developer who truly wants to understand what’s happening “under the hood.” Manually installing each component gives you absolute control over versions and configurations.
While I personally use Docker for my day-to-day work now due to its efficiency, building a server from scratch like this on Linux early in my career was the single most valuable lesson in how a web server actually works. We’ll use Ubuntu (a popular Linux distribution) for this example, as it’s very common for live web servers.
Prerequisite
You need a machine or a virtual machine running a fresh version of Ubuntu.
5.1. Step 1: Update your system
First, let’s make sure all your system’s package lists are up to date. The sudo prefix means we’re running these commands with administrator privileges.
Generated code
     sudo apt update
sudo apt upgrade
5.2. Step 2: Install the Apache web server
Next, we install Apache. This is the “waiter” in our restaurant analogy.
Generated code
sudo apt install apache2Once installed, you can immediately test it. Open your browser and go to your server’s IP address or http://localhost. You should see the default Apache2 Ubuntu welcome page.
5.3. Step 3: Install the MySQL database
Now for our “pantry”. We’ll install the MySQL server.
Generated bash
sudo apt install mysql-serverAfter installation, it’s highly recommended to run the included security script. This will help you set a password for the root user and remove some insecure defaults.
Generated bash
sudo mysql_secure_installation5.4. Step 4: Install PHP
It’s time to install the “chef”. We need not only PHP itself but also the modules that allow it to communicate with Apache and MySQL.
Generated bash
sudo apt install php libapache2-mod-php php-mysql- php: The core PHP language.
- libapache2-mod-php: The “glue” that allows Apache to process PHP files.
- php-mysql: The “translator” that allows PHP to talk to your MySQL database.
5.5. Step 5: Restart Apache and verify PHP
For Apache to recognize our new PHP module, we need to restart it.
Generated code
sudo systemctl restart apache2To verify that PHP is working correctly, you can create a special test file. The default web root folder on Ubuntu is /var/www/html/. Create a file there called info.php:
Generated code
sudo nano /var/www/html/info.phpAdd this single line of code to the file:
Generated php
<?php phpinfo(); ?>Save and close the file. Now, in your browser, go to http://localhost/info.php. You should see a long, detailed page with all the information about your new PHP installation. (Remember to delete this file later for security reasons!).
5.6. Your first “Hello World” project
The final confirmation is running your own code.
- Let’s create an index.php file in our web root:
Generated bash
sudo nano /var/www/html/index.php- Add this code:
Generated php
      <?php

echo "Hello from my Manual Ubuntu Environment!";

?>- Save the file.
- Visit http://localhost in your browser. The default Apache page should now be replaced with your message.
You’ve done it. You’ve built a fully functional web server from its core components. This is the most hands-on you can get, and the knowledge you gain is invaluable.
6. Essential tools for your new PHP environment
You’ve successfully built the engine; now it’s time to equip the cockpit. A running server is just the start. To be truly productive, you need a set of tools that make writing, managing, and debugging your code faster and more enjoyable. These are the tools I use every single day.
6.1. Code editor / IDE
Your code editor is your most important toolit’s where you’ll spend almost all of your time. While you can write PHP in a simple text file, a modern editor provides features that feel like superpowers.
MY RECOMMENDATION: Visual Studio Code (VS Code)
Without a doubt, VS Code is the de facto standard for millions of developers, and for good reason. It’s free, incredibly powerful, and has a massive library of extensions.
For PHP development, you’ll want to install these two extensions immediately:
- PHP Intelephense: This gives you super-powered autocomplete, error checking, and a deeper understanding of your code, right as you type.
- PHP Debug: This lets you stop using echo or var_dump() to figure out problems. Instead, you can set breakpoints to pause your code and inspect what’s happening step-by-step. It’s a game-changer.
>> For a deep dive, check out Safelyo’s upcoming review of the TOP 5 Code Editors for Web Developers.
6.2. Package manager (Composer)
Imagine you need a library to handle dates or send emails. The old way was to find it online, download a zip file, and manually include it in your project. It was messy.
Composer is the modern solution. Think of it as a shopping list for your code. You simply tell Composer what packages (libraries) your project needs, and it automatically downloads and manages them for you. It’s a non-negotiable tool in modern PHP development. You’ll run the composer install command at the start of almost every new project you join.
6.3. Database client
Interacting with your database through a command-line terminal is powerful, but it can be clunky for everyday tasks. A database client gives you a graphical user interface (GUI) to see and manage your data visually. It’s the difference between managing files in a terminal versus using a familiar folder system.
- For XAMPP users: You already have phpMyAdmin built in. It’s a web-based tool that gets the job done for basic tasks.
- For Docker or Manual setups: I highly recommend a standalone application like TablePlus or DBeaver. These are incredibly powerful clients that can connect to any database, look clean, and will make your life much, much easier.
7. FAQ about how to set up a local development environment for PHP
Got a few lingering questions? You’re not alone. Here are the answers to some of the most common queries we see from developers setting up their environments.
I’m a total beginner. Which method should I use?
We strongly recommend starting with an all-in-one package like XAMPP (Section 3). It’s the fastest and easiest way to get a working environment without getting bogged down in configuration, allowing you to focus on learning PHP itself.
Is Docker hard to learn?
Docker has a learning curve, but the basics are straightforward. Following our guide in Section 4 will give you a solid, reusable setup. The initial time investment pays off massively in long-term projects due to its consistency and scalability.
Do I need to set up virtual hosts?
For simple projects or learning, using http://localhost/my-project is perfectly fine. For professional development with multiple projects, setting up virtual hosts (e.g., my-project.test) is highly recommended. This is an advanced topic often done after the initial setup.
8. Conclusion
You’ve just navigated the entire landscape of how to set up a local PHP development environment for PHP. From a simple click-and-run setup to a professional containerized workflow, you’re now equipped with the knowledge to make an informed choice that best suits your project’s needs and your own skill level.
Remember that a solid foundation makes building anything easier. To ensure a smooth journey, always keep these key points in mind:
- Understand the stack: Know the roles of the web server, PHP, and the database.
- Choose your path wisely: Use XAMPP for ease, Docker for professional consistency, or Manual for maximum control.
- Embrace essential tools: A great code editor like VS Code and the Composer package manager are non-negotiable.
- Always build a “Hello World”: It’s the ultimate, satisfying confirmation that everything is working as expected.
Don’t be afraid to experiment. Start with XAMPP, and as your confidence grows, challenge yourself with Docker. Mastering your development environment is a powerful investment in your career. Now that your workshop is ready, the next step is to build securely from the ground up. Protect your future applications by exploring the Tech How-To Simplified guides on preventing common PHP security vulnerabilities of Safelyo.

