Learning how to set up a proxy server on Linux is a powerful way for system administrators, developers, and tech enthusiasts to gain granular control over their network traffic. It’s more than just a technical exercise; it’s about building a customized gateway that can enhance security, boost performance, and enforce access policies tailored to your specific needs. This comprehensive guide will focus on creating a forward proxy server from scratch using Squid, the industry-standard software for this task. Please note: This is a server-side setup guide, not a client-side configuration tutorial.
As someone who has managed network infrastructures for over a decade, I’ve seen firsthand how a well-configured proxy can solve real-world problems – from blocking distracting websites in an office to caching data that saves significant bandwidth for a small business. While the command line can seem intimidating, a proxy server is a fundamental tool that every serious Linux user should master. It’s your network’s first line of defense and its central traffic controller.
In this step-by-step tutorial, you will discover how to:
- Install and verify the Squid proxy service on an Ubuntu/Debian system.
- Configure core security rules and define which clients can access your proxy.
- Implement advanced features like user authentication and website blocking.
- Connect various clients (Windows, macOS, Linux) to your new proxy.
Ready to take command of your network traffic? Let’s walk through everything you need to build your own powerful and secure Linux proxy server with me now!
1. When do you need a Linux proxy server?
Before we dive headfirst into the terminal, let’s hit pause and answer a crucial question: Why do you even need a proxy server? Think of it less as a piece of abstract software and more as a multi-tool for your network, designed to solve very specific problems. Its true power lies in its ability to sit between your users and the wider internet, acting as a gatekeeper, a security guard, and a librarian all at once.
From my experience managing various network setups, I can’t stress this enough: Before you start, it’s crucial to define your goal. Are you primarily looking to block sites, or is performance caching your main objective? Your goal will determine which configuration steps are most important for you.

Here are the most common reasons you’d want to set one up:
- Content filtering: This is the classic use case. Imagine you want to block social media sites in an office environment or prevent access to certain content on a school network. A proxy is the perfect tool for the job.
- Security: By funneling all traffic through a single point, the proxy can act as a checkpoint. You can use it to scan incoming data for malware or viruses before they ever reach your users’ computers, adding a vital layer of defense.
- Performance: A proxy can cache (store) frequently accessed web content. If ten people in your office visit the same news website, the proxy downloads it once and serves the local copy to the other nine. This reduces bandwidth usage and makes websites load significantly faster.
- Access control: You can configure your proxy to require a username and password. This ensures that only authorized individuals can access the internet through your network, much like showing an ID badge to enter a secure building.
- Anonymity for your network: A proxy masks the individual IP addresses of your internal clients. To the outside world, all web traffic from your network appears to come from a single source: The proxy server itself. This is great for protecting the identity of users on your internal network.
2. Squid vs. Tinyproxy: Which one should you choose?
When you decide to set up a proxy on Linux, you’ll quickly encounter two popular names: Squid and Tinyproxy. Choosing between them is like picking a tool for a job. Do you need a feature-packed Swiss Army knife that can do almost anything, or will a simple, reliable screwdriver suffice?
I’ve deployed both in various scenarios – from small home labs running on a Raspberry Pi to more complex office networks. The decision almost always boils down to a fundamental trade-off between extensive features and lightweight simplicity. Understanding this difference is key to avoiding an overly complicated setup for a simple task or a limited tool for a complex one.
>> Read more:
To make it crystal clear, here’s a quick breakdown:
| Feature | Squid | Tinyproxy |
|---|---|---|
| Complexity | High (very powerful) | Low (lightweight) |
| Features | Caching, ACLs, auth, filtering | Basic proxying only |
| Resource Usage | Higher | Minimal |
| Best For | Enterprise, complex filtering | Small networks, simple tasks |
OUR RECOMMENDATION:
For this guide, we will focus on Squid because of its power and flexibility. If your needs are as simple as sharing a single internet connection for a couple of devices, Tinyproxy is an excellent, low-effort alternative. But for serious, granular control over your network traffic – including the advanced features we’ll cover – Squid is the tool you’ll want to master. It’s the industry standard for a reason.
3. Step-by-step: Installing Squid on Ubuntu/Debian
Alright, let’s roll up our sleeves and get our hands dirty. This is where the magic happens. We’ll be working in the command line, but don’t worry – I’ll explain what each command does. I’ve gone through this process hundreds of times, and it’s remarkably straightforward once you understand the logic. We’re using an Ubuntu/Debian-based system for this guide as it’s one of the most common and user-friendly environments for new server setups.
>> You may also be interested in:
3.1. Update your system’s package list
First things first. Before installing any new software, it’s crucial to tell your system to check for the latest list of available packages and updates. Think of this as good digital hygiene – it’s like checking the “What’s New” section in an app store before you download something. This ensures you get the most recent and secure version of Squid.
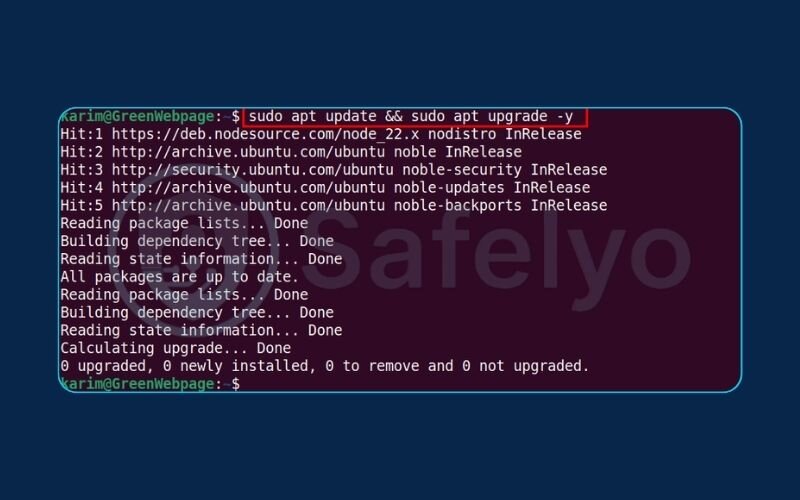
Generated bashsudo apt update
sudo apt upgrade -y
The update command refreshes your list of software, and the upgrade installs any pending updates. The -y flag just automatically says “yes” to any prompts, saving you a keystroke.
3.2. Install the Squid package
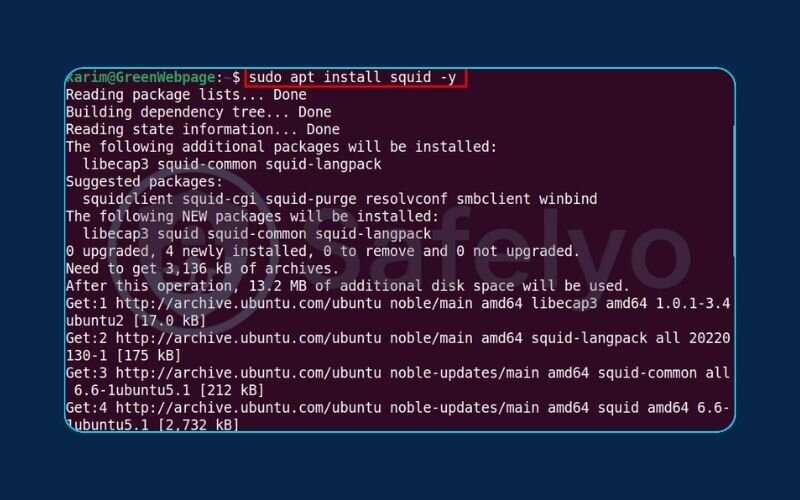
Now for the main event. With our system up-to-date, we can install Squid with a single command. The apt package manager handles all the heavy lifting, finding the Squid software and any dependencies it needs to run.
Generated bashsudo apt install Squid -y
3.3. Start and enable the Squid service
Here’s a step that often trips people up. Installing software doesn’t always mean it’s running. We need to explicitly turn it on. It’s like plugging in a new appliance; you still have to press the power button. We’ll do two things: start the service now, and tell it to start automatically whenever the server reboots.
Generated bashsudo systemctl start Squid
This command starts the service immediately.
Generated bashsudo systemctl enable Squid
And this one ensures Squid launches automatically every time you boot your server. This “set it and forget it” step will save you from future headaches.
3.4. Verify the Squid service status
How do we know it all worked? We ask the system for a status report. This is the moment of truth.
Generated bashsudo systemctl status Squid
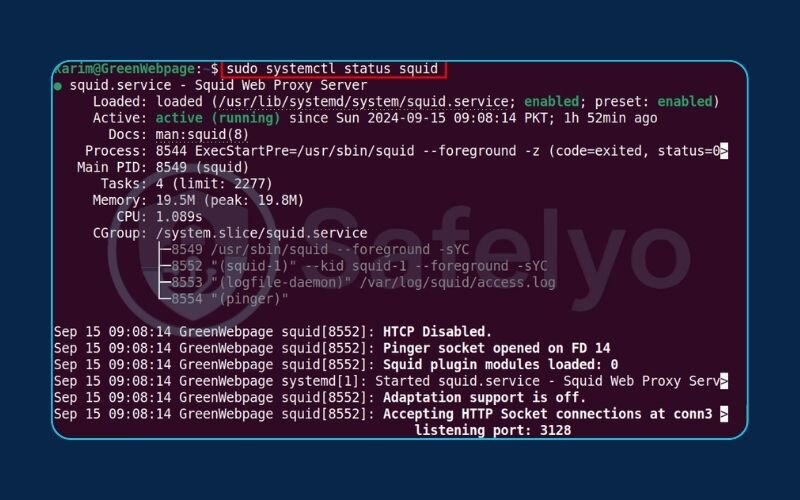
If everything went well, you should see a line that says active (running), usually highlighted in green. This confirms your Squid proxy server is installed and running successfully.
4. Core configuration: Allowing clients and securing the proxy
We’ve successfully installed Squid, and it’s running. But right now, it’s like an engine sitting on the garage floor – it has potential, but it’s not connected to anything. In this section, we’ll connect the “steering wheel” and “gas pedal” by telling Squid who is allowed to use it and what port it should listen on. This is where a few simple lines of text will transform your server into a functional network gateway.
4.1. Understanding the Squid configuration file
All of Squid’s power is controlled by a single, very long text file located at /etc/Squid/Squid.conf. When you first open it, it can be intimidating – it’s thousands of lines long! But here’s the secret: Most of it is comments (lines starting with #) designed to explain the options. We only need to change a few key lines.
Before we touch anything, let’s follow the golden rule of system administration. Trust me on this one, it will save you one day: make a backup of the original configuration file.
Generated bashsudo cp /etc/Squid/Squid.conf /etc/Squid/Squid.conf.original
Now, if we make a mistake, we can easily restore the original file. Let’s open the file for editing using nano, a simple command-line text editor.
Generated bashsudo nano /etc/Squid/Squid.conf
4.2. Defining your internal network (ACL)
The foundation of Squid’s security is Access Control Lists (ACLs). This sounds complex, but the concept is simple. Think of a bouncer at a nightclub. An ACL is just the bouncer’s guest list. It defines a group of people (or, in our case, a group of IP addresses). We need to create a “guest list” for our local network so Squid knows which devices are friendly.
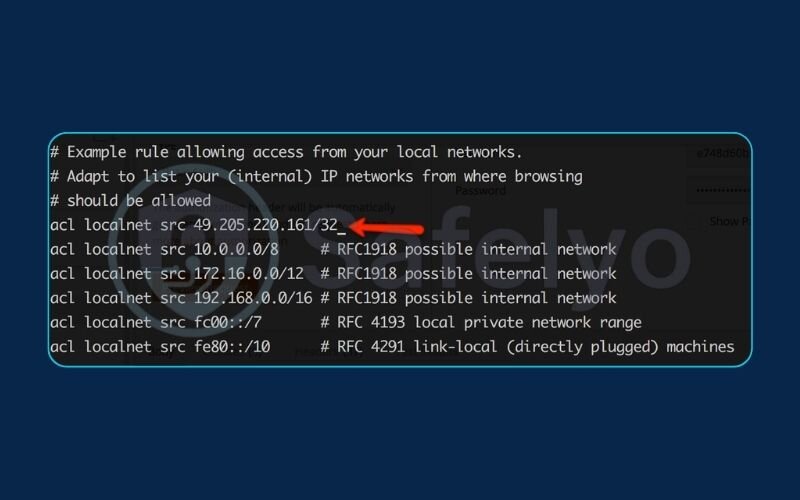
Use Ctrl + W in nano to search for acl localnet src. You’ll find a few commented-out examples. Add your own ACL definition right below them.
Generated bash# Define our local network on the guest list
acl localnet src 192.168.1.0/24
IMPORTANT:
You must replace 192.168.1.0/24 with your actual network’s IP range. If you don’t know it, you can usually find it in your router’s settings.
4.3. Allowing access for your network
Now that our bouncer has a guest list (ACL localnet), we need to give him instructions. The instruction is http_access. By default, Squid’s final rule is http_access deny all, which is like telling the bouncer, “Don’t let anyone in.” We need to add our rule before that one.
Search for http_access deny all. Just above this line, add the following:
Generated bash# Give access to anyone on our guest list
http_access allow localnet
The order is critical. Squid reads these rules from top to bottom. When a computer from your local network tries to connect, it will match the allow localnet rule first and be granted access.
4.4. Changing the default port (optional but recommended)
Squid’s default port is 3128. Everyone knows this, including people who run automated scans looking for vulnerable servers. Changing it is a simple security boost. It’s like moving your front door to the side of the house – it doesn’t make it impenetrable, but it stops casual passersby from knocking.
Search for http_port 3128 and change it to something else, like 8888.
Generated bash# Change the listening port to something less obvious
http_port 8888
Just be sure to remember the port number you choose!
4.5. Opening the firewall port
This is the step that gets forgotten most often. I can’t count the times I’ve spent ages debugging a connection issue only to realize the firewall was blocking me. Your server’s firewall is like a locked front door. Even though Squid is ready to accept guests inside, no one can get to it.
If you are using UFW (Uncomplicated Firewall), which is standard on Ubuntu, run these commands. Use the port you just configured.
Generated bash# Open port 8888 in the firewall
sudo ufw allow 8888/tcp
sudo ufw reload
4.6. Applying changes and testing
We’ve edited the configuration. Now we just need to tell Squid to re-read it by restarting the service.
Generated bashsudo systemctl restart Squid
To test, go to another computer on the same network. Open your web browser’s proxy settings (in Windows, search for “Proxy Settings”; on macOS, it’s under Network > Details > Proxies). Enter the IP address of your Linux server and the port number you chose (e.g., 8888).
Now, try to visit a website. If it loads, congratulations! You have successfully configured a basic, secure proxy server.
5. Advanced configuration: Adding powerful features
With your basic proxy up and running, it’s time to unlock Squid’s true potential. Think of the last section as building a house; now we’re going to install the security system and set some house rules. These advanced features are what elevate Squid from a simple traffic forwarder to a sophisticated network management tool.
5.1. How to set up user authentication
Right now, anyone on your local network can use the proxy. But what if you need more granular control? For instance, in an office, you might want to ensure only specific employees can access the internet. This is where user authentication comes in – it’s the digital equivalent of asking for a username and password before letting someone through the door.
Step 1: Install the tools
To handle passwords, we need a small utility that’s part of the Apache web server tools. Don’t worry, you don’t need to install the full web server.
Generated bashsudo apt install apache2-utils -y
Step 2: Create the password file
Now, we’ll create a file to store our usernames and encrypted passwords. The -c flag creates a new file. Only use -c the very first time you create the file. For adding more users later, you would leave it out.
Generated bashsudo htpasswd -c /etc/Squid/passwd yourusername
Replace your username with the actual username you want to create (e.g., john.smith). The command will then prompt you to enter and confirm a password for that user.
Step 3: Tell Squid to use the password file
We need to edit our Squid.conf file again to tell Squid how to check these passwords.
Generated bashsudo nano /etc/Squid/Squid.conf
Add these lines near the top, with your other ACLs. These lines tell Squid where to find the password checking program, what message to show in the login prompt, and define an “authenticated” group.
Generated bash# User authentication setup
auth_param basic program /usr/lib/Squid/basic_ncsa_auth /etc/Squid/passwd
auth_param basic realm "Squid Proxy Server - Please Login"
acl authenticated proxy_auth REQUIRED
Now, find your http_access rules and replace http_access allow localnet with this:
Generated bash# Allow access only to users who have successfully logged in
http_access allow authenticated
This changes the rule from “let anyone on the local network in” to “let anyone who provides a valid password in.”
Step 4: Restart and test
Apply the new configuration.
Generated bashsudo systemctl restart Squid
Now, when your browser tries to connect through the proxy, a pop-up window will appear asking for the username and password you created. It’s that simple!
5.2. How to block websites with Squid
This is one of the most powerful features of Squid. Let’s say you want to block time-wasting websites during work hours. I’ve used this feature countless times to improve focus in office environments.
Step 1: Create a blocklist file
First, we create a simple text file that will contain all the domains we want to block.
Generated bashsudo nano /etc/Squid/blocked_sites.acl
Inside this file, add the domains you want to block, one per line. The leading dot is a wildcard, meaning it will block the main site and all its subdomains (e.g., .facebook.com blocks www.facebook.com, mobile.facebook.com, etc.).
Generated code.facebook.com
.twitter.com
.tiktok.com
Save and close the file (Ctrl + X, then Y, then Enter).
Step 2: Tell Squid about the blocklist
Open your Squid.conf file again.
Generated bashsudo nano /etc/Squid/Squid.conf
Add a new ACL that reads from our blocklist file. Put this with your other ACL definitions.
Generated bash# ACL for our list of blocked websites
acl blocked_sites dstdomain "/etc/Squid/blocked_sites.acl"
Now, we need to create a rule to deny access to this ACL. Crucially, this rule must come before your main “allow” rule.
Generated bash# Deny access to the sites on our blocklist
http_access deny blocked_sites
# Then, allow authenticated users (or localnet)
http_access allow authenticated
If you place the deny rule after the allow rule, it will never be checked. Squid stops processing as soon as it finds a matching “allow” rule.
Step 3: Restart and test
Save your configuration, restart Squid, and try to visit one of the sites you blocked.
Generated bashsudo systemctl restart Squid
Your browser should now show a Squid “Access Denied” error page instead of loading the website.
See also:
5.3. Enabling caching for performance
One of Squid’s original purposes was to speed up the Internet by caching content. If you’re managing a network where many users access the same sites, enabling the cache can dramatically reduce your internet bandwidth usage.
Step 1: Add the cache directive
Open your Squid.conf file and add the following line. This tells Squid to create a 100MB cache on the hard drive.
Generated bash# Enable a 100MB disk cache
cache_dir ufs /var/spool/Squid 100 16 256
The numbers 100 16 256 define the cache size in megabytes and the directory structure. These are good starting values.
Step 2: Create the cache directories
Squid needs to create a specific folder structure to manage the cache. We can do this with one command.
Generated bashsudo Squid -z
You only need to run this command once.
Step 3: Restart Squid
Finally, restart the service to activate the cache.
Generated bashsudo systemctl restart Squid
Now, Squid will automatically start storing frequently accessed objects, transparently speeding up browsing for your users without them even knowing it’s happening.
6. How to configure a client to use your new Linux proxy
You’ve done the heavy lifting on the server, but a proxy is useless if no one is connecting to it. The final step is to tell your client devices – your laptop, desktop, or even your phone – to route their web traffic through your new Squid server. I’ll show you the quick and easy way to do this on the most common operating systems.
Remember the two key pieces of information you need:

1. Your Linux server's IP address.
2. The port number you configured (e.g., 8888).
6.1. For Windows 10/11
Setting up a proxy on Windows is very straightforward.
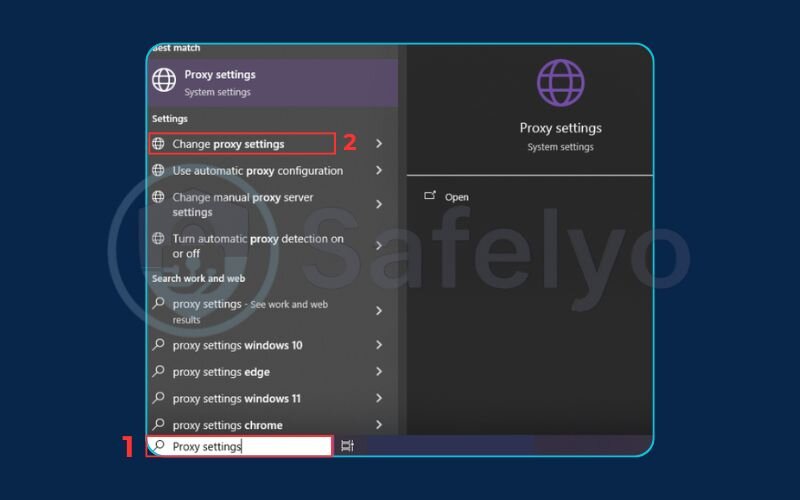
- Press the Windows key and type “Proxy Settings”, then press Enter.
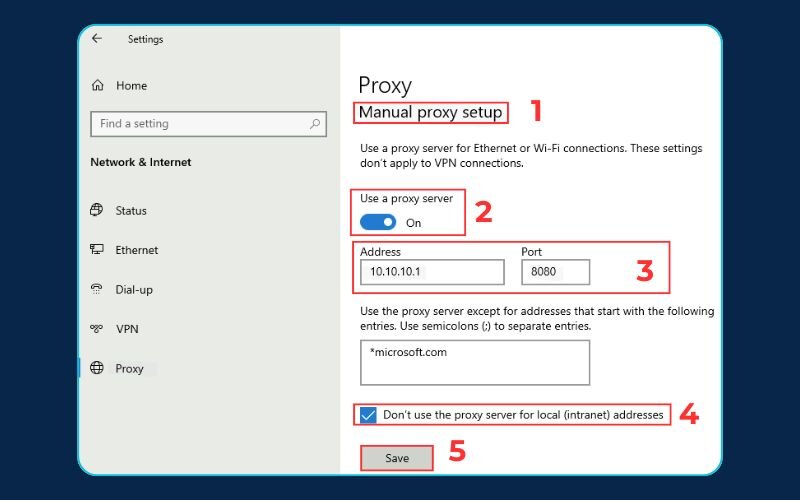
- Scroll down to the “Manual proxy setup” section.
- Toggle the “Use a proxy server” switch to On.
- In the Address box, enter your Linux server’s IP address.
- In the Port box, enter the port number (e.g., 8888).
- Click Save. Your Windows web traffic will now go through your proxy.
>> Read more: How to configure proxy server on Windows 10 & 11
6.2. For macOS
The process on a Mac is similarly simple, just located in a different menu.
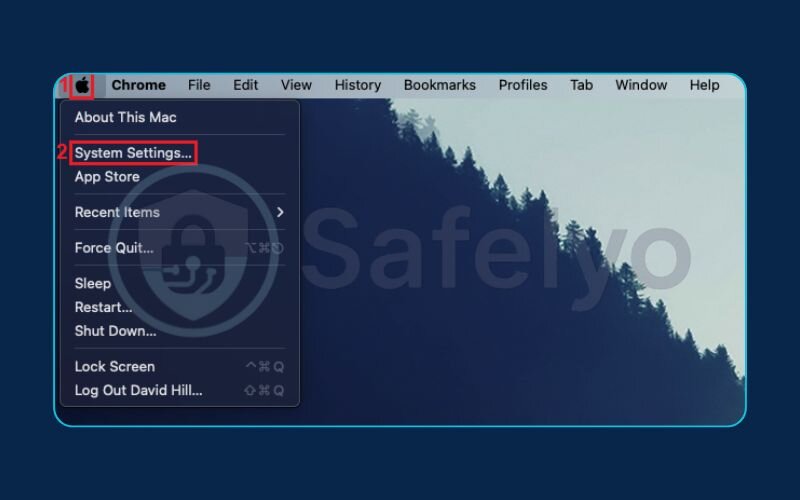
- Open System Settings (or System Preferences on older versions).
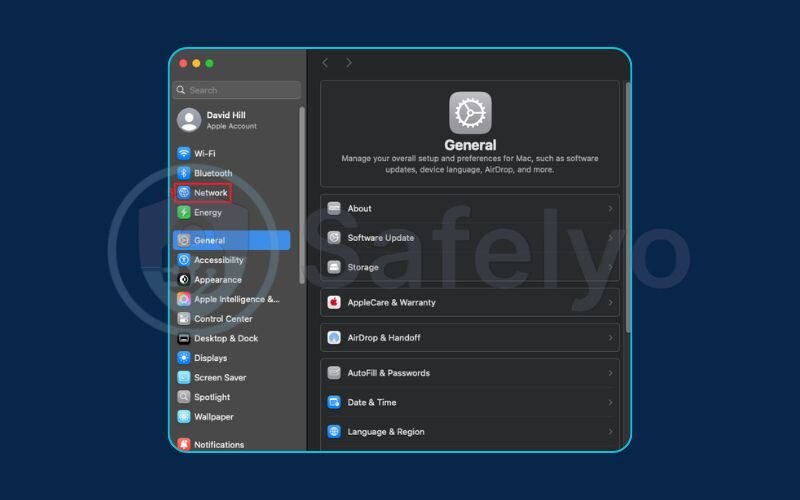
- Click on Network in the sidebar.
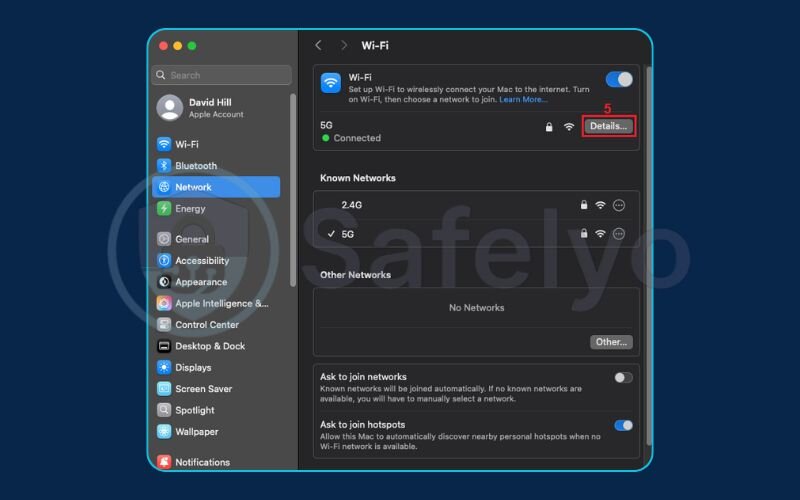
- Select the active network connection you’re using (usually Wi-Fi).
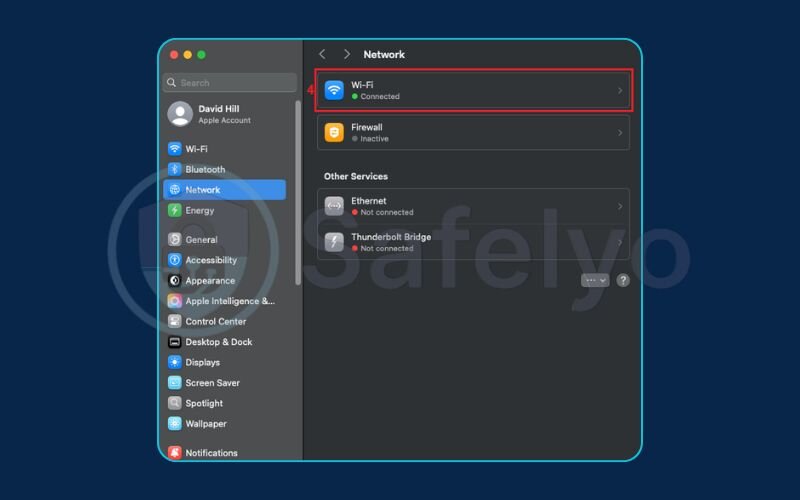
- Click the Details… button.
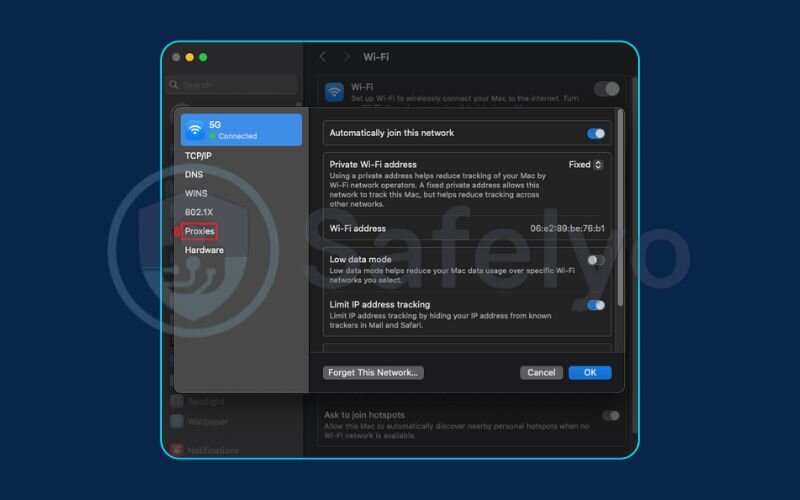
- Then select the Proxies tab.
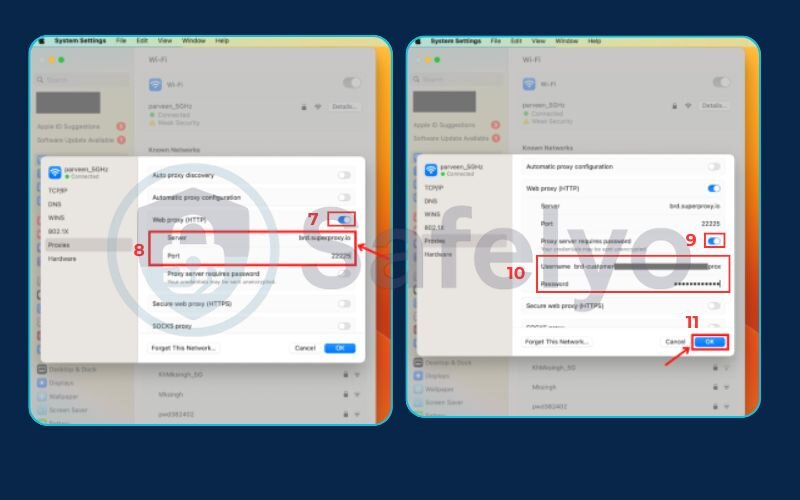
- Check the box for Web Proxy (HTTP).
- In the Proxy Server field, enter your Linux server’s IP. In the adjacent Port field, enter the port number.
- Click OK.
>> Read more: How to set up a proxy server on Mac easily in 10 minutes
6.3. For the Linux command line (for developers)
If you work in the terminal on another Linux machine, you can set the proxy using environment variables. This is incredibly useful for command-line tools like curl or wget.
Simply run this command in your terminal:
Generated bashexport http_proxy="http://YOUR_SERVER_IP:PORT"
export https_proxy="http://YOUR_SERVER_IP:PORT"
Replace YOUR_SERVER_IP and PORT with your actual server IP and port number.
For example: export http_proxy=”http://192.168.1.100:8888″.
Note:
This setting only lasts for your current terminal session. To make it permanent, you would add these lines to your ~/.bashrc or ~/.zshrc file.
7. Quick command cheatsheet
I know we’ve gone through a lot of commands. For your convenience, here is a quick reference table with the most common commands you’ll use to manage your Squid server. I recommend bookmarking this page just for this cheatsheet!
| Action | Command |
| Install Squid | sudo apt install Squid -y |
| Start Service | sudo systemctl start Squid |
| Check Status | sudo systemctl status Squid |
| Restart Service | sudo systemctl restart Squid |
| Edit Config | sudo nano /etc/Squid/Squid.conf |
| Create Password | sudo htpasswd -c /etc/Squid/passwd [user] |
| Open Firewall | sudo ufw allow [port]/tcp |
8. FAQ about how to set up a proxy server on Linux
Even with a step-by-step guide, you might run into a few common hurdles or have lingering questions. I’ve been there. Here are answers to some of the most frequent issues I’ve seen pop up when people first set up Squid.
How can I check the Squid access logs?
The logs are your best friend for troubleshooting. They are typically located at /var/log/Squid/access.log. To see all connections happening in real-time, which is incredibly useful for debugging, use the command: sudo tail -f /var/log/Squid/access.log.
My clients are getting an “access denied” error. What’s wrong?
This is almost always an ACL issue. First, double-check that your client’s IP address is actually included in your acl localnet definition in Squid.conf. Second, ensure that your http_access allow localnet (or http_access allow authenticated) rule is placed before the final http_access deny all rule. Squid reads from top to bottom, so order matters.
Can I use Squid as a caching proxy to save bandwidth?
Absolutely, that’s one of its core strengths and what we covered in section 5.3. It requires adding the cache_dir directive to your Squid.conf file to define where the cache is stored and how large it is. While this is an advanced topic, it’s extremely powerful for improving network performance, especially in offices or schools.
9. Conclusion
Congratulations, you have successfully learned how to set up a proxy server on Linux using the powerful and versatile Squid tool. You’ve gone from a blank server to a fully functional network gateway, capable of controlling access, enhancing security, and even improving performance. This is a significant step in mastering Linux network administration.
To quickly recap, you have:
- Installed Squid and configured it for basic client access.
- Mastered advanced features like user authentication and website blocking.
- Learned how to configure various clients to use your new proxy.
A well-configured proxy server is a formidable tool in any sysadmin’s arsenal. Don’t be afraid to continue exploring Squid’s vast configuration options in its official documentation to tailor it perfectly to your unique needs.
To further enhance your server’s security posture, explore our other expert guides in the Tech How-To Simplified category, starting with the essential Linux server hardening tips from Safelyo.


