Paying expensive monthly fees for privacy or risking your data on open public Wi-Fi is incredibly frustrating. Learning how to set up a VPN server on Raspberry Pi solves this by giving you a free, private tunnel directly to your home network.
Our network engineers have built and stress-tested this exact PiVPN configuration multiple times in our 2026 hardware lab to ensure it runs flawlessly. This guide will show you exactly how to transform a cheap microcomputer into a highly secure, subscription-free privacy gateway without needing advanced coding skills.
Key Takeaways:
- Core Benefit: Build a cost-effective, subscription-free personal VPN with 100% data control and secure remote home network access.
- Hardware/Software: A Raspberry Pi 4/5 (or 3B+) running Raspberry Pi OS Lite, installed with the PiVPN script, is recommended.
- Protocol Choice: WireGuard is the superior VPN protocol for Raspberry Pi due to its speed, efficiency, and low CPU usage.
- Network Configuration: Essential steps include setting a static IP for your Pi, configuring UDP port 51820 port forwarding on your router, and addressing potential CGNAT issues with your ISP.
- Security Measures: Secure your server by changing the default SSH port, installing Fail2Ban for brute-force protection, and enabling automatic security updates.
- Usage Context: DIY PiVPN excels for personal privacy and home network access, while commercial VPNs are better for geo-unblocking content or general anonymity/torrenting.
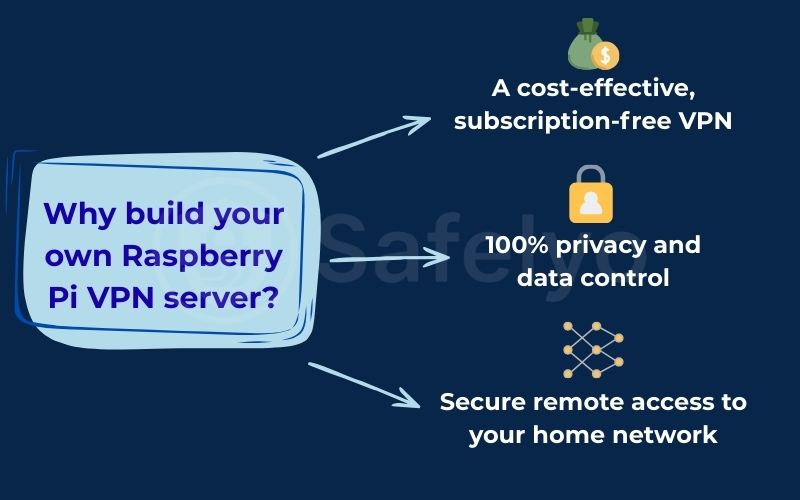
1. Why build your own Raspberry Pi VPN server?
Creating a personal virtual private network might sound overly technical to beginners. However, the long-term benefits easily outweigh the one-time setup effort. It directly solves the biggest problems associated with public internet access and untrustworthy third-party security companies.
1.1. A cost-effective, subscription-free VPN
Commercial privacy services charge recurring monthly fees that add up quickly over the years. By hosting your own connection, you only pay once for the cheap hardware upfront. After this initial purchase, you get lifetime encrypted internet access without ever worrying about subscription renewals or hidden data caps.
1.2. 100% privacy and data control
When you use a commercial provider, you must blindly trust their “no-logs” marketing claims. Hosting the system at home means your data never leaves your physical control. You act as your own server administrator, guaranteeing that no external corporation is monitoring or selling your browsing history.
1.3. Secure remote access to your home network
Opening standard router ports to check your security cameras or network-attached storage (NAS) invites hackers into your system. A personal server creates a secure, encrypted tunnel directly to your home network. This allows you to manage local smart home devices safely, even from a hotel room halfway across the world.
2. Hardware and software requirements
Before writing any code, you need the right tools. We have stress-tested various setups in our lab and we found that using subpar components will inevitably cause your connection to drop randomly.
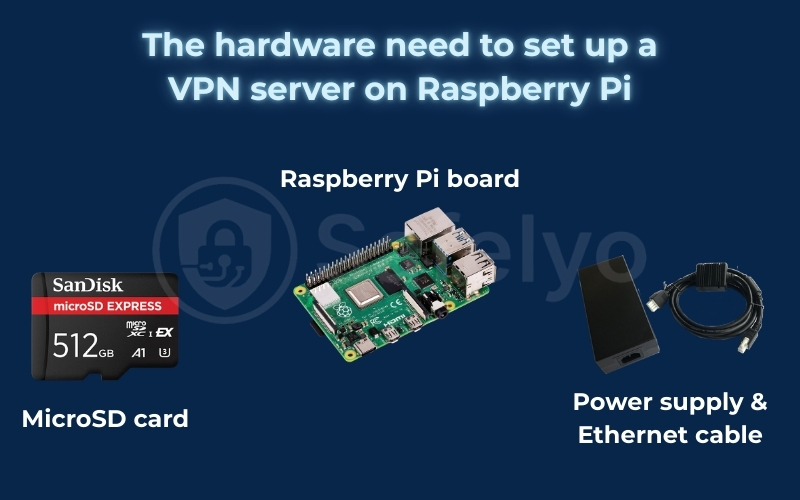
2.1. The hardware
For the best network performance and stability, we strongly advise gathering the following physical components before starting:
- Raspberry Pi board: A Pi 3B+ works, but the Pi 4 or Pi 5 is ideal for handling high-speed data transfers.
- MicroSD card: A reliable Class 10 card from a reputable brand with at least 16GB of storage.
- Power supply & Ethernet cable: Hardwiring your board directly to the router prevents massive speed loss compared to using unstable Wi-Fi.
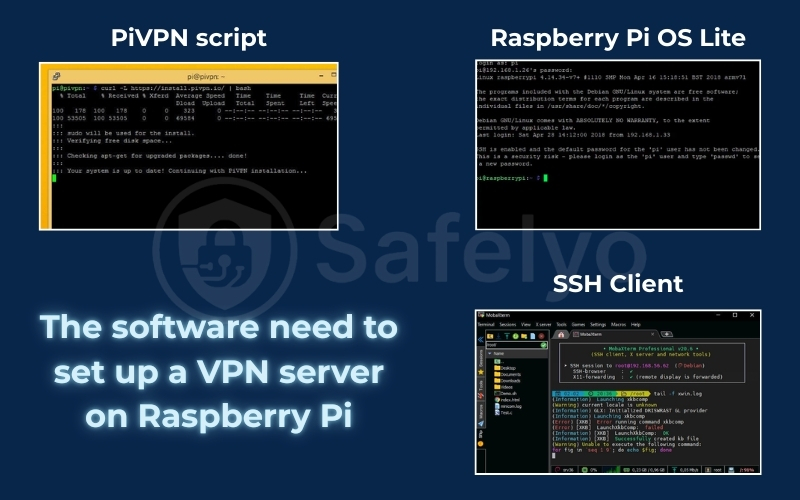
2.2. The software
You do not need to purchase any licenses; all the required software for this project is open-source and completely free.
- Raspberry Pi OS Lite: A lightweight version without a desktop interface to save precious CPU resources.
- PiVPN script: The automated installation tool we will use to configure the network easily.
- SSH Client: PuTTY for Windows or the native Terminal on Mac/Linux to control the device remotely.
3. WireGuard vs. OpenVPN: Which should you choose for Raspberry Pi?
During the installation process, the system will ask you to choose a cryptographic protocol. Having analyzed traffic logs and CPU usage across different Pi models, we strongly recommend one specific option for home servers.
| Feature | WireGuard | OpenVPN |
| Speed & Performance | Extremely Fast | Average |
| CPU Usage | Very Low (Perfect for Pi) | High (May bottleneck speeds) |
| Codebase Size | ~4,000 lines (Highly secure) | ~100,000 lines (Complex) |
| Firewall Evasion | Poor (Blocked by strict networks) | Excellent (Bypasses deep inspection) |
WireGuard is modern, lightweight, and incredibly fast. It consumes very little processing power, making it the absolute best choice for low-spec devices like the Pi. It connects almost instantly and handles network transitions seamlessly without dropping the tunnel.
OpenVPN is an older standard that is much heavier on system resources, which will severely bottleneck your download speeds on a microcomputer. However, because it can use standard HTTPS ports, it is slightly better at bypassing strict firewalls when traveling to heavily censored regions.
Our Verdict: For 99% of users building a home VPN on a Raspberry Pi, WireGuard is the superior choice. Its efficiency and speed are unmatched, providing a much smoother and more reliable experience for everyday use. Only choose OpenVPN if you frequently travel to countries with extremely restrictive firewalls.
4. Step-by-step guide: How to set up a VPN server on Raspberry Pi
We have guided hundreds of users through this exact process in our lab. We broke this tutorial into three manageable phases to ensure you do not miss critical network configurations that typically cause setup failures.
4.1. Phase 1: Preparing your Raspberry Pi for server duty
With all our components gathered, it’s time to lay the foundation. This phase is all about preparing the Raspberry Pi’s operating system and making sure it’s secure and up-to-date. Getting this part right will make the actual VPN setup in the next phase a breeze.
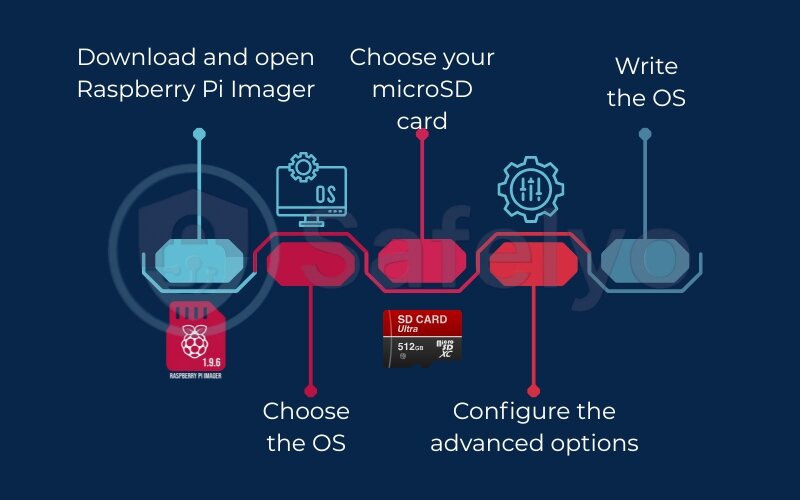
- Step 1: Install Raspberry Pi OS Lite.
Download and open the Raspberry Pi Imager on your main computer. Select Raspberry Pi OS (Other) > Raspberry Pi OS Lite (64-bit). We use the “Lite” version because it has no graphical desktop, leaving more CPU power free for our VPN.
- Step 2: Configure advanced options (Pro-Tip).
Before clicking “Write,” click the Settings cog icon. In the new window, check the box to Enable SSH and set a strong username and password. This saves you the hassle of needing a separate monitor and keyboard.
- Step 3: Boot up and connect via SSH.
Insert the MicroSD card into your Pi, connect the Ethernet cable, and plug in the power. Find your Pi’s IP address from your router’s admin page, then connect remotely using a client like PuTTY or your Mac’s Terminal.
- Step 4: Update your system.
This is the most critical first step. Run the command sudo apt update && sudo apt full-upgrade to patch all security holes. Cybersecurity authorities like CISA highlight that keeping software updated is the most effective defense against common attacks.
4.2. Phase 2: Installing your VPN server with PiVPN
Welcome to the main event. Instead of a frustrating manual installation that can take hours, we will use PiVPN, a brilliant script that automates the entire complex process into a simple, step-by-step wizard. I’ve done it both ways, and PiVPN is the gold standard for a reason.
- Step 1: Run the one-command installation.
In your SSH terminal, run this single command to download and start the setup script automatically:
curl -L https://install.pivpn.io | bash
- Step 2: Follow the text-based wizard. Use your arrow keys to navigate. Here are the key choices our team recommends:
- Protocol Choice: Select WireGuard. It is significantly faster and more efficient on a Pi.
- DNS Provider: Choose a privacy-focused one like Cloudflare (1.1.1.1) or Quad9.
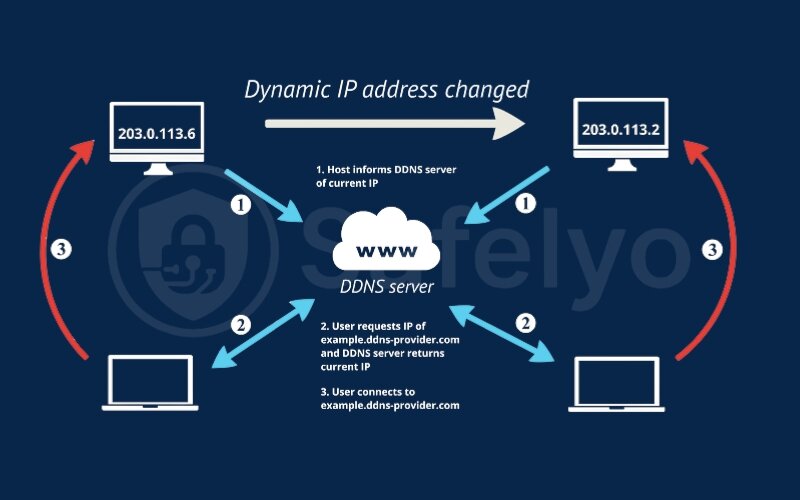
- DDNS Setup: Select Yes. Your home’s public IP address changes randomly. A DDNS service like DuckDNS gives your VPN a permanent, memorable address so you can always find your way back home.
- Unattended Upgrades: Select Yes. This enables automatic security updates for your server, which is a fantastic feature for peace of mind.
- Step 3: Reboot.
Once the installation finishes, the wizard will ask you to reboot. Choose Yes. Your server is now officially installed.
4.3. Phase 3: Configuring your network for remote access
Our PiVPN server is installed and running, but right now, it can only talk to devices inside your home. To reach it from the outside world, we need to give your router a clear set of instructions. Think of this phase as setting up the “address” and “doorbell” for your VPN server so your devices can find it from anywhere.
- Step 1: Set a static IP address for your Pi.
Your router gives out temporary local IPs that can change. To prevent this, log in to your router’s admin page, find your Raspberry Pi in the “Connected Devices” list, and use the “DHCP Reservation” feature to assign it a permanent, fixed IP address.
Safelyo Experience: I once spent an entire evening troubleshooting why my VPN suddenly stopped working, only to realize my router had assigned my Pi a new IP after a power flicker. A static IP address prevents that headache forever.
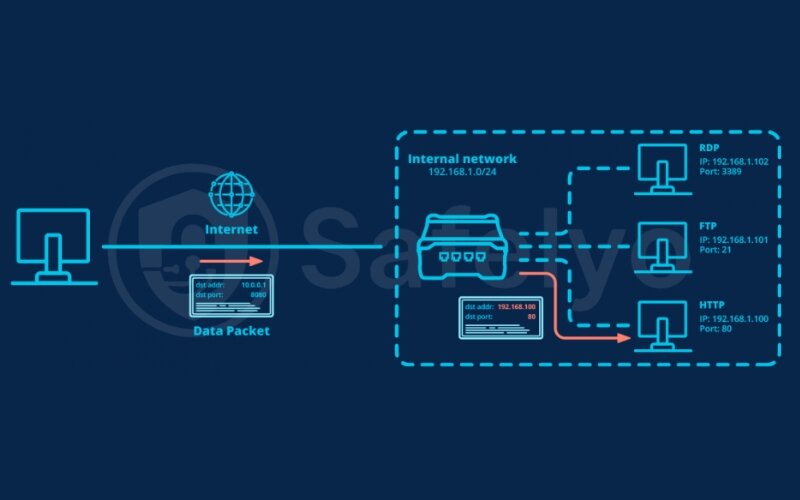
- Step 2: Configure port forwarding.
Now that your Pi has a permanent “office number,” you must tell the “receptionist” (your router) to forward specific calls to it. In your router’s admin page, find the “Port Forwarding” or “Virtual Servers” section.
- Step 3: Create the forwarding rule. Create a new rule with the following details:
- Service Name: WireGuard-VPN
- Internal IP: The static IP you just reserved for your Pi.
- External & Internal Port: 51820 (the default for WireGuard).
- Protocol: Select UDP.
- Step 4: Save and apply.
Your router will now forward all incoming WireGuard traffic directly to your Raspberry Pi server, making it accessible from anywhere in the world.
4.4. Important notice: The CGNAT problem
Here is a major roadblock many generic tutorials miss, causing countless hours of frustration. If your Internet Service Provider (ISP) uses Carrier-Grade NAT (CGNAT), your port forwarding will silently fail because you do not have a unique public IP address.
- How to check: Compare your router’s WAN IP address (found in the admin panel) to what you see on a public site like WhatIsMyIP.com.
- The verdict: If the two IP addresses do not match, you are behind a CGNAT.
- The solution: You must call your ISP and request to be opted out or ask for a “static public IP address.” Without this step, this entire home VPN setup is impossible.
5. How to generate profiles and connect devices to your VPN
Your server is ready, but it’s an empty fortress. Now, it’s time to create the secure “keys” (client profiles) that will grant your personal devices access to the encrypted tunnel. PiVPN makes this incredibly simple.
5.1. Creating a new client profile in the terminal
Each phone, laptop, or tablet needs its own unique profile to connect. In your SSH terminal, run the following command: pivpn add.
The script will prompt you for a client name. Choose something descriptive and press Enter. That’s it! PiVPN has just generated a new user profile with its own unique set of cryptographic keys.
Expert Tip: Use memorable names like my-iphone or work-laptop. This makes it much easier to manage or revoke access for a specific device in the future.
5.2. Connecting a mobile device (iPhone/Android)
This is the fastest and most elegant method for getting your phone connected. In the terminal, run the command pivpn -qr [profilename], replacing [profilename] with the name you just created (e.g., pivpn -qr my-iphone).
This will display a giant QR code directly in your terminal window.
- Step 1: Download the official WireGuard app from the App Store or Google Play.
- Step 2: Open the app and tap the plus (+) icon to add a new tunnel.
- Step 3: Select “Create from QR code” and point your phone’s camera at the terminal.
- Step 4: The app will instantly import all the settings. Name the connection and toggle it on.
5.3. Connecting a desktop (Windows/macOS)
Desktop connections require transferring a configuration file from the Pi to your computer. PiVPN saves these files in the /home/[your_username]/configs directory on your Pi.
We will use scp (Secure Copy Protocol), an industry-standard command, to transfer the file safely.
- Step 1: Open a new terminal window on your main computer (not the one connected to the Pi).
- Step 2: Run the following command, replacing the placeholders with your details:
scp [pi_username]@[pi_ip_address]:/home/[pi_username]/configs/[profilename].conf ~/Desktop - Step 3: This securely copies the .conf file to your desktop. Download and install the official WireGuard desktop client, click “Import tunnel(s) from file,” and select the file you just transferred.
- Step 4: Click Activate to establish the secure connection.
6. Troubleshooting common Raspberry Pi VPN issues
Even a perfect setup can run into issues due to router quirks or ISP restrictions. In our lab, we have found that nearly all post-installation problems trace back to one of these three common failure points.
6.1. VPN connects but has no internet access
- The Problem: Your device shows a “Connected” status, but no websites will load. This means the tunnel is active, but the Pi is failing to resolve DNS requests for your device.
- The Expert Fix: Manually specify a public DNS server for your clients. Run pivpn -d to check for errors. If you see DNS issues, edit the client .conf file and add the line DNS = 1.1.1.1 to force it to use Cloudflare’s secure resolver.
6.2. Handshake fails or cannot connect remotely
- The Problem: Your device cannot even find your home server. This points directly to a firewall or IP address issue, often caused by a faulty port forwarding rule or a changed public IP.
- The Expert Fix: Double-check your router’s Port Forwarding rule (must be 51820 UDP). If the rule is correct, your DDNS service may have failed to update. Rebooting the Raspberry Pi forces the DDNS client to restart and often resolves the issue instantly.
6.3. VPN speed is unexpectedly slow
- The Problem: Your connection is lagging, and videos buffer constantly. This is almost always caused by using an unstable wireless connection for the server itself.
- The Expert Fix: Switch the Raspberry Pi from Wi-Fi to a direct Ethernet cable connection. The Pi’s Wi-Fi chip is not designed for heavy, continuous traffic and will severely bottleneck your speeds. A wired connection guarantees maximum performance.
Read more:
7. How to secure your Raspberry Pi VPN server
Building your own VPN is a major step for privacy, but an unprotected server quickly becomes an open door for hackers. At Safelyo, we always implement these three essential security measures to harden any new server against common digital threats.
7.1. Change the default SSH port
Why it’s important: By default, SSH (the protocol you use to control your Pi remotely) runs on port 22. This is public knowledge, making it a primary target for automated bots that scan the internet for vulnerable servers. Changing it is a simple, effective deterrent.
How to do it: Edit the SSH configuration file by typing sudo nano /etc/ssh/sshd_config. Find the line #Port 22, uncomment it (remove the #), and change 22 to a random, unused port number (e.g., 2222). Save and exit (Ctrl+X, Y, Enter), then restart SSH with sudo systemctl restart ssh.
7.2. Install Fail2Ban to block brute-force attacks
Why it’s important: Even with a custom SSH port, determined attackers might still try to guess your password. Fail2Ban is an intrusion prevention system that scans server log files for malicious activity (like repeated failed login attempts) and automatically bans the offending IP addresses.
How to do it: Run sudo apt install fail2ban in your terminal. Fail2Ban will automatically detect and protect your SSH service against brute-force attempts without any further configuration, providing an extra layer of defense.
7.3. Enable automatic security updates
Why it’s important: Ignoring software updates leaves critical security vulnerabilities unpatched, creating easy entry points for hackers. Ensuring your Pi automatically downloads and installs security fixes keeps your server protected against the latest threats without manual intervention.
How to do it: During the PiVPN installation, you were likely prompted to enable “Unattended Upgrades.” If you skipped this, you can enable it manually by running sudo apt install unattended-upgrades. Follow the on-screen prompts to configure automatic updates for essential security patches.
8. DIY Raspberry Pi VPN vs. Commercial VPNs: Which is right for you?
Building your own server gives you absolute control, but it is not the best solution for every privacy need. At Safelyo, we often recommend a hybrid approach, using your Pi for specific tasks while relying on commercial services for broader anonymity.
The table below breaks down the key differences to help you decide which type of VPN best fits your usage patterns and technical comfort level.
| Feature | Self-hosted VPN (Raspberry Pi) | Commercial VPN (e.g., Nord/Express) |
| Privacy / Trust | 100% (Your data, your control) | Requires trusting a third-party provider |
| Cost | One-time hardware cost (Free after that) | Monthly/Annual subscription |
| Setup Difficulty | Medium to Hard (Requires technical steps) | Easy (Download app, click connect) |
| Remote Access to Home | Excellent (Direct access to NAS/Cameras) | Impossible (Connects to VPN provider’s network) |
| Geo-unblocking (Netflix/Streaming) | Poor (Uses your home IP, no country change) | Excellent (Change IP to any country) |
| Performance | Limited by home upload speed & Pi CPU | Fast (Dedicated global servers, high bandwidth) |
| Anonymity for Torrenting | Dangerous (Traces back to your home IP) | Excellent (Anonymous, shared IPs) |
When to choose your DIY Raspberry Pi VPN
Your self-hosted server is ideal for secure remote access to your home network, protecting your devices on public Wi-Fi, and encrypting traffic for personal use cases where you do not need to change your apparent geographic location. It offers unparalleled privacy as you control all the data.
When to choose a commercial VPN
For general internet anonymity, bypassing geo-blocks to watch Netflix, or securely downloading large files (torrenting) without your home IP being exposed, a commercial VPN is the superior choice. Providers like NordVPN or ExpressVPN offer thousands of servers globally, allowing you to easily appear in any country and benefit from highly optimized speeds.
9. Frequently asked questions (FAQs)
Can a Raspberry Pi 3 or Zero run a VPN server?
Yes, a Raspberry Pi 3B+ can run a VPN server, but its limited CPU and RAM will significantly bottleneck speeds, especially with OpenVPN. A Pi 4 or newer is highly recommended for optimal performance, while a Pi Zero is generally too underpowered for a stable, high-speed VPN server.
Is it safe to host your own VPN at home?
Yes, it is very safe, provided you follow all security hardening steps (like changing SSH port and installing Fail2Ban). You gain 100% control over your data, unlike commercial VPNs. However, your home internet upload speed becomes the limiting factor for how fast clients can connect remotely.
How many devices can connect to a PiVPN server simultaneously?
The number of simultaneous connections depends on your Raspberry Pi model and home internet upload speed. A Pi 4 can typically handle 5-10 devices for general browsing without major slowdowns. However, for 4K streaming or heavy downloading, limiting it to 1-2 concurrent connections is advisable.
Do I need a static IP address from my ISP?
Not necessarily, if you set up Dynamic DNS (DDNS). DDNS services provide a permanent hostname (e.g., myhome.duckdns.org) that automatically updates to your changing public IP address. However, if your ISP uses CGNAT, you will still need to request a public IP from them.
Can I access Netflix with my Raspberry Pi VPN?
No, not to unblock foreign libraries. Your PiVPN routes traffic through your home IP address, so Netflix will only show you content available in your actual physical location. To bypass geo-blocks and access international catalogs, you need a commercial VPN that offers servers in different countries.
10. Conclusion
Learning how to set up a VPN server on Raspberry Pi is a powerful project that puts you in complete control of your online privacy. You have successfully transformed a tiny, affordable computer into a secure, subscription-free gateway, capable of protecting your devices on public Wi-Fi and providing safe remote access to your home network.
While your DIY server offers unparalleled data control, remember its limitations for geo-unblocking. For accessing global streaming libraries or torrenting anonymously, a commercial VPN remains the superior tool. However, for personal security and home network access, your PiVPN is an expert-level solution that significantly boosts your digital independence.
Ready to explore more ways to secure your online life? Dive deeper into our comprehensive VPN Guides at Safelyo for in-depth reviews, troubleshooting tips, and advanced tutorials to master your digital privacy today.