Learning how to configure proxy server on Windows is an essential skill for anyone needing to access a corporate or school network, or simply to bypass basic web filters. It’s a gateway to the resources you need, but the settings can often look intimidating.
When you’re just handed a server address and a port number by your IT department, it can feel like a technical chore. After guiding numerous users through various network setups, I know that a clear, visual guide makes all the difference between frustration and a successful connection. This guide focuses squarely on the most common task: setting up your Windows 10 or 11 PC to use an existing proxy server.
We’ll walk you through the entire process with simple, annotated screenshots, covering both manual setup and automatic script configuration.
You will learn:
- How to find and open the correct proxy settings in seconds.
- The step-by-step process for both manual and automatic setup.
- A quick way to verify if your proxy is working correctly.
- How to disable the proxy when you no longer need it.
Let me simplify Windows proxy settings for you. Let’s get you connected.
1. Before you begin: What you need to have ready
Before we dive into the Windows settings, it’s crucial to have the correct details from your proxy provider. This could be your company’s IT department, your school’s network administrator, or the third-party proxy service you’re using. You can’t configure a proxy without knowing what to connect to.
Depending on their instructions, you will need one of the two types of information below.
For a manual setup, you’ll need:
- Proxy server address: This is either a name (like proxy.yourcompany.com) or an IP address (a series of numbers like 192.168.1.100).
- Port number: A specific number that works with the address (e.g., 8080, 8888).
- (Optional) Username and password: Some private proxies require you to log in for access.
For an automatic setup, you’ll need:
- Script address: This is a single URL that points to a configuration file, often ending in .pac.
From my years of troubleshooting network issues, I can tell you that the single most common reason for a proxy connection to fail is a simple typo. Double-check that you have copied the server address and port number exactly as they were given to you. One wrong character can prevent the entire setup from working.
2. How to access proxy settings in Windows
Alright, you’ve got your proxy details ready to go. Now, the next question is: where do you actually put them? The Windows settings panel can feel like a sprawling maze, but thankfully, there’s a direct shortcut to the exact screen we need.
This is the fastest and most efficient way to get there, and it’s the method I use every time.
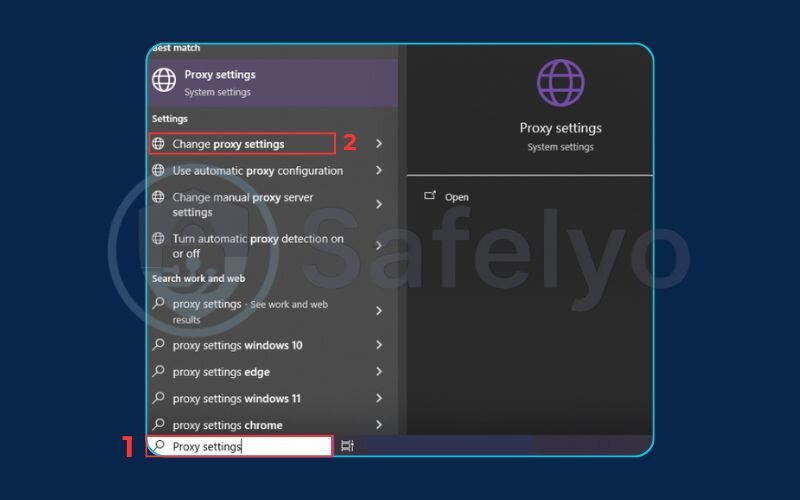
- Press the Windows key on your keyboard (the one with the logo). This will open the Start Menu.
- Simply start typing the words proxy settings. You don’t need to click a search box first.
- Click on “Change proxy settings” from the search results that appear.
This action will open the modern Windows Settings app directly to the Proxy page. It’s a universal method that works perfectly on both Windows 10 and 11.

A Quick Note for Control Panel Fans (The 'Old School' Way)
If you’ve been using Windows for a long time, you might be used to finding things through the classic Control Panel. Good news: you can still get to the proxy settings that way.
You can navigate to Control Panel > Network and Internet > Internet Options. In the new window, go to the Connections tab and click the LAN settings button.
Interestingly, the window that pops up contains the exact same manual and automatic proxy settings. It’s just a different door to the same room. However, for simplicity and to follow the modern standard, I always recommend using the Windows Search method described above.
3. Method 1: Manual proxy setup on Windows
This is the most common route you’ll take. If you’ve been given a specific address and a set of “magic numbers” (the port), this is the method for you. It’s like having a physical address and a specific apartment number to find someone.
Follow these steps carefully on the Proxy settings page you opened earlier.
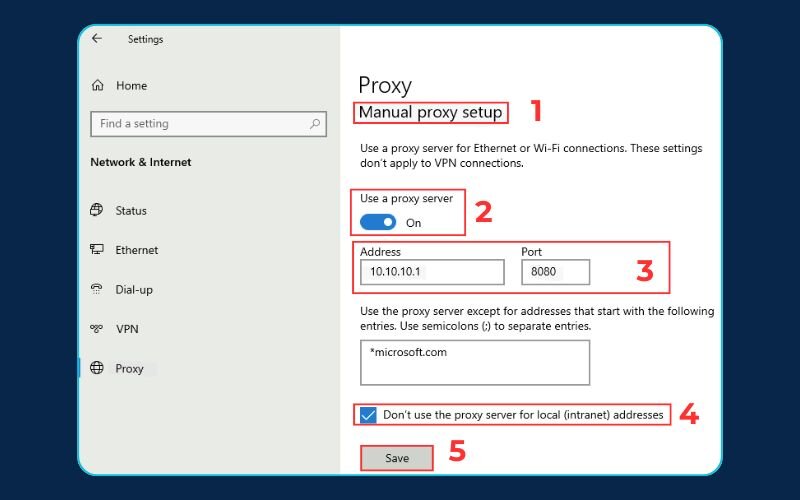
- Scroll down to the section titled “Manual proxy setup.” It’s usually the second main block of options on the page.
- Find the switch labeled “Use a proxy server” and flip it to the On position. This will make the address and port fields editable.
- This is the key part. In the “Address” box, type or paste the proxy server address you prepared. For example, it might look like proxy.your-school.edu or 192.168.1.100.
- In the “Port” box, enter the corresponding port number, such as 8080.
- Look at the large text box below. This is for exceptions. Think of it as a “do-not-disturb” list for your proxy. If there are specific websites (like an internal company portal) that shouldn’t go through the proxy, you would add their addresses here, separated by semicolons. For most users, you can leave this blank.
- Finally, ensure the box for “Don’t use the proxy server for local (intranet) addresses” is checked. This is important on a corporate or school network to make sure you can still access internal resources.
- Click the Save button at the bottom to apply your new settings.
I’ve seen it countless times in my career: a user fills everything out perfectly but forgets to click Save. They close the window and wonder why nothing has changed. That one click is the final step that makes it all work.

4. Method 2: Using an automatic proxy setup script
Think of this as the “set it and forget it” option. This method is common in large corporate or university environments. Instead of giving everyone a specific address and port to type in manually, the IT department provides a single link to a “setup script.” Your computer uses this link to fetch all the necessary, and sometimes complex, proxy rules automatically.
Here’s how to set it up in the Proxy settings window.
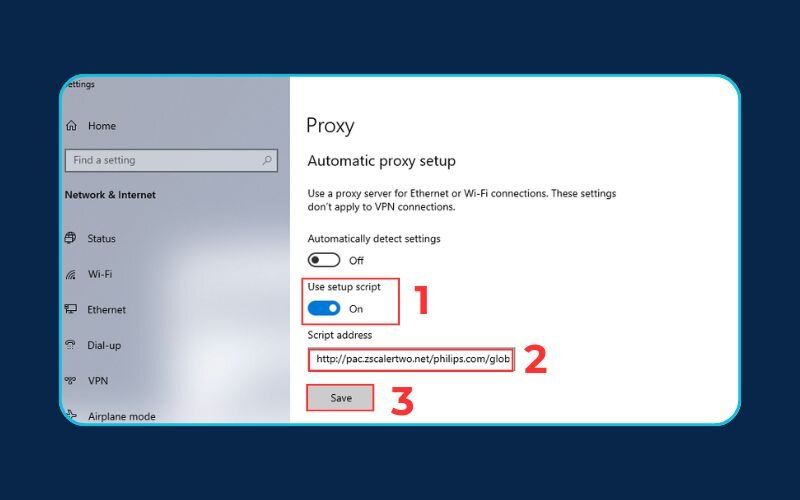
- First, glance down at the ‘Manual proxy setup’ section and make sure the switch for “Use a proxy server” is turned Off. You can’t have both manual and automatic settings active at the same time; they will conflict.
- Now, scroll back up to the top section, “Automatic proxy setup.”
- Flip the switch for “Use setup script” to the On position.
- A new field labeled “Script address” will appear. This is where you paste the full URL you were given (it often ends with a .pac extension, like http://proxyserver.ourcompany.com/config.pac).
- Click the Save button.
That’s it. Your computer will now check this script for instructions on how to handle your internet traffic.

From an IT management perspective, this method is a lifesaver. It allows administrators to update proxy rules for thousands of computers at once without ever having to touch an individual PC. For you as the user, it means your settings are always effortlessly up-to-date with the latest network requirements.
Read more:
5. How to check if your proxy is working
So you’ve followed the steps and clicked ‘Save’. You’re done, right? Not quite. The final, and arguably most important, step is to verify that the proxy is actually working. I can’t count the number of times I’ve helped someone who thought their proxy was active, only to find out a typo was holding them back. A quick check saves a lot of headaches later.
After you find and change the proxy settings in Windows, here are two simple methods to confirm everything is running smoothly.
5.1. Method 1: The IP Address Check
This is the classic, foolproof method. Your proxy server’s main job is to act as an intermediary, which means websites should see the proxy’s IP address, not your own home IP address.
- Open your preferred web browser (Chrome, Edge, Firefox, etc.).
- Go to a website that reveals your public IP address. My personal favorites are whatismyipaddress.com or ipleak.net.
- Look at the IP address and location displayed on the page.
If the setup was successful, you should see the IP address and location of the proxy server, not your actual location. For example, if you’re in Chicago but using your company’s proxy server in New York, the website should report that you are in New York. If you see your home IP address, something is wrong in the setup, and you should go back and re-check the address and port number.
5.2. Method 2: Accessing a Blocked Website
This method is more practical and directly tests the reason you might be using a proxy in the first place.
Let’s say you’re a student using your school’s proxy to access academic journals from off-campus. Before setting up the proxy, trying to access those journals would give you a “you are not authorized” error.
The test is simple: try to visit a website that was previously inaccessible.
- If you’re using a school proxy to access library resources, try loading the library’s database now.
- If you’re using a work proxy to access the internal company network, try navigating to the company’s intranet homepage.
If the site that was blocked before now loads perfectly, congratulations! Your proxy is working exactly as intended.
6. How to disable proxy settings on Windows
There will come a time when you no longer need the proxy. Perhaps you’ve left the office for the day or finished your research project at the library. Leaving a proxy active when you don’t need it can sometimes slow down your regular browsing or prevent you from accessing certain sites.
Thankfully, disabling it is even easier than setting it up. I often tell people to think of it as flipping a light switch off when you leave a room.
- Navigate back to the “Proxy settings” window using the same quick search method we used before (Press the Windows key, type proxy settings).
- Look at the section you used for your setup:
- If you used Method 1 (Manual), simply flip the “Use a proxy server” switch back to the Off position.
- If you used Method 2 (Automatic), flip the “Use setup script” switch back to the Off position.
That’s it. There isn’t even a “Save” button to click in this case. The change is instant. Your computer’s internet traffic will immediately stop routing through the proxy and will go back to its normal, direct connection through your home or public Wi-Fi.
7. Proxy vs. VPN on Windows: Which should you use?
Now that you’ve mastered configuring a proxy, you might be wondering about its more famous cousin, the VPN (Virtual Private Network). People often use the terms interchangeably, but in the world of online security, they are fundamentally different tools for different jobs.
I often explain the difference like this:
- A proxy server is like a mail forwarding service. It receives your mail (internet traffic) and sends it out from its own address, effectively changing your return address (your IP). However, anyone can still open the letter and read its contents.
- A VPN is like an armored car service. It puts your mail into a locked, armored vehicle (encryption) before sending it to a different post office to be mailed. It changes your return address and makes the contents unreadable to anyone who intercepts it along the way.
When is a proxy the right choice?
Despite a VPN’s clear security advantages, a proxy isn’t obsolete. It’s the correct and sometimes necessary tool in very specific situations:
- Corporate or School Networks: This is the most common reason. You must go through your organization’s proxy server to access internal files, databases, or specific applications. In this case, it’s not a choice; it’s a requirement.
- Specific Software Needs: Certain applications, like some peer-to-peer (P2P) clients or specialized web scrapers, are designed to work specifically with a SOCKS5 proxy for their functionality.
- Quick, Low-Stakes Tasks: If all you need to do is quickly check how a website looks from a different country for a non-sensitive task, and speed is your only concern, a proxy can do the job.
For everything else that involves your personal data, privacy, and security, a VPN is the way to go.
Here’s a clear breakdown:
| Feature | Proxy Server | VPN (Virtual Private Network) |
|---|---|---|
| Main Job | Hides your IP address. | Hides your IP address and encrypts your data. |
| Encryption | Typically none. Your data is exposed. | Strong, military-grade encryption (like AES-256). |
| Scope | Often only works for your web browser or a specific app. | Protects the entire internet connection of your device. |
| Best For | Accessing required corporate/school networks, basic geo-unblocking. | Total privacy, security on public Wi-Fi, secure streaming, and anonymity. |
The table makes it clear: for tasks that demand security and privacy – like online banking, shopping, or just browsing without being tracked – a VPN is not just an alternative; it’s the necessary upgrade.
While a proxy has its uses, for true online security and privacy, a VPN is the superior choice. A proxy hides your IP, but a VPN hides your IP and protects all your data. Explore our guide to the best VPN services to secure your Windows PC today.
Read more for the detailed comparison: Proxy vs VPN: What’s best for your online privacy?
8. FAQ about how to configure proxy server on Windows
Setting up a proxy for the first time can bring up a few common questions. Here are quick, direct answers to the ones we encounter most often.
What does it mean to configure a proxy server?
In simple terms, it means telling your Windows computer to send its internet traffic through another computer (the proxy server) first, instead of connecting directly to websites. This is done to use the proxy server’s IP address and network connection.
How to set up a proxy server on Windows?
You can set up a proxy by going to Windows “Proxy settings.” From there, you have two main options: a manual setup, where you enter the server’s address and port number, or an automatic setup, where you provide a link to a setup script. Our guide above walks you through both methods step-by-step.
Why does Windows say it “could not automatically detect this network’s proxy settings”?
This is a very common message. It usually means your network requires you to enter the proxy information manually or use a setup script. The first thing to try is disabling the “Automatically detect settings” toggle and then following either Method 1 or Method 2 in our guide.
Do I need to configure the proxy in Chrome/Firefox after setting it in Windows?
No. By default, major web browsers like Google Chrome, Microsoft Edge, and Opera automatically use the system proxy settings you’ve configured in Windows. While Firefox can be set to use its own custom settings, its default behavior is also to follow what you’ve set in Windows.
Is it safe to use a free proxy server?
We strongly advise against it. Free proxies are notoriously slow, unreliable, and often have a dangerous business model. They may monitor and sell your browsing data or even inject malware and ads into the websites you visit. Only use proxies from a trusted source, like your workplace or a reputable paid service.
How to set up your own proxy server?
Setting up your own computer to be a proxy server is a more advanced technical task than what is covered in this guide. It involves installing and configuring special server software and is typically done by network administrators. This guide focuses on the far more common task of connecting to an existing proxy.
Does Microsoft have a proxy server?
No, Microsoft does not operate a public proxy server service that you can use for general browsing. Windows has built-in settings to connect to any proxy, but Microsoft itself doesn’t provide the proxy server. Businesses may use Microsoft’s Azure cloud platform to create their own private network solutions, but this is different.
9. Conclusion
You now have all the knowledge and confidence needed to master proxy settings on your Windows PC. What once seemed like a cryptic technical task is now a straightforward process, whether you’re connecting to a work network or bypassing a simple web filter.
To recap, here are the key points on how to configure proxy server on Windows to remember:
- You can easily set up a proxy through both manual (address/port) and automatic (script) methods.
- Always verify your connection by checking your IP address to ensure the proxy is active.
- Disabling the proxy is as simple as flipping a switch in the settings when you’re done.
- You understand the crucial difference: a proxy is for access, while a VPN is for security and privacy.
Using a proxy is a valuable technical skill, but never forget to prioritize your digital safety. For the comprehensive protection and data encryption that a proxy simply cannot provide, a trusted VPN is always your best defense. Continue mastering your digital environment with more expert guides from Safelyo in the Tech How-To Simplified section.


