Trying to set up port forwarding for a game, keep your network printer reliably connected, or just take better control of your home network? Learning how to configure static IP address on Windows 10 is the key skill you need to unlock a more stable and powerful network experience.
I get it – messing with network settings can feel like walking a tightrope without a net. One wrong number and your internet connection might vanish. But here’s the good news: while the term sounds technical, the process is surprisingly straightforward when you have a clear, step-by-step guide to follow.
Note: The steps shown in this guide for Windows 10 are nearly identical for Windows 11 users, especially the Settings app method.
As someone who’s set up dozens of home and small office networks, I’ve seen firsthand how a static IP can solve those nagging connection issues that drive people crazy. This isn’t just a trick for the IT crowd; it’s a fundamental tool for anyone looking for a more predictable and efficient network.
In this comprehensive guide, you’ll discover:
- Why and when a static IP is the right choice for you.
- The essential information you need to gather before you start.
- Two distinct methods to get the job done (via Control Panel and Settings).
- How to verify your new setup and troubleshoot common errors.
Stop letting random IP assignments cause headaches. Let me walk you through both methods, ensuring a smooth and error-free setup from start to finish.
1. Why and when should you use a static IP address?
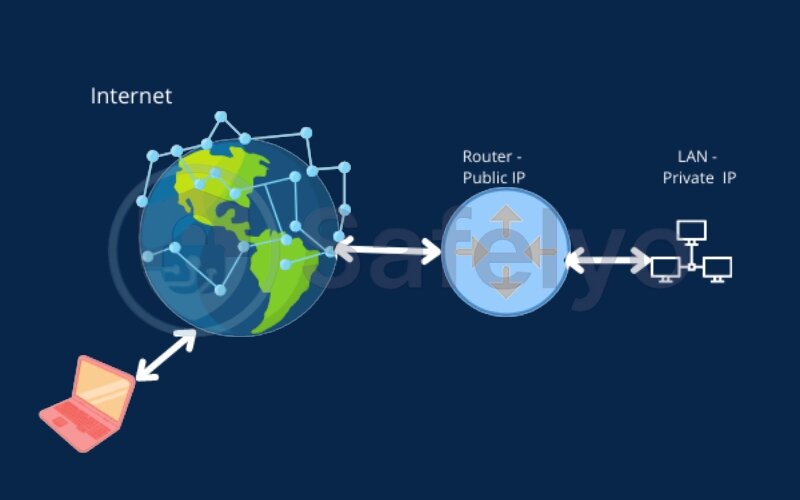
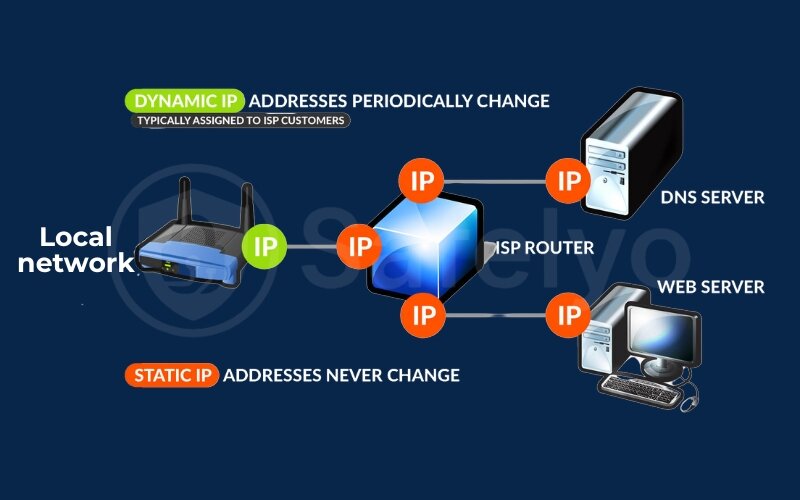
By default, your router uses a system called DHCP (Dynamic Host Configuration Protocol) to automatically hand out temporary IP addresses to devices that connect. Think of it like a host at a party assigning guests to random available seats. It’s efficient, but the seating chart is always changing.
A static IP address, on the other hand, is like a reserved seat with your name on it. It’s a permanent address that you manually assign to a device, ensuring it never changes. You – and other devices – always know exactly where to find it.
Here’s a quick comparison to make it even clearer:
| Feature | DHCP (Dynamic IP) | Static IP |
| Ease of Setup | Automatic. No user action needed. | Manual. Requires configuration. |
| Reliability | Less reliable for servers or printers. | Highly reliable. The address never changes. |
| Best For | Every day devices (laptops, phones, tablets). | Key devices (servers, printers, security cameras). |
| Potential Issues | It can cause connection drops for specific tasks. | Risk of IP conflict if not set up correctly. |
So, when does this actually matter? You should use a static IP for:
- Port forwarding: If you’ve ever wrestled with a “Strict NAT Type” in a game like Call of Duty or tried to host a Minecraft server for friends, a static IP is the non-negotiable first step. It tells your router exactly which computer to send the game traffic to.
- Reliable network devices: I once had a wireless printer that would “disappear” from the network every other day. The culprit? Its IP address kept changing. Assigning it a static IP was a five-minute fix that permanently solved the problem. This is also crucial for security cameras and network storage (NAS) drives.
- Stable remote access: If you need to access your computer or a specific service from outside your home network, a static IP ensures you’re always connecting to the right machine.
- Better network control: For those who like an organized network, assigning static IPs helps you know exactly which device is which, making management and troubleshooting much easier.
2. Before you begin: Gathering your essential network information
This is, without a doubt, the single most important step in the entire process. Skipping this is the #1 reason people lose internet access after setting a static IP. Trust me, I’ve made that mistake myself in the early days.
Think of it like gathering your ingredients before you start baking. You need to know what your network currently looks like before you can change it. Thankfully, Windows has a built-in tool that tells us everything we need to know.
First, you need to open the Command Prompt. The quickest way is:
- Press the Windows key + R on your keyboard to open the Run box.
- Type cmd and press Enter.

A black terminal window will appear. Now, for the magic part. Type the following command exactly as shown and press Enter:
IPconfig /all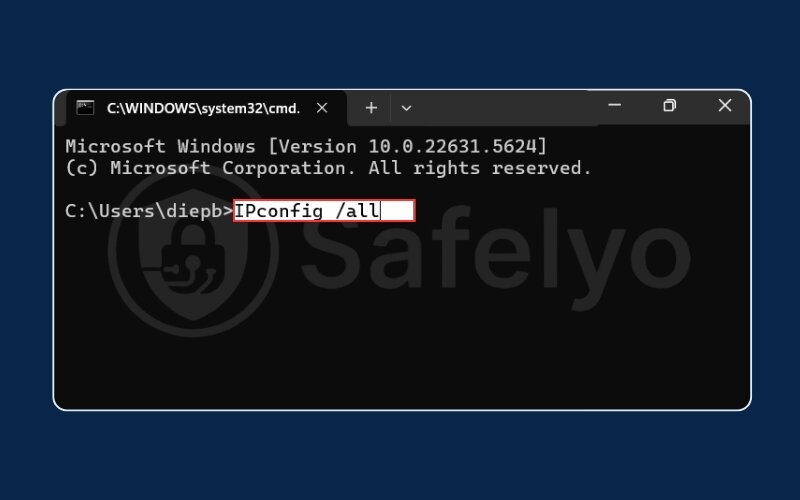
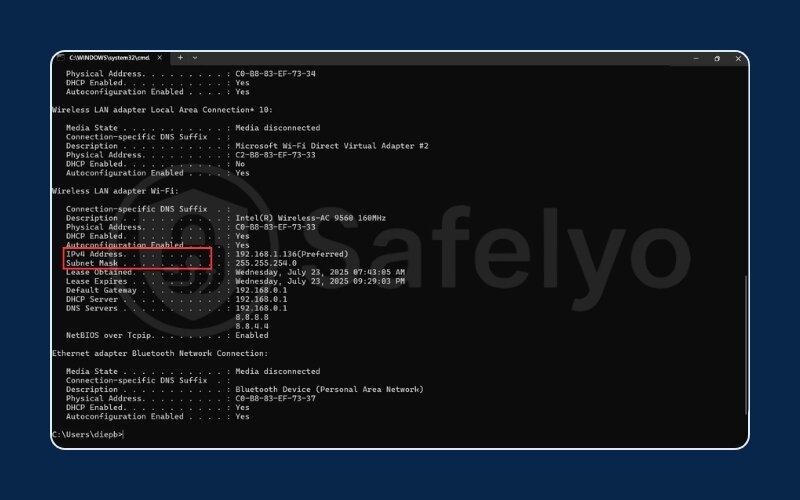
Your screen will fill with text, but don’t be intimidated. You only need to find and write down four specific pieces of information for your active connection (it will likely be under a heading like “Ethernet adapter Ethernet” or “Wireless LAN adapter Wi-Fi”).
Here’s what you’re looking for and what they mean in simple terms:
- IPv4 Address: This is your computer’s current, temporary address. (e.g., 192.168.1.102).
- Subnet Mask: This tells your devices which part of the network is “local”. It’s almost always 255.255.255.0.
- Default Gateway: This is the address of your router – the doorway from your computer to the internet. (e.g., 192.168.1.1).
- DNS Servers: These are the internet’s phonebooks. They turn website names (like safelyo.com) into IP addresses your computer can understand. You’ll likely see two of them.
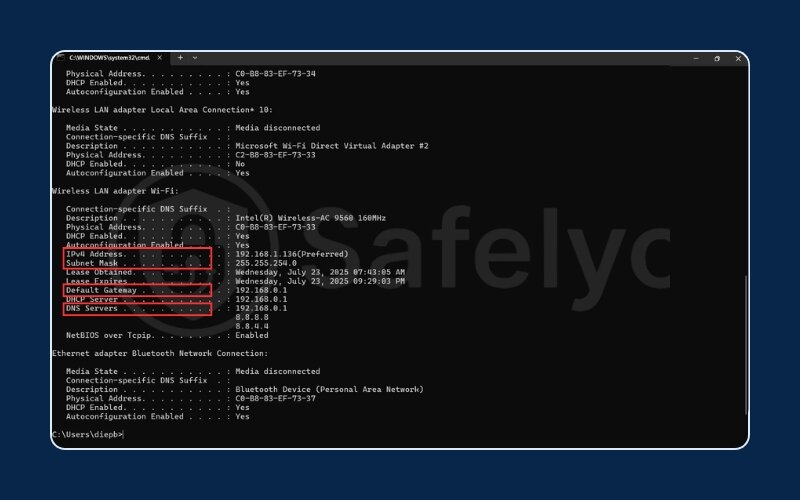
Grab a pen and paper, open Notepad, or do what I usually do – just snap a quick photo of the screen with your phone. Keep this information handy. You’ll need it in the next step.
3. Method 1: How to configure static IP address on Windows 10 via the Control Panel
This is the classic, “old-school” way of changing network settings in Windows. It’s the method I first learned, and it remains a reliable and powerful tool that works flawlessly across different Windows versions. Let’s dive in.
3.1. Accessing your network connections
First, we need to navigate through the Control Panel to find your network adapters.
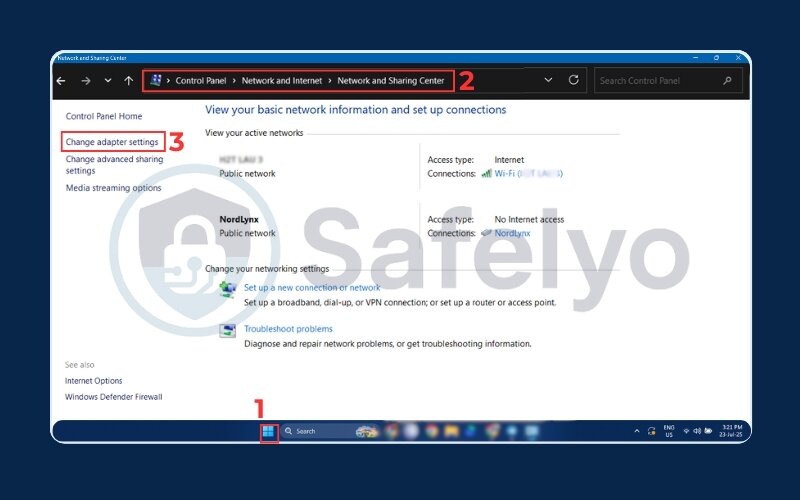
- Click the Start Menu or the Search icon on your taskbar and type “Control Panel”. Click on the app to open it.
- In the Control Panel window, make sure the “View by:” option in the top-right corner is set to “Category”. Then, click on “Network and Internet”.
- On the next screen, click on “Network and Sharing Center”.
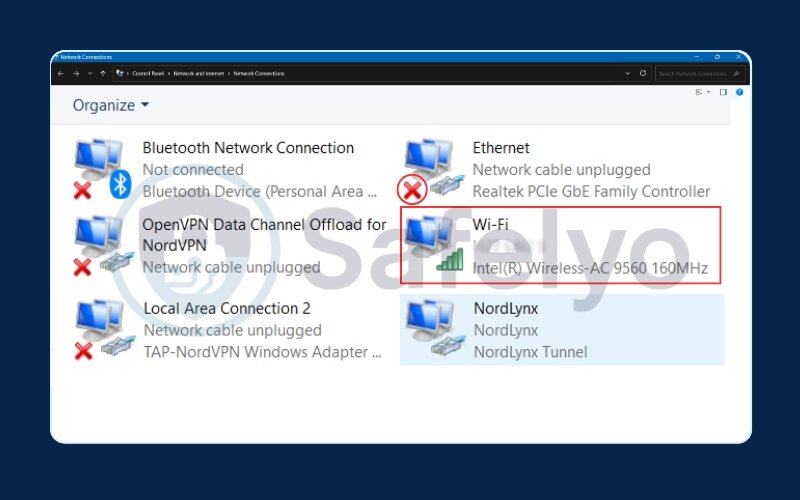
- From the menu on the left-hand side, click on “Change adapter settings”.
You will now see a window showing all your network connections.
3.2. Opening adapter properties
Now you need to identify which connection you’re currently using.
- Look for the adapter that is active. It will likely be named “Ethernet” (if you’re connected with a cable) or “Wi-Fi” (if you’re connected wirelessly). The active connection won’t have a red ‘X’ or be grayed out.
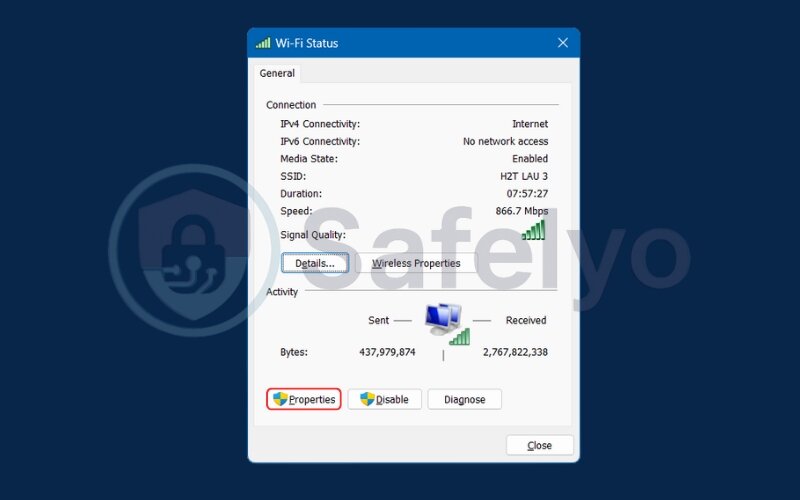
- Right-click on your active network adapter and select “Properties” from the menu. You may see a User Account Control prompt asking for permission; click “Yes”.
3.3. Entering the static IP details
This is the moment of truth where we input the information you gathered earlier.
- In the Properties window that pops up, scroll through the list until you find “Internet Protocol Version 4 (TCP/IPv4)”. Be sure to select Version 4, not Version 6.
- Click on it once to highlight it, then click the “Properties” button.
- A new window will open. By default, “Obtain an IP address automatically” is selected. Click the radio button for “Use the following IP address”. This will make the fields below editable.
- Now, carefully enter the information you wrote down from the IPconfig command:
- IP address: Here’s the most important part. Do NOT use the exact same IP address you wrote down. You need to pick a new one to avoid conflicts. My personal rule is to take the current IP (e.g., 192.168.1.102) and change the last number to something high, like 192.168.1.150. This usually keeps it outside the router’s automatic assignment range.
- Subnet mask: Enter the Subnet Mask exactly as you recorded it.
- Default gateway: Enter the Default Gateway address exactly as you recorded it.
- Next, click the radio button for “Use the following DNS server addresses” and enter the DNS servers you recorded.
- Finally, check the box for “Validate settings upon exit”. This is a handy feature that makes Windows double-check your work for you.
- Click “OK” on this window, and then “Close” on the previous one. Windows will briefly run a diagnostic, and you’re all set.
4. Method 2: How to set a static IP in Windows 10 using the Settings app
If you prefer the modern, streamlined interface of Windows 10, the Settings app provides a more direct path to configure your IP address. While the end result is the same, some users find this method more intuitive.
Personally, the Settings app method has become my go-to for quick changes on my own devices. It feels faster once you know the path, and the layout is a bit cleaner.
4.1. Navigating to network settings
Let’s get to the right screen in the Settings app.
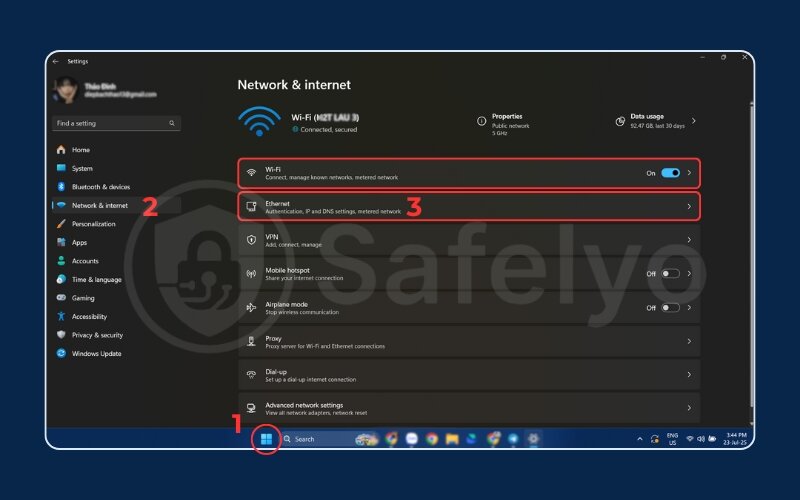
- Press the Windows key + I to instantly open the Settings app.
- Click on the “Network & Internet” section.
- On the left-hand menu, select either “Ethernet” or “Wi-Fi”, depending on how you are connected.
- In the main panel, click on the name of the network you are currently connected to.
This will take you to the properties page for your specific network connection.
4.2. Editing the IP assignment
Now we’ll switch from automatic to manual mode.
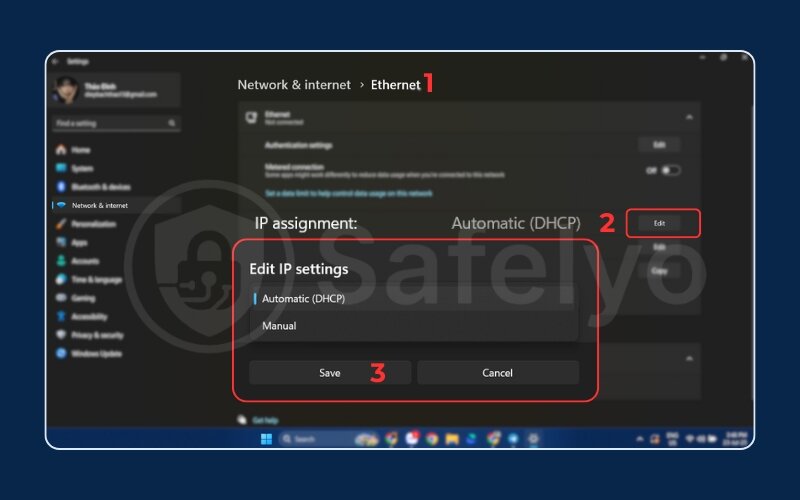
- Scroll down the page until you see the “IP settings” section.
- Click the “Edit” button.
- A dialog box will appear. Click the dropdown menu that currently says “Automatic (DHCP)” and change it to “Manual”.
4.3. Configuring your manual IP address
The final step is to fill in the details, just like in the previous method.
- After selecting “Manual”, a toggle for IPv4 will appear. Turn it on.
- Several fields will now become available. Using the information you gathered from the IPconfig command, fill them out carefully:
- IP address: Just as before, choose a unique address. If your old IP was 192.168.1.102, a good choice would be 192.168.1.150.
- Subnet prefix length: This is just a different way of writing the Subnet Mask. If your mask was 255.255.255.0, you will enter 24 here. This is the standard for nearly all home networks.
- Gateway: Enter the Default Gateway address you recorded.
- Preferred DNS: Enter the first DNS server address you recorded.
- Alternate DNS: Enter the second DNS server address if you have one.
- Once all the fields are filled, double-check your numbers one last time.
- Click “Save”. Your computer will apply the new settings instantly.
Read more:
5. Verifying your new static IP address
The hard part is over! Now for the moment of truth: making sure your changes worked correctly. This is a quick two-step check that I always perform to be certain everything is in order.
First, the technical proof. Let's go back to where we started.
- Open the Command Prompt again (Windows Key + R, type cmd, press Enter).
- Type IPconfig and press Enter.
Look at the “IPv4 Address” line for your active connection. It should now display the new static IP you just assigned (e.g., 192.168.1.150). If it does, that’s a great sign.
Second, the real-world test. A correct IP address doesn't mean much if you can't browse the web.
- Open your favorite web browser and try to visit a reliable site like google.com or safelyo.com.
If the page loads successfully, then you’ve done it! For me, seeing that page pop up is the ultimate confirmation. It means your new static IP, gateway, and DNS servers are all communicating perfectly.
Congratulations, you’ve successfully taken control of your device’s network address.
6. Troubleshooting common static IP connection issues
Even with the best guide, sometimes a setting gets missed or a number is mistyped. It happens. If you’ve set your static IP but can’t connect, don’t panic. Think of this section as your network first-aid kit. These are the most common issues and how to fix them in minutes.
Problem 1: No internet access

You see an error like "Unidentified Network" or the network icon has a yellow warning triangle.
A simple typo in the Default Gateway or DNS Server addresses. The gateway is your door to the internet; if the address is wrong, you’re locked inside your local network.
Solution: Go back to the “Internet Protocol Version 4 (TCP/IPv4) Properties” window and meticulously compare each number you entered against the information you wrote down from the IPconfig command. It’s like dialing a phone number – one wrong digit and the call won’t go through.
Believe me, it happens to everyone. I once spent 20 minutes troubleshooting only to realize I had typed 192.168.0.1 instead of 192.168.1.1 for the gateway. A single number was off! Always double-check the basics first.
Problem 2: IP address conflict

Windows explicitly tells you that another device is already using the IP address you chose.
This means another device on your network (like a phone or another computer) was already assigned the ‘reserved seat’ you chose for your PC.
Solution: The fix is easy: just pick a different IP address. Go back to the settings and try changing the last number. If 192.168.1.150 was taken, try 192.168.1.151 or jump up to 192.168.1.180.
Problem 3: How to revert to a dynamic IP

You've decided you just want to go back to the way things were before.
Solution: This is the simplest fix of all. Just navigate back to the “Internet Protocol Version 4 (TCP/IPv4) Properties” window and select “Obtain an IP address automatically” and “Obtain DNS server address automatically”. Click OK, and your router will take back control. It’s the “undo” button for this whole process.
A QUICK NOTE ON SECURITY
While a static IP is great for stability, it does make your device slightly more predictable to other devices on your local network. This isn’t a major vulnerability for most home users, but it’s always wise to ensure your basic defenses are up. A great first step is to make sure your Windows Firewall is turned on and configured correctly. It acts as a digital gatekeeper, controlling what traffic can come in and out of your computer.
7. FAQ about configuring static IP address on Windows 10
Still have a few questions about the process? We’ve gathered the answers to the most common queries right here.
How do I configure my static IP address on Windows 10?
You can manually configure a static IP by using one of two built-in methods. Our guide details the traditional Control Panel path via “Network and Sharing Center” and the modern Settings app path under “Network & Internet”. Both are effective and fully explained in sections 3 and 4 of this article.
Should my IP settings be DHCP or static?
It depends entirely on your needs. DHCP (automatic) is best for most everyday devices like laptops and phones because it’s completely hassle-free. A static IP (manual) is better for key devices that require a stable, unchanging address, such as network printers, game consoles for port forwarding, or home servers.
How to check if the PC is set to a static IP?
The easiest way is to use the Command Prompt. Open it and type IPconfig. If the “IPv4 Address” listed matches the specific address you manually set, then your PC has a static IP. If it’s a random number in your network’s range, it’s likely still on DHCP.
Should I give my PC a static IP address?
You should only if you have a specific reason, such as hosting a game server, setting up remote access, or ensuring a stable connection for a media server. For general web browsing, emailing, and daily use, the default dynamic IP provided by DHCP is perfectly fine and requires no setup.
Can I choose any IP address I want?
No. The address must be within your local network’s range (e.g., 192.168.1.x) and, crucially, should be outside the router’s automatic DHCP pool to avoid conflicts. The safest method is to use the first three parts of your router’s IP and only change the last number to a higher value (like 150 or above).
Will setting a static IP make my internet faster?
No, a static IP does not directly impact your internet download or upload speed. Its primary purpose is to provide a consistent, predictable address for your device on the local network, not to speed up your connection to the wider internet.
Do I need to set a static IP for my gaming console (PlayStation/Xbox)?
It is highly recommended, especially if you are trying to achieve an “Open NAT Type”. Setting a static IP on your console is the essential first step before you can correctly configure port forwarding for specific games, which can dramatically reduce lag and improve your online gaming experience.
8. Conclusion
You’ve now seen that learning how to configure static IP address on Windows 10 is not a daunting task reserved for IT professionals. Whether you prefer the classic Control Panel or the modern Settings app, you have the tools and knowledge to assign a permanent, reliable address to your PC. This simple skill unlocks better stability for key devices, provides a solid foundation for port forwarding, and gives you greater overall control of your home network.
To ensure success, just remember these key points:
- Gather info with IPconfig /all first. This is your non-negotiable prep step.
- Choose your method. Both the Control Panel and Settings app work perfectly.
- Enter the details carefully. A single typo is the most common source of errors.
- Verify your connection. A quick check confirms your success.
Mastering this skill is a fantastic step toward optimizing your digital life. Now that you’ve secured your device’s place on the network, you’re ready for the next level. Explore more of Tech How-To Simplified guides from Safelyo to learn how to change your DNS for better privacy or set up a VPN on your router.

