If you’ve been wondering how to delete NordVPN account and completely remove your data from all Nord services, the process is easier than it looks. You just need to sign in to my.nordaccount.com, open Account settings, choose Delete account, and confirm the request through the email NordVPN sends you.
For most users, deleting a NordVPN account is about more than ending a VPN plan. It’s also a way to ensure that personal details and payment records are completely removed from Nord’s system.
If you plan to switch to another VPN or simply reduce your digital footprint, following the right sequence helps you avoid unexpected charges and ensures your information stays private.
-
Use the Nord Account dashboard (Recommended)
Log in to my.nordaccount.com → Account Settings → Delete account → Confirm the request via email.
-
Request via the NordVPN app (mobile)
Open the app → Profile/Settings → tap Delete Account to be redirected to the deletion page.
-
Submit a support form
If you cannot log in, fill out the official “Account Deletion Request” form to have customer support handle it manually.
1. How to delete NordVPN account
Depending on how you subscribed or which device you use, NordVPN now provides three official methods to delete your account.
You can delete it via your Nord Account, through the NordVPN or related apps, or by submitting a request form.
Quick steps:
- Cancel active subscriptions (turn off Auto-Renewal or cancel via App Store / Google Play).
- Sign in to my.nordaccount.com
- Go to Account Settings → Delete account.
- Enter the verification code sent to your email.
- Confirm deletion in the NordVPN email.
1.1. Delete your NordVPN account via Nord Account (recommended method)
This is the fastest and most reliable method officially recommended by NordVPN.
Steps:
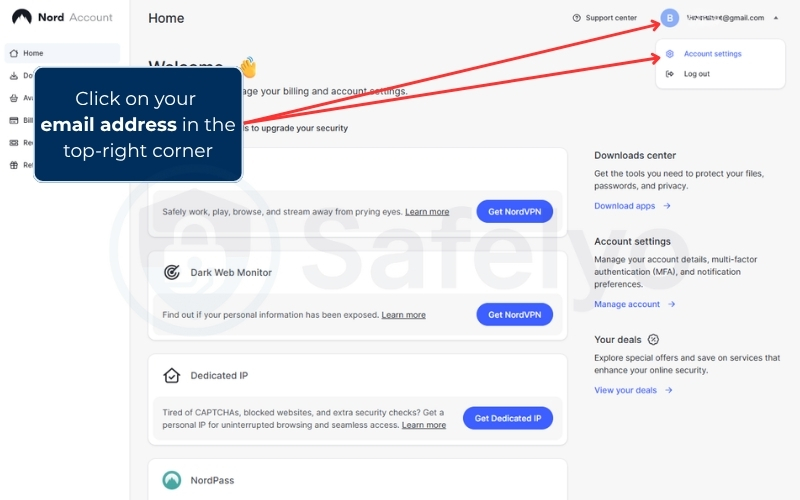
- Go to https://my.nordaccount.com and sign in with your NordVPN credentials.
- Click on your email address in the top-right corner → choose Account Settings.
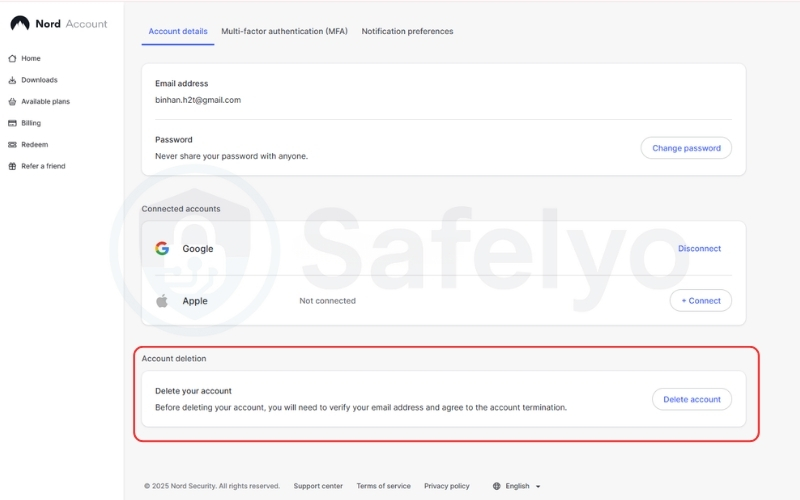
- Scroll to the bottom of the page and click Delete account.
- A verification code will be sent to your registered email address.
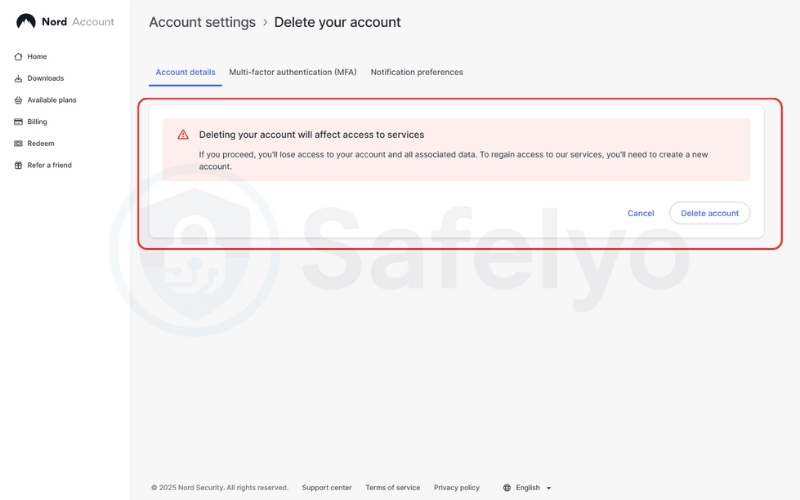
- Enter the code to confirm your identity.
- After verification, follow the on-screen instructions to finalize your account deletion.
In some cases, for example, if your subscription was purchased through the Apple App Store, linked to a business account, or requires extra verification, NordVPN may ask for additional information before completing the process.
Before deleting your account:
- Export all your passwords from NordPass and files from NordLocker if you use them.
- If you only want to delete NordPass or NordLocker, follow their respective guides:
- NordPass account deletion guide
- NordLocker account deletion guide
1.2. Delete your NordVPN account via NordVPN or related applications
You can also initiate the deletion directly through NordVPN’s mobile or desktop apps or from related Nord apps such as NordPass or NordLocker.
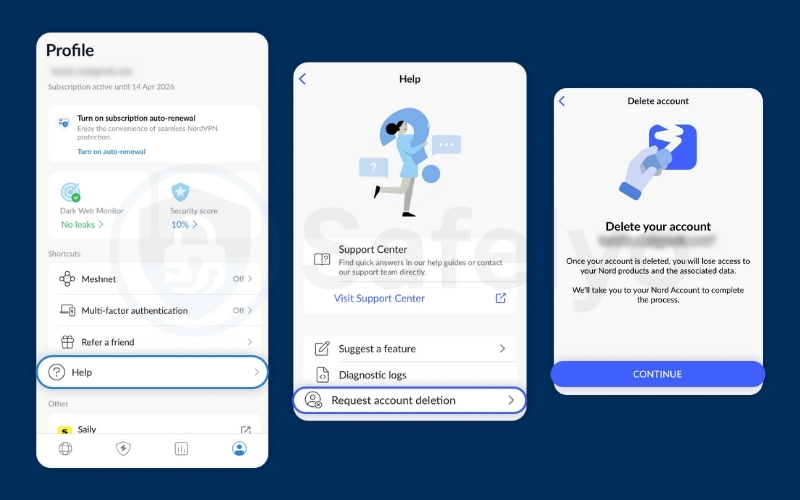
On the NordVPN mobile app:
- Open the NordVPN app and log in.
- Tap the Profile icon → Help → Request account deletion.
- Tap Continue — you’ll be redirected to your Nord Account to complete the process.
On the NordPass mobile app:
- Open the NordPass app and log in.
- Tap Profile → Settings → Delete account → Submit delete request.
- You’ll receive an email from Nord Account Support.
Follow the link provided in the email to access your Nord Account and complete the deletion.
On the NordLocker mobile app:
- Open the NordLocker app and log in.
- Go to Settings → Delete account.
- You’ll be redirected to the Account deletion request form in your mobile browser.
- Choose “Delete my account” from the dropdown menu, fill in the required fields, and click Submit.
1.3. Delete your NordVPN account by filling out the Account Deletion Request Form
If you cannot sign in to your Nord Account or face technical issues, you can manually request deletion using NordVPN’s official Account Deletion Request Form.
Steps:
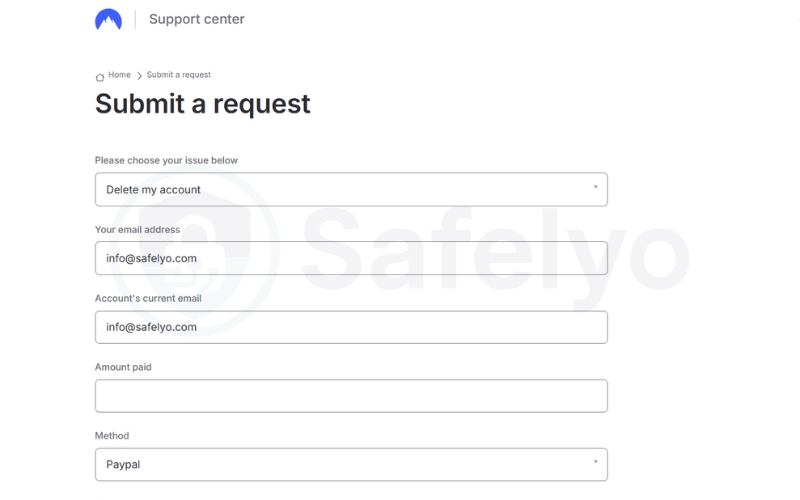
- Open the official Account Deletion Request Form (https://support.nordvpn.com/hc/en-us/requests/new).
- Choose “Delete my account” on the issue box.
- Fill in all required fields:
- Your email address: The email address to contact you.
- Account’s current email: The email address linked to your NordVPN account.
- Amount paid: The amount from your oldest available NordVPN payment.
- Payment method: The payment option used (e.g., credit card, PayPal).
- Payment date: The exact date of your oldest available payment.
- Do you have a NordPass or NordLocker account?: Indicate yes or no.
- Reason: Explain why you wish to delete your account.
- Description: (Optional) Add extra details or notes for the support team.
- Attachment (optional): Upload a screenshot or photo of your payment receipt to speed up verification.
- Click Submit to send your request.
Response time: NordVPN’s customer support team will contact you within 24 hours to confirm and guide you through the final deletion steps.
Read more:
2. What happens when you delete your Nord Account
When you delete your Nord Account, you remove every connected service such as NordVPN, NordPass, and NordLocker. The system treats them as one profile, so deleting the main account also removes access to all associated tools.
All personal data, login credentials, and saved payment information are permanently erased from Nord’s servers according to its data removal policy. Once completed, you can’t sign in again, restore files, or recover encrypted vaults.
Keep in mind that deleting an account doesn’t automatically cancel your active plan or trigger a refund. If you still have an active subscription, you’ll need to stop renewal or request a refund separately through your account or the support team before completing deletion.
3. Unsubscribe before deleting your NordVPN account
Before you remove your account, make sure your subscription is completely canceled so you won’t be charged again. Deleting an account without stopping renewal can lead to unexpected payments that are difficult to reverse later.
Start by signing in to your Nord Account and opening the Billing section. Look for the plan marked “Active” and turn Auto-Renewal off. This ensures the plan will not renew after its current billing cycle ends.
If you originally subscribed through the App Store or Google Play, open your device’s subscription settings and cancel NordVPN there as well. These mobile platforms handle payments separately, and deleting your Nord Account does not stop them automatically.
It is also a good idea to save your invoices or payment receipts from the dashboard. They serve as proof of purchase in case you need to request a refund or verify your payment history later.
For readers who want a complete walkthrough with screenshots for every device, visit my detailed tutorial here: How to unsubscribe from NordVPN
4. Optional: Clean up after deletion
After your Nord Account is deleted, it’s a good idea to remove all remaining NordVPN files and profiles from your devices. This step helps keep your system clean and ensures no background connections try to start again.
Start by uninstalling the NordVPN app from every device where it was installed. On Windows and macOS, use the built-in uninstall option from your system settings. On iOS or Android, hold the app icon and choose Remove App or Uninstall.
Next, check for any leftover VPN configurations.
- On Windows, open Network Connections and remove any TAP-NordVPN or NordLynx adapters.
- On macOS and iOS, go to Settings → VPN and delete any saved profiles.
- On Android, open Settings → Network & Internet → VPN and remove any profiles linked to NordVPN.
Finally, restart your device. This clears cached network data and ensures your system doesn’t try to reconnect to servers that no longer exist.
Cleaning up this way keeps your privacy settings tidy and prevents connection errors if you install another VPN later.
5. Troubleshooting common issues
Even when you follow all the steps correctly, a few issues can delay your NordVPN account deletion. Here’s how to solve the most common ones.
5.1. Didn’t receive the confirmation email
If the confirmation message doesn’t arrive, check your Spam or Junk folder first. Add NordVPN’s address to your safe senders list to ensure future emails reach your inbox.
If you still can’t find it, go back to your Nord Account, verify your registered email address, and resend the deletion request. In some cases, it can take several minutes for the account deletion confirmation email to appear.
5.2. Forgot your password
If you can’t log in to delete your account, click Forgot password? on the Nord login page and follow the reset link sent to your inbox. Once your new password is active, sign in again and restart the deletion process from Account settings.
5.3. Still charged after deletion
If you notice charges after deletion, check whether your subscription was canceled correctly.
- For direct website purchases, make sure Auto-Renewal was turned off before the last billing date.
- For App Store or Google Play subscriptions, open your device’s subscription settings to confirm the plan was canceled.
If charges continue, contact NordVPN Support and provide your transaction receipts. Keeping copies of your payment records will help them verify and resolve the issue faster.
These simple checks usually solve most deletion or billing problems without needing additional support steps.
6. FAQs about How to delete NordVPN account
Can I delete only NordVPN and keep NordPass?
No. Your Nord Account controls all Nord services together, including NordVPN, NordPass, and NordLocker. Deleting one means deleting access to all of them.
Can I recover my account later?
Once you confirm deletion, the process is permanent. NordVPN does not allow account recovery or data restoration after your Nord Account is removed.
Will I still be billed after deletion?
You won’t be billed if you canceled every active subscription before deleting your account. If a payment still goes through, check your App Store or Google Play settings to make sure the plan was stopped.
Can I re-register with the same email?
Yes. You can sign up again using the same email address, but it will create a completely new Nord Account with no previous data or settings saved.
7. Conclusion
To understand how to delete NordVPN account safely, start by canceling your active subscriptions, then sign in to your Nord Account, open Account settings, and choose Delete account. Confirm the request through the email NordVPN sends, and uninstall the app from all your devices to ensure a full and private removal.
When I tested this process myself, the deletion was quick once the email confirmation was clicked, and all linked services disappeared from the dashboard within a few hours. The key is to make sure your billing and app-store subscriptions are stopped before confirming deletion so that no unexpected charges occur.
By following these steps carefully, you can close your NordVPN account with confidence and ensure your personal data is erased securely.
For more practical guides on VPN privacy, subscriptions, and account management, explore the Tech How-To Simplified section at Safelyo.


