Trying to figure out how to disable McAfee antivirus? It might feel like a necessary evil, but having an antivirus that slows down your PC, blocks trusted programs, or bombards you with pop-ups is a problem you don’t have to live with.
In the world of cybersecurity, finding the right balance between robust protection and smooth system performance is essential. Your security software should work for you, not against you. Deciding to disable or switch from a program like McAfee is a critical step towards optimizing your computer’s health and usability.
As a tech expert who has tested dozens of antivirus suites over the years, I’ve frequently encountered the frustration users face with pre-installed or overly aggressive software. A security tool is only effective if it doesn’t hinder your daily tasks. This isn’t about being anti-security; it’s about choosing smarter security.
In this comprehensive guide, you’ll discover:
- The common reasons why you might need to turn off McAfee.
- How to temporarily disable its features without uninstalling.
- The correct way to completely uninstall it from Windows and Mac for a clean slate.
- Top-rated, lightweight alternatives to install immediately for better protection.
Your device’s performance and security are too important to compromise. Let me guide you through every step to take back control.
1. Why you might need to turn off McAfee
If you’re searching for how to disable McAfee, chances are you have a very good reason. Don’t worry, you’re not alone. While it aims to protect you, sometimes its methods can be a bit… overzealous. This can lead to some common and genuinely frustrating issues that make users want to reach for the “off” switch.
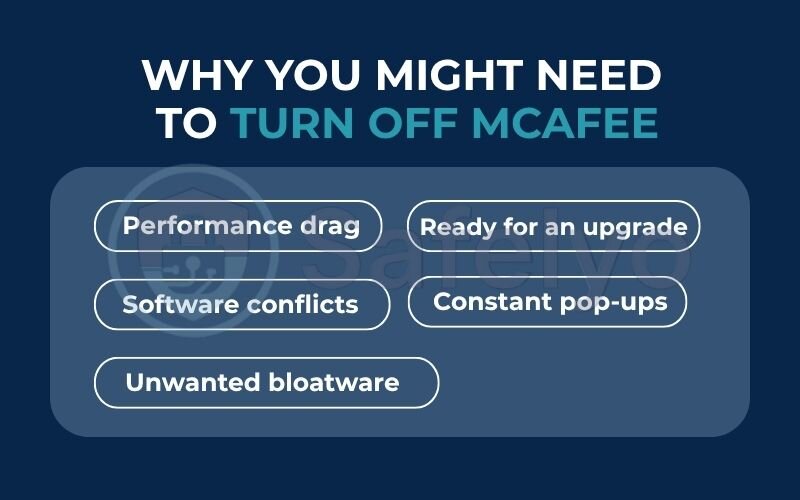
Here are the most common reasons you might be looking for a solution:
- Performance drag: It’s hogging your system resources, making everything from booting up to opening applications feel sluggish. You’ve probably noticed McAfee slowing down your computer.
- Software conflicts: A critical program, a piece of work software, or a new game you’re excited to play won’t install or run correctly because McAfee’s firewall or real-time scanner mistakenly flags it as a threat.
- Constant pop-ups: You’re simply tired of the endless stream of notifications, scan alerts, and upsell attempts. You just want to figure out how to stop McAfee pop-ups.
- Unwanted bloatware: You suspect it’s just bloatware that came pre-installed on your new PC or laptop, and you never really asked for it in the first place.
- Ready for an upgrade: You’ve decided it’s time to switch to a better McAfee alternative that provides more effective protection without the performance hit.
From my own experience, I’ve had to temporarily disable McAfee’s firewall just to get essential work software, like a local development server, to run without being blocked. It’s a classic case of an overly aggressive firewall mistaking safe traffic for a threat.
Whatever your reason, you’ve come to the right place for a solution.
Read more:
2. A crucial warning: Don’t leave your device unprotected
Before we touch a single setting, let’s be crystal clear about something. Disabling your antivirus, even for a few minutes, is like leaving your front door wide open while you run to the mailbox. It’s probably fine, but it’s a risk.
I have a golden rule I always follow and advise friends on: if your computer’s protection is off, your internet connection must be off too. That means disconnecting from Wi-Fi and unplugging any network cables. This creates a secure “air gap,” ensuring no online threats – like sneaky malware, file-locking ransomware, or phishing scams – can get in while the guard is down.
This is especially true if you plan to permanently uninstall McAfee. Having a reliable replacement ready to install the moment McAfee is gone isn’t just a good idea; it’s the most important step to keep your digital life secure.
3. How to temporarily disable McAfee features (without uninstalling)
If you just need to install a trusted program, run a specific application, or stop a feature for a moment, this is the section for you. You don’t need to uninstall the entire suite to get things working.
These steps apply to the most common versions of McAfee’s consumer software, such as McAfee Total Protection and McAfee LiveSafe. The interface is nearly identical across these products on Windows and macOS, so you should feel right at home.
3.1. On Windows (10 & 11)
Let’s walk through disabling the two most common culprits: the Real-Time Scanner and the Firewall.
- Open the McAfee Dashboard. The easiest way is to find the McAfee shield icon in your system tray (the small icons on the bottom-right of your screen). Right-click it and select “Open McAfee.” If you can’t see it, just search for “McAfee” in your Start Menu.
- Navigate to Protection Settings. On the main screen, look for a cog icon (⚙️) or a tab labeled “My Protection.” Click it. This will take you to the central security settings.
- Turn Off the Feature You Need:
- To disable Real-Time Scanning: Look for an option that says “Real-Time Scanning.” Click on it. You will see a prominent “Turn Off” button.
- Simple Example: This is the setting you’d likely disable if you’re trying to install a legitimate piece of software (like a game or a development tool) that McAfee keeps mistakenly blocking during the installation process.
- To turn off the Firewall: Go back to the main protection menu and find the “Firewall” option. Click it, and you’ll find another clear “Turn Off” button.
- Simple Example: You might need to do this if a multiplayer game is failing to connect to its online server, or if a streaming device on your home network can’t be found by your PC.
- To disable Real-Time Scanning: Look for an option that says “Real-Time Scanning.” Click on it. You will see a prominent “Turn Off” button.
- Choose a time limit. After clicking “Turn Off,” McAfee will wisely ask you for how long you want to disable the feature (e.g., 15 minutes, 1 hour, or until restart). Choose the shortest time you need to complete your task.
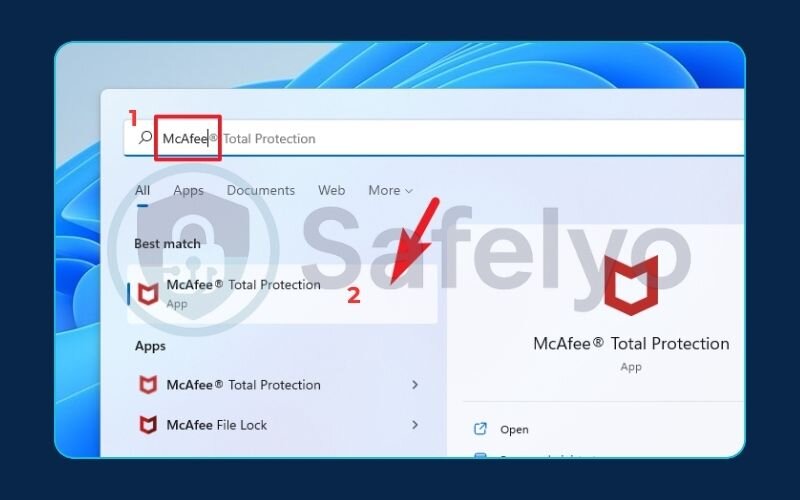
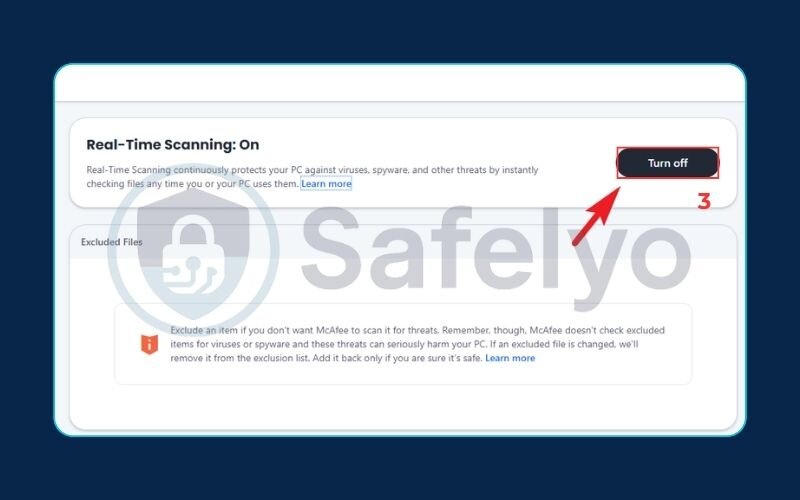
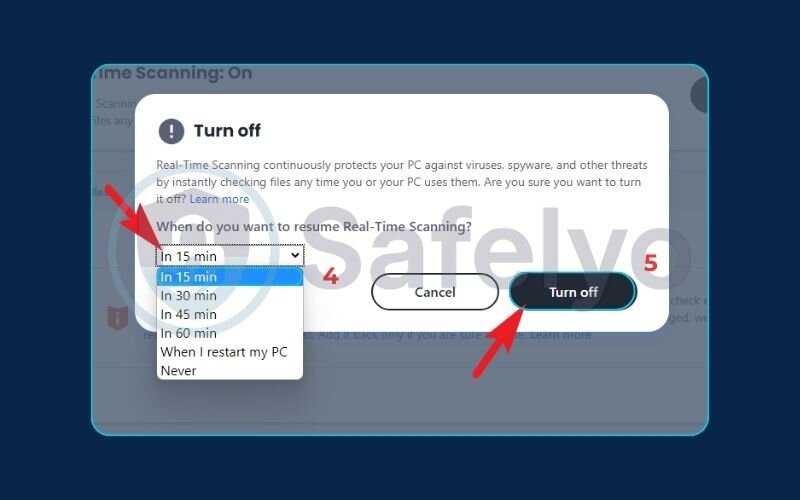
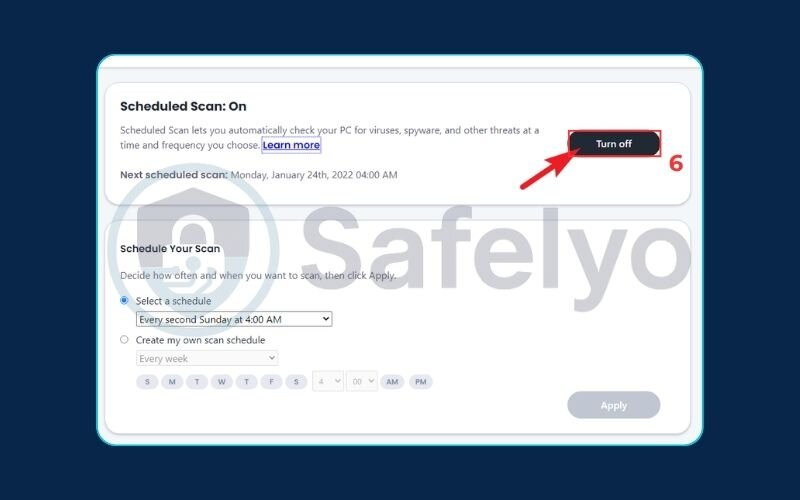
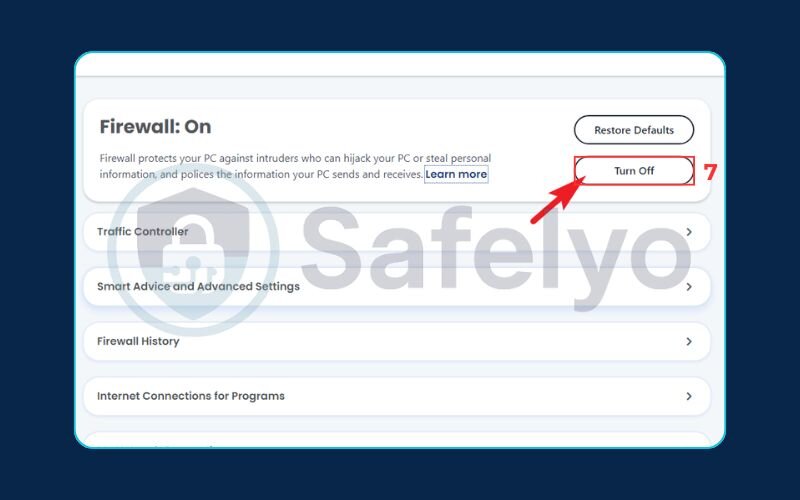
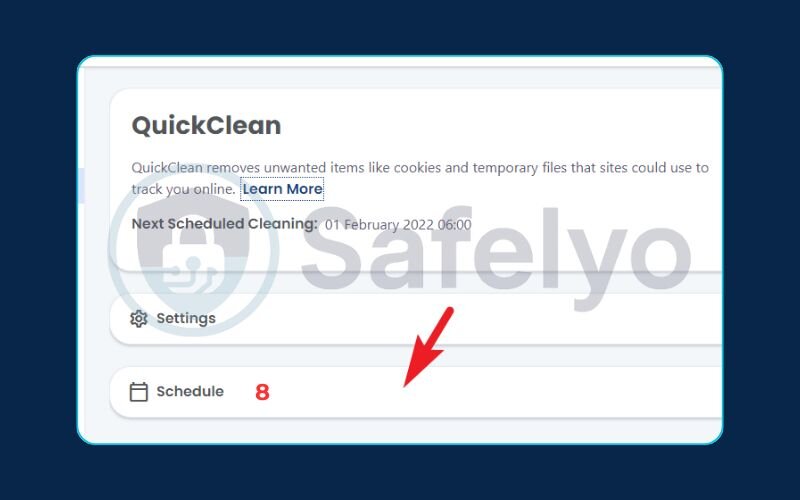
Remember to turn the feature back on once you’re done, or simply restart your computer to ensure you’re protected again.
3.2. On macOS
For Mac users, the process is just as straightforward, though the interface looks a bit different. The core features you’ll likely need to disable are the same.
- Open the McAfee Application. Click the McAfee shield icon in the top menu bar (near your Wi-Fi and battery indicators). From the dropdown, select “McAfee [Your Product Name] Console,” for example, “McAfee LiveSafe Console.”
- Access Security Settings. Inside the console, look for tabs or icons related to security. They are typically labeled “Mac Security” or “Home.”
- Disable the Specific Feature:
- To disable Real-Time Scanning: Click on the “Real-Time Scanning” option. You’ll likely see a padlock icon at the bottom of the window. You must click the padlock and enter your Mac’s password to make changes. Once unlocked, you can use the toggle switch to turn Real-Time Scanning Off.
- Simple Example: I’ve had to do this when using specialized design software that McAfee incorrectly flagged as suspicious simply because it wasn’t a mainstream application.
- To turn off the Firewall: Go to the “Firewall” tab. Again, you will probably need to click the padlock and authenticate. After that, a simple toggle or button will allow you to turn the firewall Off.
- Simple Example: This is a common step if you’re setting up a home media server (like Plex) and your Mac isn’t allowing other devices on your network to connect to it.
- To disable Real-Time Scanning: Click on the “Real-Time Scanning” option. You’ll likely see a padlock icon at the bottom of the window. You must click the padlock and enter your Mac’s password to make changes. Once unlocked, you can use the toggle switch to turn Real-Time Scanning Off.
Just like on Windows, McAfee will likely ask for a duration. Always choose the shortest time necessary and remember to re-enable the protection when you’re finished.
3.3. How to disable McAfee WebAdvisor
McAfee WebAdvisor is the browser extension that’s supposed to protect you from malicious websites, but sometimes it can be overly cautious, blocking safe sites or slowing down your browsing. Here’s how to quickly turn it off.
- Open your browser’s extensions page. This is the simplest way to manage it.
- On Chrome: Type chrome://extensions into your address bar and press Enter.
- On Firefox: Type about:addons into your address bar and press Enter.
- On Microsoft Edge: Type edge://extensions into your address bar and press Enter.
- Find McAfee WebAdvisor. Scroll through the list of your installed extensions until you see “McAfee WebAdvisor” or a similar name.
- Disable or Remove it.
- To temporarily disable it: Simply click the blue toggle switch next to the extension’s name. It will turn grey, indicating it’s inactive.
- To permanently remove it: Click the “Remove” button. Your browser will ask for confirmation. Click “Remove” again.
MY PERSONAL TAKE:
Unless you find WebAdvisor genuinely useful, I recommend removing it entirely. Modern browsers like Chrome and Firefox already have excellent built-in protection against malicious sites (like Google Safe Browsing), and removing unneeded extensions is a great way to speed up your browser and improve privacy.
4. How to completely uninstall McAfee from your device
If you’re done with temporary fixes and want to reclaim your system resources for good, it’s time to uninstall McAfee completely. This is the best option if you’re planning to switch to a new antivirus or simply don’t want McAfee on your computer anymore.
The following instructions are designed for popular versions like McAfee Total Protection, McAfee LiveSafe, and other consumer suites that often come pre-installed on new computers.
IMPORTANT: Your computer will be vulnerable
Once you uninstall McAfee, your computer is exposed to online threats. We’ve prepared a section with top-rated, lightweight alternatives ready for you to install immediately.
4.1. Uninstalling McAfee on Windows (2 methods)
For Windows users, there are two ways to do this: the standard way and the “make sure it’s really gone” way. I almost always recommend the second method.
This is the basic method and works most of the time.
- Open Settings on your PC. You can do this by pressing the Windows key + I.
- Go to the “Apps” section, and then click on “Apps & features.”
- Scroll through the list until you find your McAfee product (e.g., “McAfee LiveSafe”).
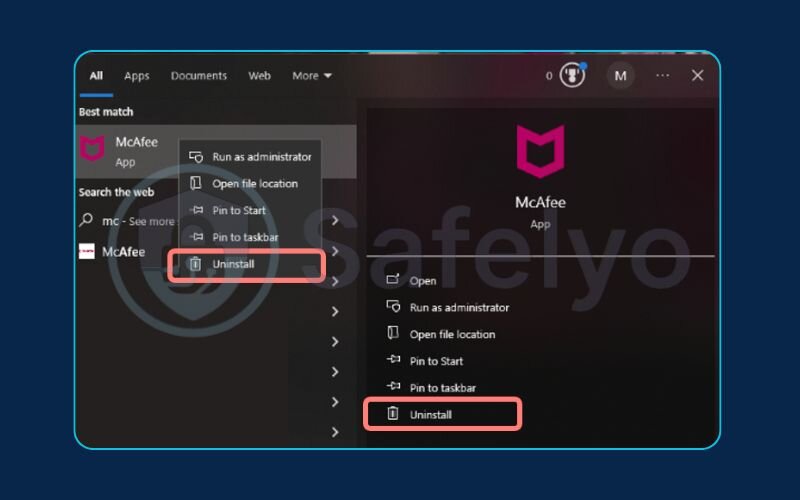
- Click on it, and then click the “Uninstall” button. A confirmation pop-up will appear; click “Uninstall” again.
- The McAfee uninstaller will launch. Follow the on-screen prompts, which usually involve checking a couple of boxes and clicking “Remove” one last time.
Sometimes, the standard uninstall process can leave behind junk files, registry entries, and hidden folders. I’ve seen these leftovers cause conflicts when installing a new antivirus later. The McAfee Consumer Product Removal (MCPR) tool is the official utility designed to wipe every last trace of McAfee from your system.
This is the method I strongly recommend.
- Download the MCPR tool. Go to McAfee’s official download page and get the latest version of the tool. Always download it directly from McAfee to ensure you’re getting a safe, legitimate file.
- Run the tool. Double-click the MCPR.exe file you downloaded. You may need to right-click and select “Run as administrator.”
- Agree and Validate. Click “Next” on the welcome screen. Then, agree to the License Agreement. The tool will show you a security validation screen. Type the characters exactly as they appear in the box and click “Next.”
- Let it work. The tool will now scan your system and remove all McAfee components. This can take several minutes. Don’t be alarmed if your screen flickers or things seem to be busy; that’s normal.
- Restart your computer. Once finished, the tool will prompt you with a “Removal Complete” message and ask you to restart. This is a crucial step, as it finalizes the removal of any files that were in use. Click “Restart” to finish the job.
After your PC reboots, McAfee will be gone for good.
4.2. Uninstalling McAfee on macOS
Removing applications on a Mac can sometimes be as simple as dragging them to the Trash, but for an antivirus, we need to be more thorough.
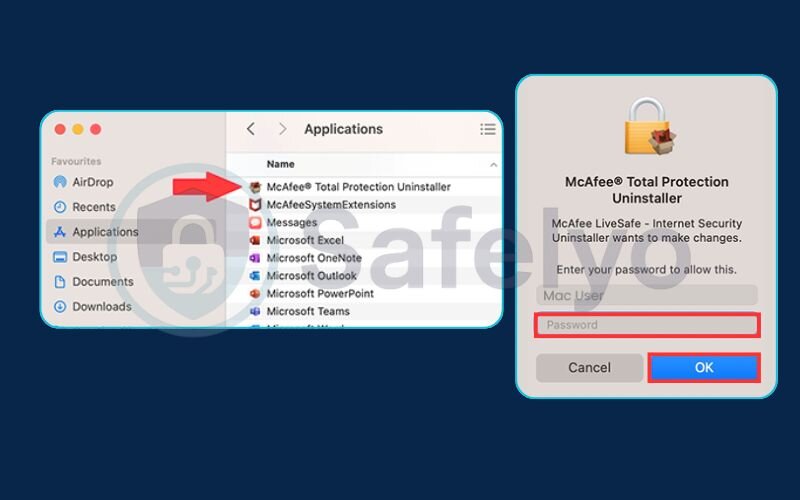
- Look for the Official Uninstaller first. This is the safest and most complete method. Open your “Applications” folder in Finder. Look for a McAfee folder or an application named something like “McAfee Uninstaller.”
- If you find it, double-click to run it. It will guide you through the process, which usually requires you to enter your Mac’s password to authorize the removal.
- If you can’t find an uninstaller… The next step is to drag the main McAfee application to the Trash. Go to your “Applications” folder, find the McAfee app (e.g., McAfee LiveSafe), and drag its icon to the Trash icon in your Dock.
- Empty the Trash. Right-click the Trash icon and select “Empty Trash” to finalize the basic removal.
BONUS TIP FROM PERSONAL EXPERIENCE
Dragging an antivirus to the Trash on a Mac often leaves behind configuration files and system helpers. For a truly clean system, I always recommend a quick manual check.
- Open Finder, click “Go” in the top menu bar, then select “Go to Folder…”
- Enter ~/Library/Application Support/ and look for any McAfee or related folders to delete.
- Do the same for ~/Library/Preferences/ and look for any files that start with com.mcafee.
Deleting these leftovers ensures no junk files are cluttering your Mac and prevents potential issues down the road.
4.3. Optional but recommended: Post-uninstall checkup
Okay, McAfee is gone. Before you do anything else, I strongly recommend this quick 2-minute “health check.” This is the first thing I do on any PC after removing a third-party antivirus to make sure the system’s own defenses are back online. This section is primarily for Windows users.
- Restart your computer. This step is non-negotiable. It’s not just about turning it off and on; a reboot finalizes the removal of locked files and lets the operating system take back control of security functions.
- Check that Windows Defender is now active. Once McAfee is gone, Windows’ built-in security should automatically take over. Here’s how to be sure:
- Open your Start Menu and type “Windows Security.” Open the app.
- Click on “Virus & threat protection.”
- You should see a big green checkmark and the message “No action needed.” Under “Who’s protecting me?”, it should say “Microsoft Defender Antivirus.” If you see that green check, you have a solid baseline of protection.
- Run Windows Update. Go to Settings > Update & Security > Windows Update and click “Check for updates.”
- Simple Explanation: This isn’t just for general system updates. This step specifically downloads the very latest virus definitions for Microsoft Defender, ensuring your newly activated protection is as up-to-date as possible.
Once you’ve done this, you can be confident your system is clean from McAfee and has its foundational security back in place. Now, let’s find you something better.
>> Read more:
5. Your PC is now vulnerable: Top 3 McAfee alternatives
Now that you’ve successfully removed McAfee, your device is exposed. It’s crucial to install a new, reliable antivirus immediately. The good news is that there are fantastic options that provide superior protection without bogging down your system.
Based on Safelyo’s extensive testing, we’ve found that the best McAfee alternatives excel in three key areas: near-perfect malware detection, minimal impact on PC performance, and a user-friendly interface.
Here’s a quick comparison of our top-rated choices:
| Antivirus | System Impact | Key Strength | Best For |
|---|---|---|---|
| Bitdefender | Very Low | Industry-leading malware detection | The best overall protection |
| TotalAV | Low | Extremely easy to use & fast scans | Beginners & performance focus |
| Norton 360 | Low-to-Medium | All-in-one security suite with extras | Users wanting total security in one package |
Let’s look at why we recommend each one.
5.1. Bitdefender Total Security: Best overall protection
If you want the strongest protection available that you can install and forget about, Bitdefender is your answer. In our tests, and in reports from independent labs like AV-Test, Bitdefender consistently scores perfect or near-perfect marks for detecting all types of malware, including brand-new threats.
What I love most about it is that it achieves this without slowing your computer down. Its “Autopilot” feature makes smart security decisions for you in the background. It’s the antivirus I recommend to tech-savvy friends who want maximum security with minimum fuss.
>> Read Safelyo’s Full Bitdefender Review
5.2. TotalAV Antivirus Pro: Best for ease of use and performance
Is your main reason for ditching McAfee that it was slow and complicated? Then you will love TotalAV. Its dashboard is incredibly clean, modern, and intuitive. Everything is clearly labeled, making it perfect for users who don’t want to dig through complex menus.
Beyond its simplicity, TotalAV is remarkably lightweight. During our performance tests, it had one of the lowest impacts on system speed during scans. If you want solid protection that feels fast and is genuinely easy to navigate, TotalAV is an outstanding choice.
>> See TotalAV‘s Latest Deals
5.3. Norton 360: Best comprehensive security suite
Norton 360 is more than just an antivirus; it’s a full security package. This is the ideal choice if you want to consolidate your digital protection under one subscription. Alongside its top-tier antivirus engine, a standard plan gives you a secure VPN, a password manager, and cloud backup storage.
I often recommend Norton 360 to family members who want a simple, all-in-one solution. Instead of paying for three or four separate services, they get everything they need to stay safe online in a single, trusted application. It offers incredible value for the number of features you get.
>> Explore Norton 360 Packages
6. FAQ about how to disable McAfee antivirus
Here are quick answers to some of the most common questions we see about managing McAfee.
How do I disable McAfee antivirus?
You have two main options covered in this guide. You can temporarily disable specific features like the firewall via the McAfee dashboard, or you can completely uninstall it using your operating system’s settings. For the cleanest removal on Windows, we recommend the official McAfee Removal Tool.
How do I temporarily disable antivirus software?
Open the McAfee dashboard, navigate to the specific protection feature you want to pause (like “Real-Time Scanning” or “Firewall”) and click the “Turn Off” button. McAfee will ask you to set a time limit for how long it stays off.
How do I cancel McAfee antivirus?
Canceling is a two-step process. First, log in to your account on the McAfee website to manage your subscription and turn off auto-renewal. Second, follow the steps in this guide to completely uninstall the software from your computer to stop it from running.
How do I turn off McAfee in the background?
To stop McAfee from actively running in the background, you must either temporarily disable its Real-Time Scanning or, for a permanent solution, uninstall the program entirely. There is no simple “pause” button for the whole application.
Is it safe to disable McAfee?
It’s safe only if you do it temporarily for a specific task and are cautious online (or disconnected from the internet). If you uninstall it permanently, you must install a replacement antivirus immediately to stay protected from threats.
Will uninstalling McAfee speed up my computer?
In many cases, yes. McAfee is known to be resource-heavy. Removing it and replacing it with a more lightweight antivirus like TotalAV or Bitdefender can significantly improve your PC’s performance, especially startup time.
Is Windows Defender good enough after I remove McAfee?
Windows Defender provides solid, baseline protection and is much better than having nothing. However, top-tier paid antivirus suites like Bitdefender or Norton offer higher malware detection rates, more advanced features like ransomware protection, and dedicated customer support.
Why can’t I uninstall McAfee?
Standard uninstallation can fail due to corrupted files or permissions issues. If this happens, using the official McAfee Removal Tool (MCPR), as detailed in our guide, is the most effective solution to guarantee a complete and clean removal.
7. Conclusion
By following this guide, you now have full control over how to disable McAfee antivirus, whether for a moment or for good. You’ve learned how to handle temporary conflicts and how to perform a clean uninstallation, freeing up your system for better performance.
Here are the most important things to remember:
- You can temporarily disable features like the firewall and real-time scanning for specific tasks without uninstalling the whole program.
- For a truly clean removal on Windows, the McAfee Removal Tool (MCPR) is your most reliable option, deleting all leftover files.
- Most importantly, never leave your computer unprotected. The moment one antivirus is gone, another one must be ready to take its place.
Choosing the right antivirus is a key part of maintaining your digital privacy and security. Don’t settle for a program that slows you down or gets in your way. Take the next step in securing your digital life and explore the comprehensive Antivirus reviews from Safelyo to find a solution that is powerful, lightweight, and perfectly suits your needs.

