Enabling two factor authentication (2FA) is one of the easiest and most effective ways to secure your Gmail account. If you’ve ever worried about someone gaining access to your inbox, contacts, or sensitive emails, adding a second layer of protection can give you peace of mind. Whether you’re a casual user or rely on Gmail for work, this guide will show you how to enable two factor authentication Gmail using step-by-step instructions.
In this definitive guide, you’ll discover:
- How to enable two factor authentication Gmail on both PC and mobile devices
- Why turning on 2FA adds essential protection to your Gmail account
- How to disable 2FA safely if you need to
- Useful tips for managing your 2FA settings
- Answers to the most frequently asked questions about Gmail 2FA
By the end of this article, you’ll be able to take full control of your Gmail account security and avoid unnecessary risks. Keep reading to get started.
1. What is two factor authentication (2FA) in Gmail
Two factor authentication is a security process that adds a second verification step when you log in to your Gmail account. Instead of just entering your password, you’ll also confirm your identity using another method such as a text message, an app prompt or a physical security key. This makes it much harder for hackers to gain access, even if they have your password.
2. How to enable two factor authentication in Gmail
Setting up 2FA is quick and straightforward. Follow the steps below to secure your account.
2.1. On computer (PC)
Here’s how to enable two factor authentication Gmail using your computer. Setting it up on desktop is quick and straightforward, giving you immediate access to Google’s strongest account protection tools.
Sign in to your Gmail account
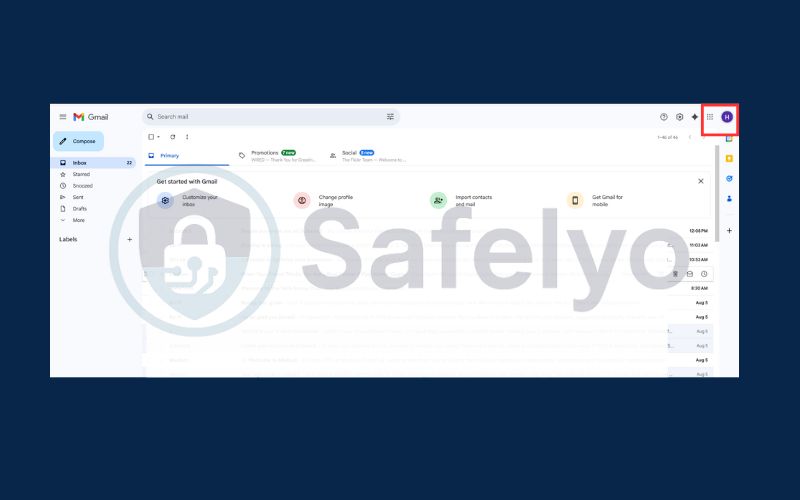
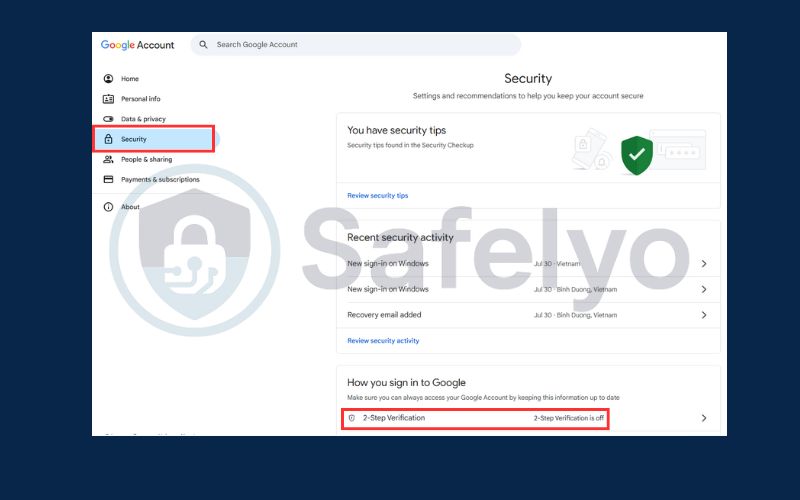
Go to your Manage your Google Account
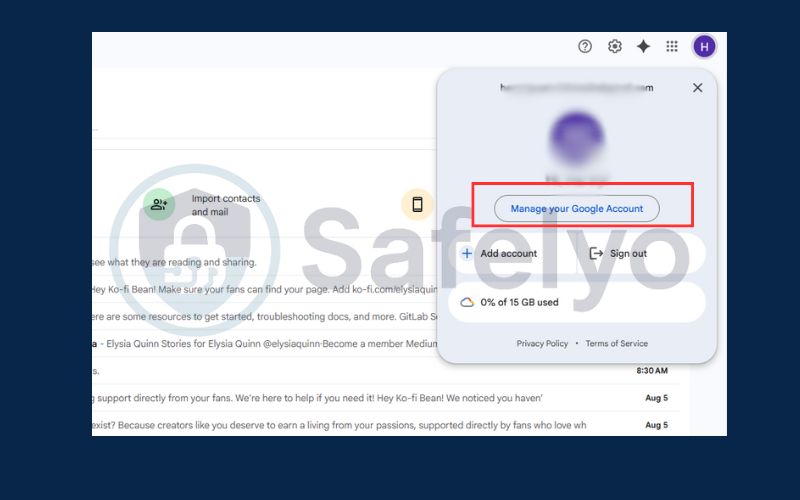
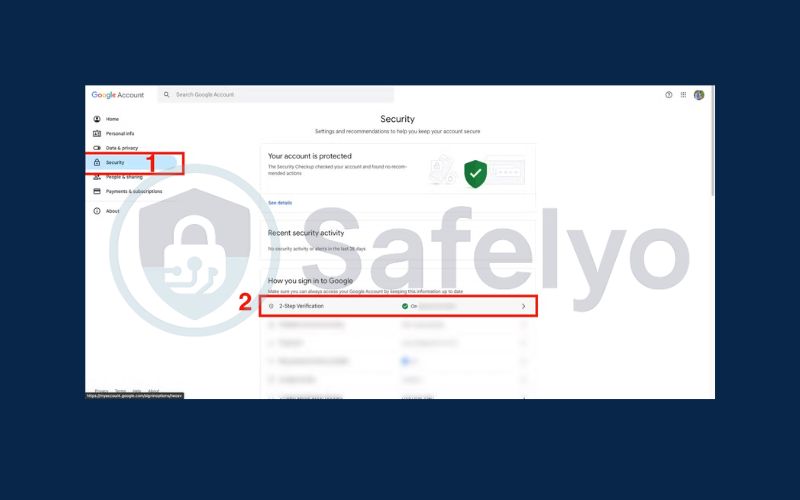
Click on the Security tab. Find and select 2-Step Verification
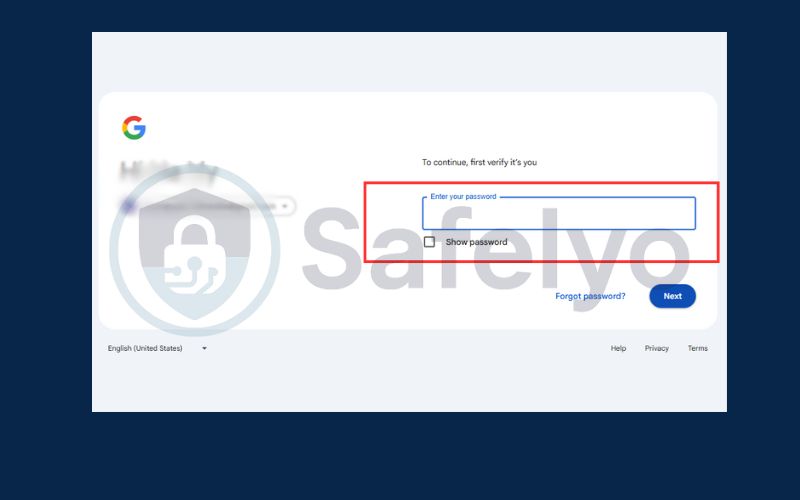
Enter your password
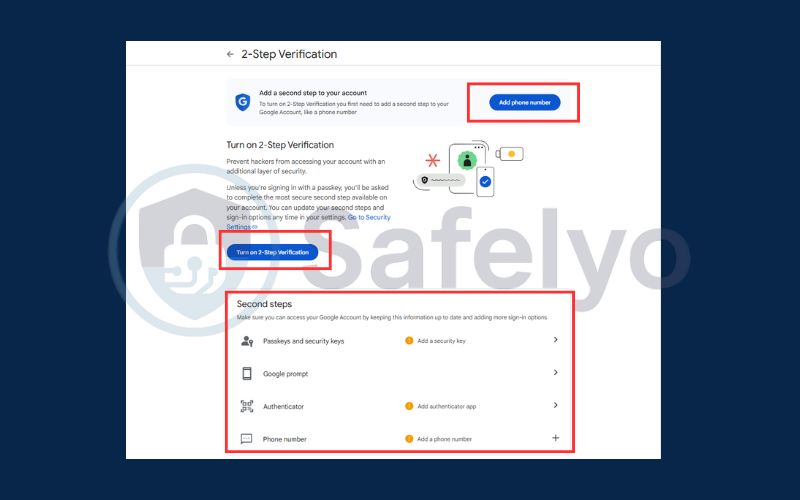
Follow the on-screen instructions to active 2FA in Gmail
2.2. On mobile (Android/iOS)
If you prefer managing your email from your phone, you can still learn how to enable two factor authentication Gmail directly on your Android or iOS device. The process is similar to the desktop version, but everything is handled through the Gmail app for convenience and speed.
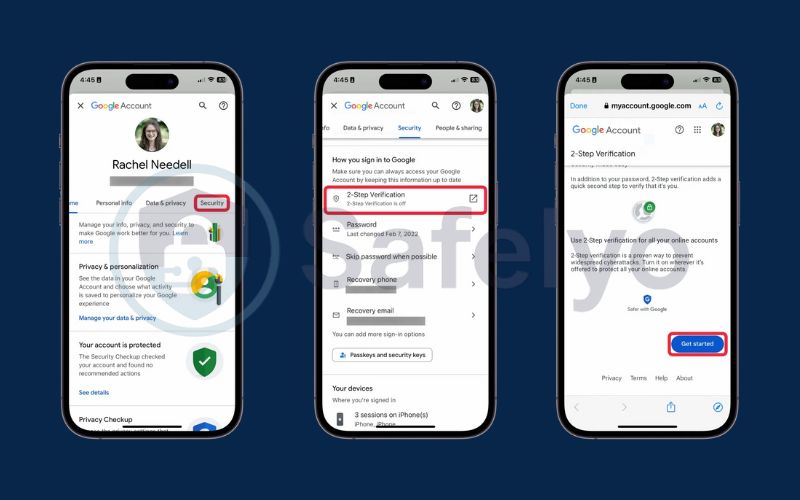
Open the Gmail app. Tap your profile picture then Manage your Google Account
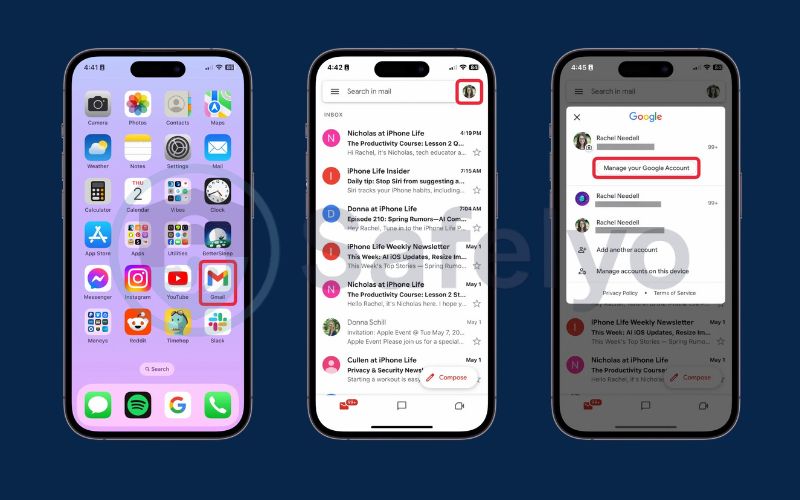
Go to the Security tab. Tap on 2-Step Verification and then Get Started
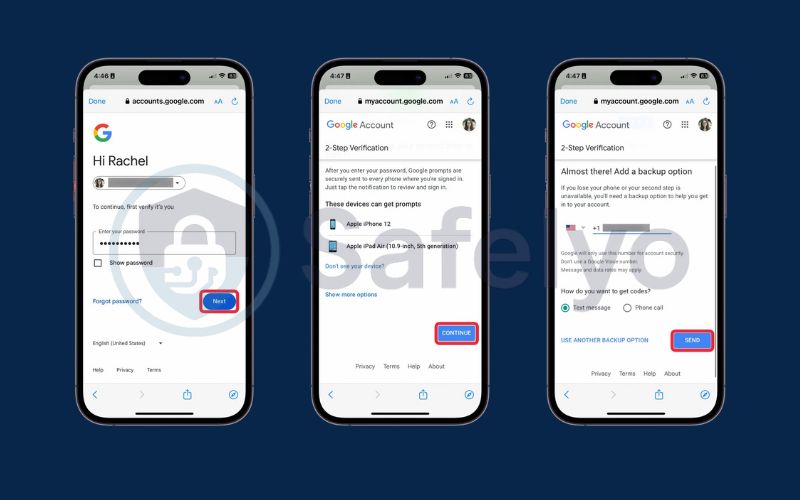
Enter your password. Then choose Continue. Enter your phone number and click Send to get code
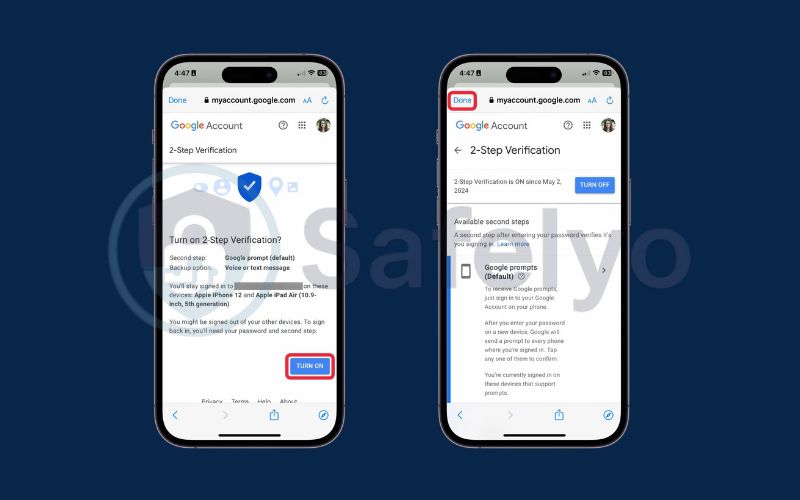
Click Turn On to active the 2FA in Gmail and click Done to finish
3. Why enable two factor authentication on Gmail
Using only a password leaves your Gmail account vulnerable to hacking, especially if the password is weak or reused across sites. When you enable two factor authentication Gmail, you add an essential safeguard that helps prevent unauthorized access and better protects your emails, contacts, and personal information.
Here are some of the key reasons to enable 2FA:
- It protects your Gmail account even if someone steals your password
- It adds an extra layer of security through verification methods like Google Prompt or an authenticator app
- It helps you defend against phishing attacks and unauthorized sign-ins
- It gives you peace of mind knowing that your emails and personal data are more secure
- It’s a recommended security step by Google and cybersecurity experts. When you enable two factor authentication Gmail, you add an essential safeguard that helps prevent unauthorized access and better protects your emails, contacts, and personal information.
Read more:
4. How to disable two factor authentication in Gmail
There may be times when you need to turn off 2FA, but it’s important to know the risks involved. Disabling this feature reduces your account’s protection level.
- Sign in to Gmail using your browser.
- Go to your Google Account and open the Security tab.
- Click on 2-Step Verification.
- Scroll down and select Turn off.
- Confirm your decision to disable 2FA
5. Tips for managing your two factor settings
Once you’ve activated 2FA, it’s a good idea to fine-tune your settings to avoid any future lockouts or problems. You can take a few additional steps to stay protected.
- Save your backup codes somewhere safe so you can use them if needed.
- Add a recovery phone number to receive codes if your main method fails.
- Migrate your authenticator app before switching to a new phone.
- Use backup methods or Google’s recovery options if you lose access to your device.
Discover:
6. FAQs: how to enable two factor authentication Gmail
Setting up two factor authentication can raise some common questions, especially if you’re new to account security or managing multiple devices. In this section, we’ll answer frequently asked questions to help you better understand how to enable two factor authentication Gmail and manage it effectively.
Do I need a smartphone to use 2FA on Gmail?
No, a smartphone is not strictly required to set up two-factor authentication on Gmail. You can use backup codes or a physical security key as alternatives if a mobile device is not available.
Is two-factor authentication required for Gmail?
Two-factor authentication is optional, but it is strongly recommended for better account security. Enabling it helps reduce the risk of unauthorized access even if your password is compromised.
What if I lose access to my second step?
If you lose access to your second verification method, you can still regain your Gmail account using backup codes or your recovery email and phone. Google also offers a recovery process for verifying your identity.
Can I disable 2FA later if I change my mind?
Yes, you can turn off two-factor authentication anytime from your Google Account security settings. However, disabling it will reduce your account’s protection, so proceed with caution.
7. Conclusion
Learning how to enable two factor authentication Gmail is one of the most effective ways to strengthen your email security. By requiring both a password and a second form of verification, you make it much harder for hackers to gain access to your account. Enabling this feature not only helps you stay protected from phishing and identity theft but also gives you peace of mind knowing your sensitive information is better secured.
Here’s what you should remember:
- How to enable two-factor authentication on Gmail is easy and can be done on a PC or mobile device
- It protects your inbox even if your password gets leaked
- Managing backup codes and recovery options helps avoid future issues
If you want to stay in control of your digital security, enabling two-factor authentication is a great place to start. For more practical, easy-to-follow tech tutorials, visit the Tech How-To Simplified category on Safelyo, where we help you make smarter choices online.


