Trying to run a secure VPN and a Plex media server on the same machine often feels like an impossible task. You turn on your VPN for privacy, only to see Plex throw up that dreaded “indirect connection” error, effectively locking your friends and family out of your library. The solution is knowing exactly how to set up split tunnel VPN for Plex – a feature that lets you have the best of both worlds.
As someone who has spent countless hours perfecting my own home media setup at Safelyo, I know that feeling of frustration. It’s that one final technical hurdle standing between you and a flawless, secure streaming experience. The good news is that the fix is simpler than you think, and it doesn’t require complex network commands.
This guide is designed to get you past that hurdle for good. We’ll show you:
- Why does this conflict between your VPN and Plex happen in the first place?
- The one critical file you need to identify before you start.
- Step-by-step instructions with screenshots for top VPNs like NordVPN, ExpressVPN, and Surfshark.
- How to verify your setup and troubleshoot common issues.
It’s time to stop choosing between security and streaming. Let Safelyo walk you through the simple steps to make your VPN and Plex work together in perfect harmony.
1. Why do you need split tunneling for Plex?
The fundamental problem lies in how a VPN and Plex remote access work – they have opposite goals. When you connect to a VPN, it creates a secure, encrypted tunnel for your internet connection. Every single piece of data from your computer is routed through this tunnel to a remote server, masking your real IP address with the VPN IP address of that server. This is fantastic for privacy and security.
However, think of your Plex Media Server as a lighthouse. For your friends and family to access your library from their homes, Plex needs to broadcast its true location: your home’s public IP address. When your VPN is active, your entire computer, including Plex, is broadcasting from the VPN server’s location. To the outside world, it looks like your Plex server is in another city or even another country, making it impossible for remote users to find and connect to it directly.
This is where split tunneling enters as the perfect solution. Split tunneling acts like a smart traffic controller for your internet connection. It allows you to choose exactly which apps use the secure VPN tunnel and which apps can bypass the VPN to connect directly to the internet. By telling your VPN to exclude Plex Media Server, you allow it to use your regular internet connection and broadcast your correct home IP address. Meanwhile, all your other activities – like browsing, downloading, or gaming – remain securely encrypted.
In short, you get to keep your browsing private while ensuring your movie night for friends and family goes off without a hitch.
2. Before you start: Key requirements for a flawless setup
Before you dive into your VPN’s settings, a little prep work will save you a lot of headaches. Think of this as your pre-flight checklist. Getting these three things right is the key to a smooth and successful setup.
- A VPN that actually has split tunneling. This might sound obvious, but not all VPNs offer this feature. It’s typically considered a premium feature, so you’re unlikely to find it on free services. Also, be aware that some providers only offer it on specific platforms, most commonly Windows and Android.
- The right type of split tunneling. Most providers that offer this feature use app-based split tunneling, which is exactly what we need. This lets you select an entire application (like Plex) to bypass the VPN. A less common type is URL-based split tunneling, which only excludes specific websites and won’t work for this purpose.
- The correct Plex application file. This is the single most important detail, and it’s where most people go wrong. Your computer likely has two “Plex” apps: Plex.exe (the desktop player for watching content) and Plex Media Server.exe (the background server that manages your library). You must exclude Plex Media Server.exe. If you exclude the wrong one, the setup simply won’t work.
From my experience at Safelyo, confusing these two files is the number one cause of troubleshooting frustration. To find the right one on a standard Windows installation, look in this folder: C:\Program Files (x86)\Plex\Plex Media Server\.
Don’t have a VPN with split tunneling yet?
For any serious Plex user, split tunneling isn’t just a nice-to-have feature – it’s essential. If your current VPN doesn’t offer it, it might be time for an upgrade. Based on our hands-on testing, ExpressVPN offers one of the most reliable and user-friendly split tunneling features available.
>> Check out our full review of the Best VPNs for Plex here
3. How to set up split tunnel VPN for Plex (step-by-step guides)
Now for the practical part. We’ll walk you through the exact steps for three of the most popular VPNs that offer split tunneling. While the interface for each app is slightly different, the core logic is the same. Just follow the guide for your specific provider.
Quick guide: The general steps
- Open your VPN app’s settings.
- Find the split tunneling feature (it may be called something else, like “Bypasser”).
- Choose the option to exclude specific apps from the VPN connection.
- Click “Add app” and manually browse to find and select Plex Media Server.exe.
- Save your settings and reconnect the VPN.
3.1. Setting up with NordVPN
NordVPN makes this process straightforward with its clearly labeled split tunneling feature.
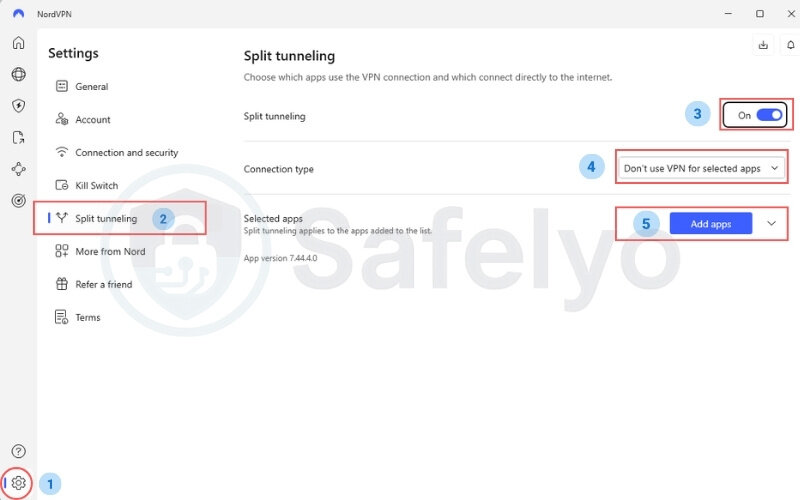
- Open the NordVPN app and click the gear icon in the bottom-left corner to open Settings.
- Select the Split tunneling tab from the left-hand menu.
- Turn the feature on. You’ll be presented with two options. We recommend choosing Disable VPN for selected apps, as it’s generally easier to manage. This means the VPN will be on for everything except the apps you add to the list.
- Click the Add apps button.
- A new window will open. If you don’t see Plex Media Server in the list, click Browse and navigate to its installation folder (usually C:\Program Files (x86)\Plex\Plex Media Server\). Select Plex Media Server.exe and add it.
- Once added, close the settings, connect to your desired VPN server, and you’re all set.
3.2. Setting up with ExpressVPN
ExpressVPN’s split tunneling is a powerful and reliable feature, easily accessible from its options menu.
- Open the ExpressVPN app and click the hamburger menu (☰) in the top-left corner, then select Options.
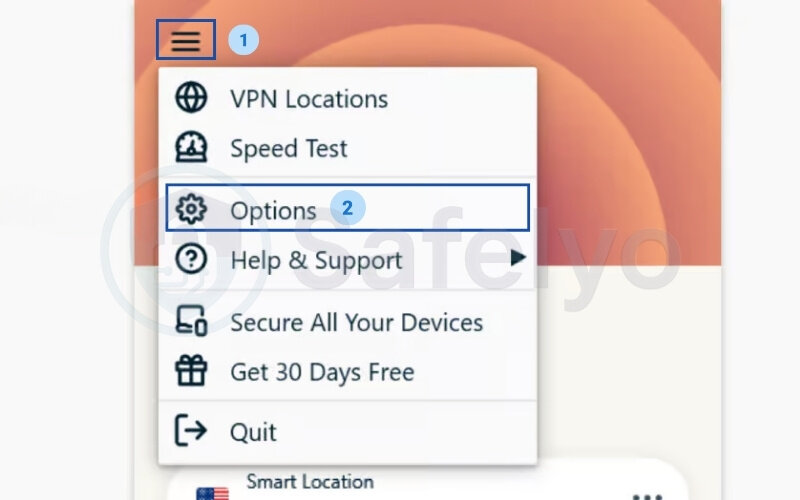
- Under the General tab, you’ll see a section for Split tunneling. Click the Settings button.
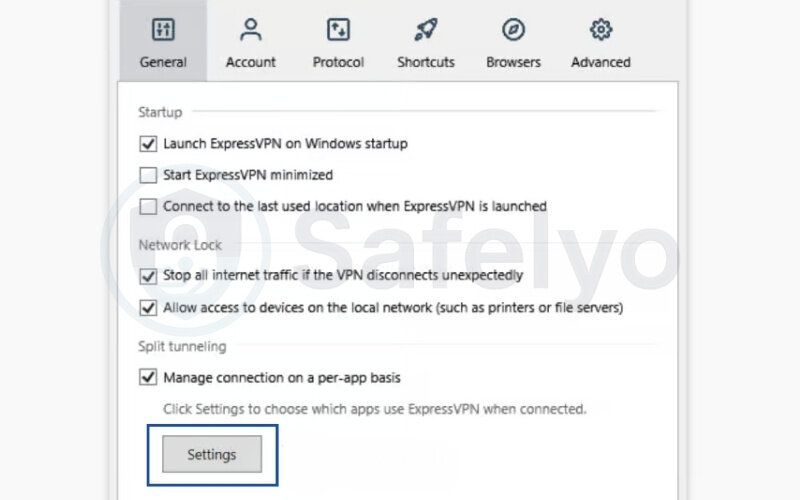
- Select the option that says Do not allow selected apps to use the VPN.
- Click the Add another app button.
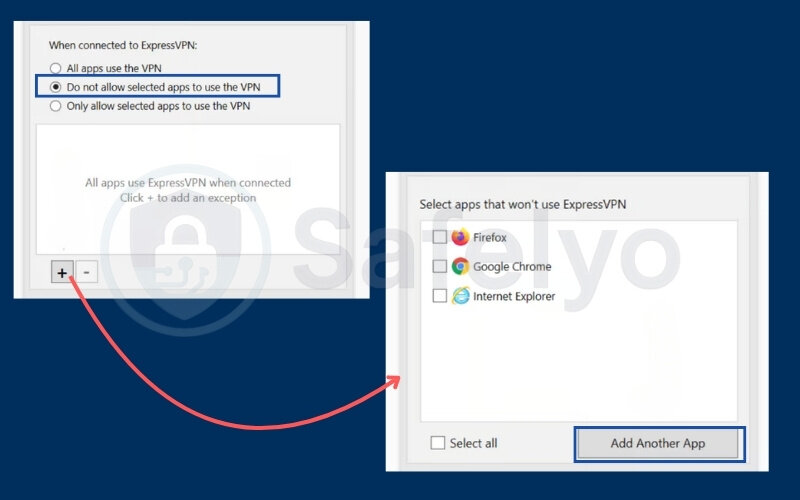
- From the list, find and check the box next to Plex Media Server. If it’s not there, select Add another app… at the bottom to browse for Plex Media Server.exe manually.
- Click OK to save your settings. Reconnect to the VPN, and Plex will now bypass it.
3.3. Setting up with Surfshark
Surfshark calls its split tunneling feature “Bypasser,” but it accomplishes the same goal effectively.
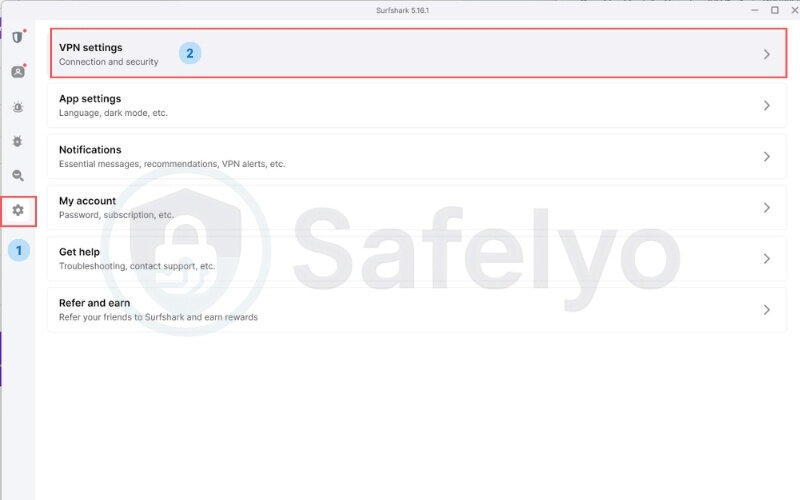
- Open the Surfshark app, click on Settings in the side menu, and then go to the VPN settings tab.
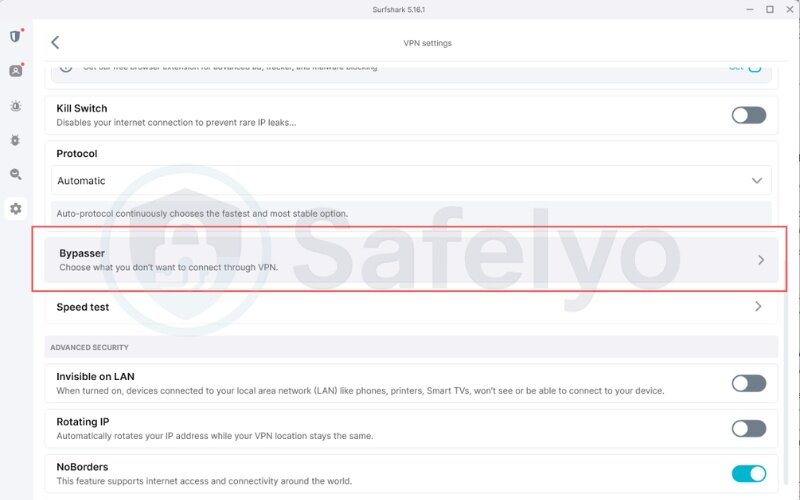
- Scroll down and click on Bypasser.
- Select the Bypass VPN option. This will make your selected apps connect directly to the internet.
- Click the Add apps button.
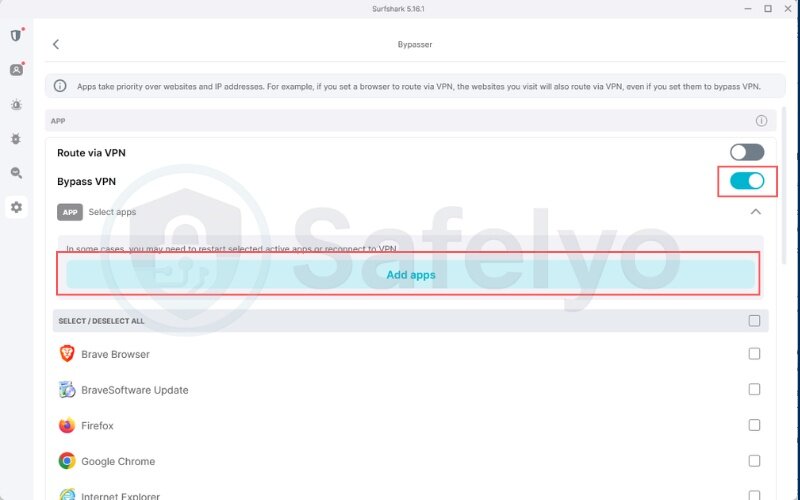
- Find and select Plex Media Server from the list of applications to add it.
- That’s it! Your changes are saved automatically. Connect to the VPN, and Plex will now operate outside the tunnel.
| VPN Provider | Feature Name | Ease of Finding | Ease of Adding App |
| NordVPN | Split tunneling | Very Easy | Easy |
| ExpressVPN | Split tunneling | Easy | Very Easy |
| Surfshark | Bypasser | Easy | Easy |
3.4. Verifying your setup is working correctly
After configuring split tunneling, don’t just assume it’s working. A quick three-step check will confirm that you’ve achieved the perfect setup.
- Check the Plex remote access status. Open your Plex Media Server settings by clicking the wrench icon. On the left, select Remote Access. You should see a green checkmark and the text “Fully accessible outside your network.” This is your primary confirmation that Plex can be reached from the internet.
- Check your public IP address. With your VPN connected, open a web browser and go to a site like whatismyip.com. The IP address shown should be the one from your VPN server, not your actual home IP. This confirms that all your other traffic is still securely routed through the VPN.
- Perform a real-world test. The ultimate test is to simulate a remote user. Disconnect your smartphone from your home Wi-Fi and use only its cellular data (4G/5G). Open the Plex app on your phone and try streaming something from your library. If it plays smoothly without any “indirect connection” warnings, your setup is a complete success.
4. Common problems and troubleshooting
Even with the best guides, sometimes things don’t work on the first try. Don’t worry if Plex is not working with a VPN. I’ve run into nearly every issue imaginable while tinkering with my own setup. Here are the most common roadblocks and how to fix them, based on real-world experience.
Problem 1: I followed the steps, but Plex still says “Not available outside your network.”
This is the most frequent issue, and 9 times out of 10, the cause is simple.
- Did you exclude the right file? I can’t stress this enough. Go back and double-check that you added Plex Media Server.exe and not Plex.exe. I once spent an hour troubleshooting only to realize I’d selected the wrong application. It’s an easy mistake to make.
- Give it a full restart. Technology’s oldest trick often works wonders here. First, disconnect your VPN. Then, completely shut down the Plex Media Server (right-click its icon in your system tray and choose “Exit”). Finally, close your VPN app. Now, restart everything in order: Plex first, wait for it to fully load, then your VPN.
- Is your firewall interfering? Sometimes, a third-party antivirus or firewall is the culprit. As a temporary test, try disabling your Windows Firewall or your antivirus’s firewall for a minute. If Plex suddenly connects, you’ve found the problem. You’ll then need to add a manual exception for Plex Media Server in that firewall’s settings.
Problem 2: I can’t find Plex Media Server in my VPN’s app list.
This happens when the VPN’s automatic scan doesn’t pick up the app. The solution is to add it manually.
- Think of it like searching for a specific file on your computer. Instead of relying on the “Recent Apps” list, you need to tell the VPN exactly where to look.
- In your VPN’s split tunneling settings, look for a button that says “Browse” or “Add another app…”.
- This will open a standard file explorer window. Navigate to the default Plex installation path: C:\Program Files (x86)\Plex\Plex Media Server\. Inside that folder, you will find Plex Media Server.exe. Select it, and you’re good to go.
Problem 3: My VPN doesn’t have split tunneling. Now what?
Unfortunately, if your VPN service lacks this feature, there’s no simple workaround within the app itself. You’re trying to use a screwdriver when you really need a wrench.
- The only practical solution is to switch to a VPN that supports it. Trying to configure complex manual routes or using two separate machines is a massive headache and not worth the effort for most people.
- This is a perfect opportunity to upgrade. If your current VPN is missing this key feature, it’s likely missing other modern security and performance benefits too. Consider this a sign that it’s time for a better tool.
- If your current VPN lacks this essential feature, it may be holding you back. Check out Safelyo’s review of the best VPN with split tunneling to find a better alternative.
A quick note on other platforms (macOS, Linux, Docker)
- macOS: For VPNs like ExpressVPN that have a full-featured macOS app, the process is nearly identical to Windows. You’ll simply find the Plex Media Server application in your /Applications folder and add it to the exclusion list.
- Linux/Docker: I love a good Linux project, but be warned: this setup is significantly more advanced. It usually involves command-line routing rules (ip route/iptables) or specific configurations within your Docker container’s network stack. This is beyond the scope of this guide, but services like Mullvad offer excellent, detailed documentation for advanced Linux users.
5. FAQ about split tunnel VPN for Plex
Can I use a free VPN to split-tunnel Plex?
It’s highly unlikely. Free VPNs almost never offer advanced features like split tunneling because their business model relies on simplicity and cutting costs. Furthermore, they often come with serious privacy risks, painfully slow speeds, and strict data caps, making them a poor choice for both security and streaming.
Is split tunneling with Plex secure?
Yes, it is a perfectly secure way to solve this specific problem. Your Plex traffic will travel over your regular internet connection (just as it would if the VPN were off), but all of your other activities, your browsing, downloading, and general internet use, remain fully encrypted and hidden behind the VPN. You’re getting the best of both worlds without compromising your overall security.
Will this setup slow down my Plex streams?
No, it should actually make them faster and more reliable. By bypassing the VPN, your Plex streams use your direct, full-speed internet connection. This avoids any potential slowdowns caused by routing through a distant VPN server, eliminating buffering and the dreaded “indirect connection” quality drop.
What’s the difference between this and port forwarding?
Think of split tunneling as a software-level solution, while port forwarding is a network-level one. Split tunneling is far easier and safer for most users; you’re just telling an app what to do. Port forwarding involves opening a “door” in your router’s firewall to the internet, which can be more complex to set up and may create security vulnerabilities if not configured correctly. For this specific Plex issue, split tunneling is the recommended and superior solution.
6. Conclusion
Successfully configuring how to set up split tunnel VPN for Plex finally bridges the gap between robust online security and seamless media streaming. You no longer have to choose between protecting your digital footprint and enjoying your media library. With just a few clicks, you can create a setup that works in perfect harmony.
Here are the key takeaways to remember:
- Keep your browsing private and secure behind a VPN.
- Allow uninterrupted, full-speed remote access to your Plex Media Server for you and your users.
- Always exclude Plex Media Server.exe, not the player app.
- Eliminate frustrating ‘indirect connection’ errors for good.
The single most important step in this entire process is starting with the right tool. Choosing a reliable VPN provider with a strong and user-friendly split tunneling feature is the foundation of a flawless setup.
Don’t let a limited VPN compromise your home media experience. To ensure you have the best tools for the job, explore Safelyo‘s comprehensive Tech How-To Simplified category for more expert guides and reviews, and find a VPN that works for you today.