Did you know that even while using a VPN, a silent flaw could be revealing every website you visit directly to your internet service provider (ISP)? This common privacy risk is called a DNS leak, and it quietly undermines the very reason you have a VPN. Answering the question of what is DNS leak is the first step to securing your connection.
In my years analyzing cybersecurity tools, I’ve seen this exact issue trip up countless users. They invest in a VPN believing they’re fully protected, but this single vulnerability leaves their digital footprint visible to their ISP. It’s like locking your front door but leaving a window wide open.
This guide is designed to close that window for good. We’ll walk you through everything you need to know. You will learn:
- What a DNS leak is, explained with a simple analogy.
- How to perform a free, 1-minute test to check your connection.
- The exact steps to fix any leaks and prevent them from happening again.
Let me help you find, test, and patch this critical security gap. It’s time to take control and make your online privacy truly private.
1. What is a DNS leak (and why you should care)?
Let’s break this down with a simple analogy that has helped countless people I’ve advised. Imagine the DNS (Domain Name System) is the internet’s phonebook. When you want to visit a website, you type in a memorable name like Safelyo.com. Your computer, however, needs a specific number – an IP address (like 104.21.5.79) – to connect. The DNS is the system that looks up the name and finds the corresponding number for you.
Without a VPN, the “phonebook” you use belongs to your Internet Service Provider (ISP). So, every time you visit a site, you’re asking your ISP to look up the number. They connect you, but they also see – and often log – every single “call” you make. This is the most basic form of ISP tracking.
When you turn on a good VPN, you stop using your ISP’s public phonebook. Instead, you use the VPN’s private, encrypted phonebook inside its secure tunnel. Your ISP can see you’re connected to a VPN, but they have no idea which websites you’re asking it to look up. They are effectively blind to your browsing activity.
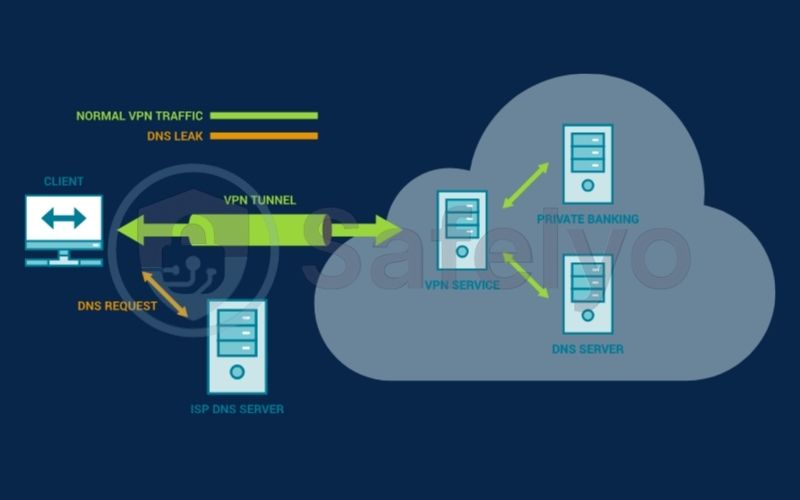
So, a DNS leak is a routing mistake. It happens when, for various technical reasons, your request to look up a website bypasses the VPN’s private phonebook and is sent to your ISP’s public phonebook instead – even while the VPN is active.
You should care because a DNS leak completely defeats the primary purpose of using a VPN. The consequences are significant:
- Your ISP can see your browsing history. The very activity you wanted to hide is now recorded by your provider, creating a log of every site you visit.
- Your true location can be exposed. Services that use DNS to determine your location might see your real ISP’s details, preventing you from accessing geo-restricted content.
- You become a target for tracking. With your browsing data exposed, you’re more vulnerable to targeted advertising and data profiling.
From my experience, this flaw is more common than people think. To make this crystal clear, the diagram below shows exactly what happens to your request in all three scenarios.
>> You may also be interested in: Can my ISP see my browsing history? And how to become invisible
2. The 1-minute DNS leak test: Check your connection now
Theory is one thing, but the only way to know for sure if your connection is secure is to perform a DNS leak test. The good news is that it’s fast, free, and incredibly simple. Don’t worry, you don’t need any technical skills to do this.
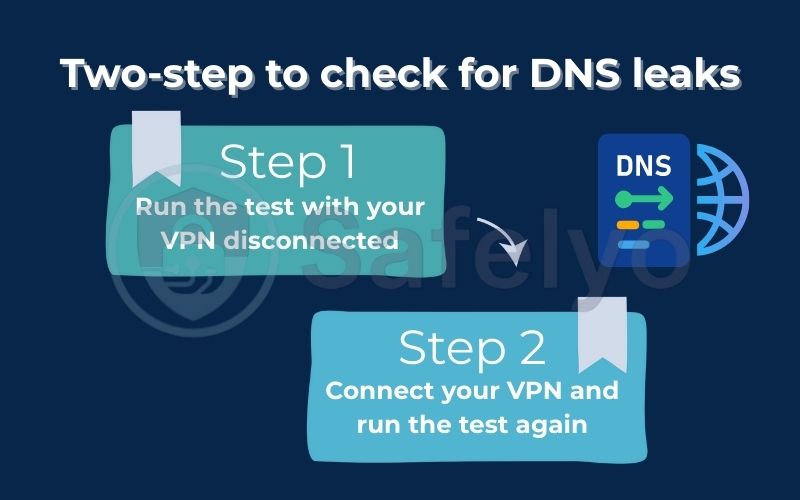
I always recommend a simple two-step process to my clients to check for DNS leaks because it gives them a clear “before and after” picture. Follow these exact steps:
- Run the test with your VPN disconnected. First, make sure your VPN is turned off. Click the test button above. You will see a list of DNS servers and IP addresses. This is your baseline – you should see the name of your Internet Service Provider (e.g., Comcast, Verizon, BT) and your real location. Take a mental note of the ISP’s name.
- Connect your VPN and run the test again. Now, turn on your VPN and connect to a server. Come back to this page and run the test again.
How to read the results:
Now, look at the new list of DNS servers. If you still see the name of your ISP or your real location anywhere in the results, you have a DNS leak. Your personal data is being exposed.
Ideally, the results should only show servers and locations associated with your VPN provider. For instance, if you connected to a NordVPN server in Switzerland, the results should show DNS servers operated by NordVPN in Switzerland. This confirms your connection is fully secured.
Safelyo’s Expert Tip
If your test results show servers from Google (IP addresses like 8.8.8.8) or Cloudflare (1.1.1.1), don’t panic. These are public DNS resolvers and are generally much safer than your ISP’s. However, it still means your VPN isn’t fully controlling your DNS queries as it should. The ideal result is always seeing servers owned and operated by your VPN provider.
3. What causes DNS leaks?
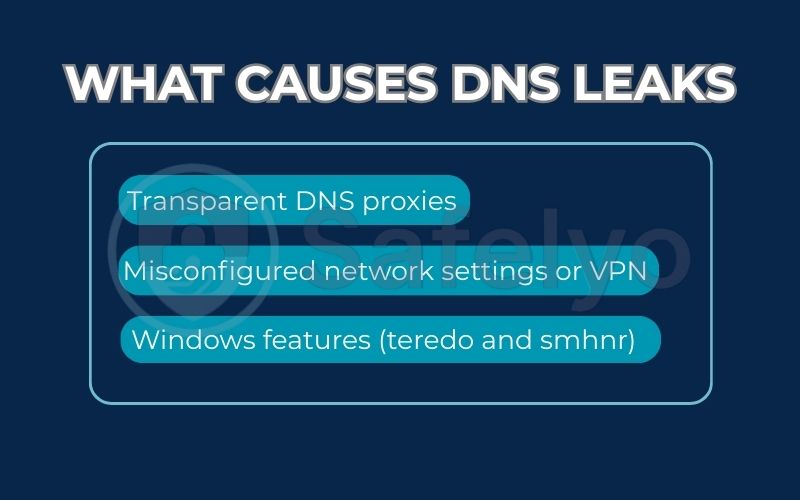
If your test revealed a leak, you’re probably wondering what causes DNS leaks in the first place. It’s rarely malicious; more often, it’s due to a misconfiguration or a feature that prioritizes speed over privacy. I’ve troubleshooted this for many users, and the cause almost always falls into one of these buckets.
3.1. Misconfigured network settings or VPN
This is the most straightforward cause. Your computer or router might have been manually set up to use specific DNS servers in the past (like your ISP’s). When you connect a VPN, your device might get confused and fall back on those old settings instead of using the VPN’s servers. It’s a simple settings conflict that is usually easy to fix.
3.2. Transparent DNS proxies
This sounds complex, but it’s essentially a sneaky tactic used by some ISPs. They implement something called a “transparent DNS proxy,” which intercepts all DNS requests on their network – even those meant for your VPN’s private servers – and forces them through their own system. It’s a form of DNS hijacking that happens without your knowledge, making it seem like your requests are secure when they’re actually being monitored.
3.3. Windows features (teredo and smhnr)
From my experience, Windows users are particularly vulnerable to DNS leaks due to a couple of built-in networking features. They were designed for convenience and compatibility, but they can easily punch a hole in your VPN’s armor.
Teredo
This is a technology Microsoft created to help the older Internet Protocol (IPv4) communicate with the newer one (IPv6). The problem is, Teredo works by creating its own communication tunnel, which can sometimes operate outside of and completely bypass your VPN’s encrypted tunnel.
Smart Multi-Homed Name Resolution (SMHNR):
This feature is a classic case of good intentions with bad privacy outcomes. To understand it, imagine you ask a question to one person (your VPN’s DNS). If they are slow to answer, SMHNR gets impatient and shouts the question out to everyone else in the room (including your ISP) just to get a faster reply. This means even if your VPN’s DNS server is working, a “backup” request might be sent directly to your ISP, creating a leak.
YOUR DNS LEAK PREVENTION CHECKLIST
To keep your connection secure over the long term, I recommend adopting a few simple habits. Think of this as your routine security check-up. Use the checklist below to make sure you’ve covered all the bases.
| Check (✓) | Action Item |
| 🗹 | Choose a Premium VPN: Select a VPN known for its own private DNS servers and built-in leak protection. |
| 🗹 | Enable Key Features: After installing your VPN, go to settings and turn on “DNS Leak Protection” and “Kill Switch”. |
| 🗹 | Test Regularly: Run a DNS leak test every few weeks, especially after software updates to your VPN or OS. |
4. How to fix a DNS leak step-by-step
Now for the good part: Fixing a DNS leak is usually very straightforward. After helping countless users through this, I’ve found that the solution is almost always a simple toggle in your VPN’s settings. Follow this checklist to learn how to fix a DNS leak and secure your connection.
4.1. The easiest fix: Enable your VPN’s built-in protection
Before you dive into complex network settings, look inside your VPN app. This is the first place you should always check, as it solves the problem for the vast majority of people. Open your VPN application and navigate to the Settings or Preferences menu. Look for options with names like:
- DNS Leak Protection
- Prevent IPv6 Leaks
- WebRTC Leak Protection
Ensure that all of these options are turned on or enabled. This instructs your VPN to be more aggressive in routing all traffic, including DNS queries, through its secure tunnel.
PRO TIP
For 90% of users, simply enabling ‘DNS Leak Protection’ and the ‘Kill Switch‘ in your VPN’s settings is all you need to do. A kill switch is a failsafe that cuts your internet connection instantly if the VPN drops, preventing any data from leaking out accidentally. Only proceed to the manual fixes below if the problem persists after enabling these features.
4.2. Manually change your device’s DNS servers
If your VPN’s built-in protection doesn’t solve the issue, the next step is to manually tell your device to use a trusted, public DNS service instead of your ISP’s. This is a bit more hands-on but is still a very safe and effective fix.
You can change your DNS settings on Windows, macOS, or your router to use one of these reputable public servers:
- Cloudflare DNS: 1.1.1.1 and 1.0.0.1
- Google Public DNS: 8.8.8.8 and 8.8.4.4
While the process varies for each operating system, it generally involves going into your network adapter’s properties and inputting these addresses.
4.3. Disable problematic Windows features
This is a more advanced fix specifically for Windows users who are still experiencing leaks after trying the steps above. This step directly targets the Teredo and SMHNR features we discussed earlier, which are common culprits.
Disabling them typically involves running a couple of simple commands in the Command Prompt application. While this sounds intimidating, it’s a well-documented fix for persistent DNS leaks on the Windows platform. I recommend this only as a last resort if the easier fixes don’t work.
5. How a quality VPN is your best defense
Fixing a DNS leak is important, but the best strategy is to prevent DNS leaks from ever happening. In my professional opinion, the single most effective way to do this is by choosing the right VPN service from the start. Not all VPNs are created equal, and a free or low-quality service is often the root cause of these issues.
A high-quality, reputable VPN service is specifically engineered to be your best defense against both VPN DNS leaks and other privacy threats. Here’s what sets them apart:
They operate their own private DNS servers.
This is the gold standard. Instead of passing your requests to a third-party DNS provider, they handle everything “in-house” within their secure network. This drastically reduces the risk of a leak.
They offer built-in, automatic leak protection.
The best VPNs don’t make you hunt for settings. Their apps are designed to automatically force all DNS traffic through the encrypted tunnel, with features like DNS Leak Protection enabled by default.
They include robust IPv6 leak protection.
As we saw with the Windows Teredo feature, traffic can sometimes leak over the newer IPv6 protocol. A premium VPN is designed to handle both IPv4 and IPv6 traffic, ensuring there are no blind spots.
They have a reliable Kill Switch.
I mentioned this earlier, but it’s worth repeating. A kill switch is your last line of defense. If your VPN connection ever falters for even a second, the kill switch instantly blocks your entire internet connection, ensuring no unencrypted data or DNS requests can escape.

I’ve tested dozens of VPNs over the years, and the difference between a service that treats leak protection as an afterthought and one that builds its entire infrastructure around it is night and day. Investing in a solid VPN is investing in peace of mind.
6. Beyond DNS leaks: What about IPv6 and WebRTC leaks?
While tackling DNS leaks is a massive step towards better privacy, it’s important to know they aren’t the only potential vulnerability. I often see users secure their DNS, only to be exposed to two other common issues. A truly secure setup needs to account for these as well.
What is an IPv6 leak?
Most of the internet still runs on an older protocol called IPv4. However, the new protocol, IPv6, is being adopted everywhere. An IPv6 leak occurs when your VPN is only configured to protect your IPv4 traffic, leaving all your IPv6 traffic to travel through your ISP’s network, completely exposed.
What is a WebRTC leak?
WebRTC (Web Real-Time Communication) is a technology built into most modern browsers like Chrome, Firefox, and Edge. It’s used for real-time voice and video calls directly in the browser. However, a flaw in WebRTC can be exploited to reveal your true IP address, even when you’re connected to a VPN.
The good news is that you don’t need to be an expert to solve these problems. A top-tier VPN with comprehensive leak protection will secure you against all three types of leaks: DNS, IPv6, and WebRTC. Their software is specifically designed to identify and block these vulnerabilities by default.
>> Curious to learn more? Dive deeper into our detailed guides on how to fix WebRTC leaks and what an IPv6 leak is.
7. FAQ about DNS leak
Here are answers to some of the most common questions we get about DNS leaks.
What is a DNS leak?
A DNS leak is a security flaw where your requests to access websites (known as DNS queries) bypass your VPN’s secure tunnel and are sent through your Internet Service Provider (ISP). This allows your ISP to see and log your browsing activity, even when your VPN is on.
How do I know if my DNS is leaked?
The only way to know for sure is to run a DNS leak test. First, test with your VPN off to see your real ISP’s information. Then, turn your VPN on and test again. If you still see your ISP’s name or your true location in the results, you have a leak.
What does a DNS leak do?
A DNS leak exposes your browsing activity to your Internet Service Provider (ISP), even when you are using a VPN. It effectively defeats the privacy purpose of your VPN by creating a log of every website you visit.
How do you fix a DNS leak?
For most people, the fix is simple: go into your VPN app’s settings and turn on “DNS Leak Protection” and the “Kill Switch.” If that doesn’t work, manually changing your device’s DNS servers to a public provider like Cloudflare (1.1.1.1) is the next best step.
How do you stop a DNS leak?
The most effective way to stop DNS leaks is to use a high-quality VPN that operates its own private DNS servers. Keeping features like the Kill Switch and built-in leak protection permanently enabled is the best long-term prevention strategy.
What’s the difference between a DNS leak and an IP leak?
They are both serious privacy risks, but different. An IP leak exposes your actual IP address, which reveals your physical location and identity to the websites you visit. A DNS leak exposes the websites you visit to your ISP, but might not expose your IP to the website itself.
Do free VPNs protect against DNS leaks?
Rarely. Most free VPNs are not profitable enough to run their own DNS servers or develop advanced features like leak protection. Worse, some make money by selling your browsing data, which is exactly what a DNS leak exposes.
What is a WebRTC leak?
A WebRTC leak is a different vulnerability, found in web browsers like Chrome and Firefox, that can reveal your true IP address even when a VPN is active. Like DNS and IPv6 leaks, a top-tier VPN will also include protection against WebRTC leaks.
8. Conclusion
Ultimately, understanding what is DNS leak isn’t about creating fear, but about empowering you to take control of your digital security. It’s a hidden flaw that can undermine your privacy, but as we’ve shown, it’s one that you can easily find and fix.
To ensure your connection is always secure, remember these key points:
- A DNS leak reveals your browsing history to your ISP, defeating a key purpose of your VPN.
- You can easily test for a leak in under a minute using a free online tool.
- Most leaks are fixed by simply enabling the “DNS Leak Protection” and “Kill Switch” features in your VPN app.
- The best long-term defense is a reputable VPN that uses its own private DNS servers.
Treating your digital privacy with care means performing these simple checks from time to time to ensure your tools are working as they should. The most reliable way to prevent leaks is to use a vetted service. Explore the guide to the best VPNs with ironclad DNS leak protection to secure your connection today. Mastering this is a core part of your Privacy & Security Basics with Safelyo right now.


