Your tiny USB flash drive can hold a world of important data, but what happens if you lose it? Suddenly, your private files, work documents, and personal photos are at risk. Learning how to encrypt a flash drive is the single best shield against this common disaster, turning that portable drive into a digital safe that only you can open.
In an age of constant digital threats, we often forget about physical data security. As a tech security specialist, I’ve seen the panic that comes from a lost, unencrypted drive – it’s a preventable data breach waiting to happen. Thankfully, securing your drive isn’t just for spies or IT wizards. It’s a simple, crucial step for anyone carrying sensitive information.
In this comprehensive guide, you will discover:
- How to password-protect a flash drive using the free, built-in tools on Windows.
- The step-by-step process for securing a drive on a Mac.
- The best solution for using your encrypted drive on both Windows and macOS.
- Choosing the right method before you start is the most important decision.
Don’t wait until it’s too late. Let me walk you through the simple steps to lock down your portable data for good.
1. Before you start: The cross-platform compatibility warning!
Before we touch a single button, we need to address the most important question, one that will save you a massive headache later. I learned this the hard way years ago after encrypting a drive for a project, only to find I couldn’t open it on my client’s Mac.
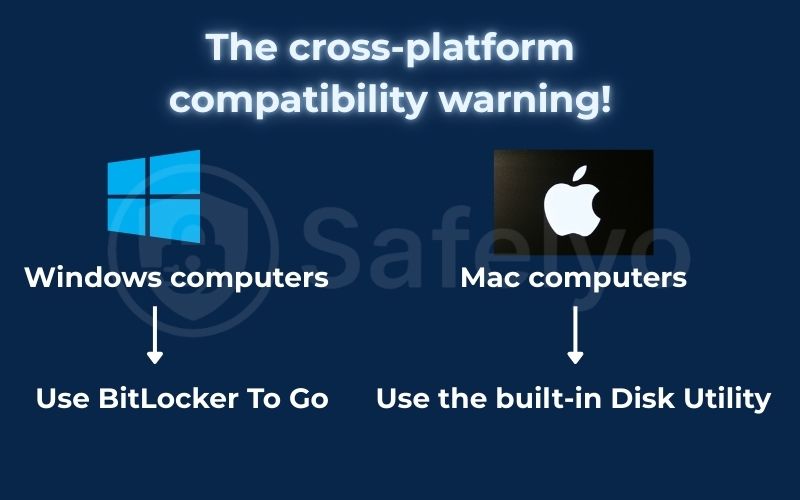
Here’s the critical piece of information: The built-in encryption tools on Windows and macOS are not compatible with each other.
- A flash drive encrypted with Windows BitLocker will appear as an unreadable, jumbled mess on a Mac.
- A drive encrypted with Mac’s tools will not work on a Windows PC.
So, to figure out the right path, you just need to answer one simple question.
Where will you use this flash drive?
- Only on Windows computers?
- Your Solution: Use BitLocker To Go. It’s the powerful, free, and perfectly integrated tool for the job. You can jump straight to our Windows guide.
- Only on Mac computers?
- Your Solution: Use the built-in Disk Utility. It’s seamless and uses the same powerful FileVault technology that protects your Mac’s internal drive. Skip ahead to our Mac guide.
- On BOTH Windows and Mac computers?
- Your Solution: You need a third-party tool designed for cross-platform USB encryption. The best free and highly respected option is VeraCrypt. We have a dedicated section for this scenario.
By taking ten seconds to answer this question now, you ensure the method you choose will actually work for your needs. It’s the difference between a secure, useful drive and a frustrating, digital paperweight.
2. How to encrypt a USB drive on Windows with BitLocker to Go
If you’re living in the Windows ecosystem, BitLocker To Go is your best friend. It’s a robust, native encryption software that’s built right into the operating system, offering military-grade protection without needing to install anything extra.
Best for: Windows users who need a powerful, set-it-and-forget-it solution.
Availability: One important note – BitLocker is a premium feature. You’ll need a Pro, Enterprise, or Education edition of Windows (10 or 11) to use it. It is not available on Windows Home editions.
Here’s the step-by-step guide to encrypt a USB drive in Windows style.
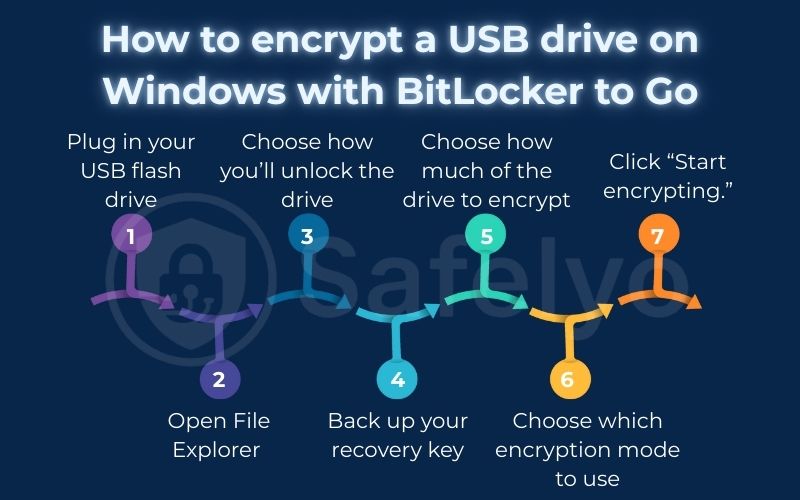
- Plug in your USB flash drive and make sure it’s recognized by your computer.
- Open File Explorer (the folder icon on your taskbar), right-click on the USB drive icon, and select “Turn on BitLocker” from the menu.
- Choose how you’ll unlock the drive. The simplest and most common method is using a password. Check the box for “Use a password to unlock the drive” and enter a strong, memorable password twice.
- Back up your recovery key. This is the single most important step in the entire process. If you forget your password, this key is your only way to access your data. BitLocker gives you several options:
- Save to your Microsoft account: A great, cloud-based option.
- Save to a file: The most common choice. Just remember: DO NOT save the recovery key file on the same flash drive you are about to encrypt! That’s like taping the key to your safe. I always save mine to my computer’s documents folder and a secure cloud storage location.
- Print the recovery key: A solid physical backup option.
- Choose how much of the drive to encrypt. For a brand-new drive, you can choose “Encrypt used disk space only.” For a drive that already has data on it, or for maximum data security, select “Encrypt entire drive.”
- Choose which encryption mode to use. Select “Compatible mode”. This ensures your drive can be opened on older versions of Windows 10, which is useful for portability.
- Click “Start encrypting.” The process will begin. Be patient, as it can take anywhere from a few minutes to over an hour, depending on the size and speed of your flash drive.
Once it’s done, your drive is secured. When you plug it in next time, Windows will prompt you for the password before you can see any of your files.
3. How to encrypt a USB drive on Mac with Disk Utility
For Mac users, encrypting an external drive is a beautifully integrated process. macOS uses the same core FileVault technology that secures your internal startup disk to protect external drives, making it a reliable and seamless experience.
Best for: Mac users who want a simple, native way to encrypt their drives for use within the Apple ecosystem.
Critical Warning
This process will completely erase the flash drive. Before you begin, you must copy any important files from the USB drive to another location, like your desktop or a cloud folder.
Ready? Here’s how to encrypt a USB drive Mac style.
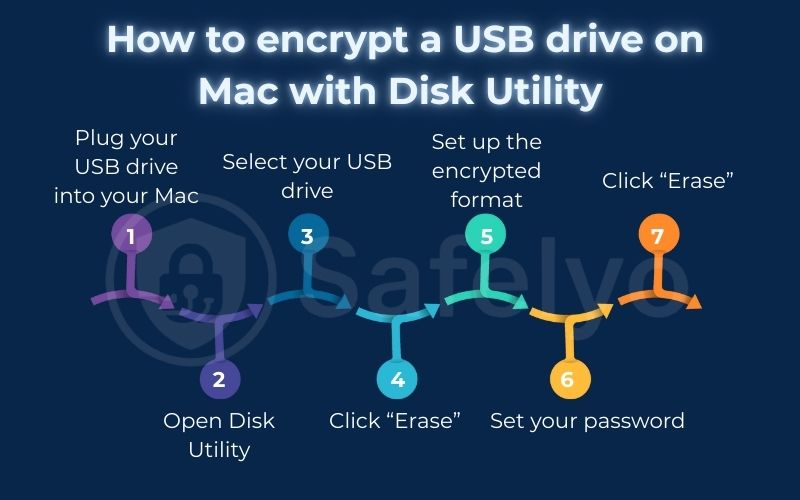
- Plug your USB drive into your Mac.
- Open Disk Utility. The easiest way to find it is to press Command + Spacebar to open Spotlight search, type “Disk Utility,” and press Enter. (You can also find it in Applications > Utilities).
- Select your USB drive. In the Disk Utility sidebar on the left, click on the name of your external USB drive. Make sure to select the drive itself, not the volume intended underneath it.
- Click “Erase” in the top menu bar. This will open a dialog box with several options.
- Set up the encrypted format. This is the key step.
- Name: Give your drive a new name.
- Format: Click the dropdown menu and choose APFS (Encrypted). This is the modern, secure, and recommended format for all current Macs.
- Set your password. A new window will immediately pop up. Enter a strong password you will remember, and verify it. You also have the option to add a hint, which can be helpful if you ever forget. Click “Choose.”
- Click “Erase” in the main dialog box. Disk Utility will now format and encrypt the drive.
And you’re done! From now on, whenever you plug this flash drive into any Mac, a dialog box will appear. This box will ask for the password before the drive mounts and becomes accessible in Finder. It’s a simple, elegant solution for protecting your data on the go.
4. The cross-platform solution: Using VeraCrypt
So, what if you live in a mixed-tech household or office, constantly moving files between a Windows PC and a MacBook? As we established, the native tools won’t work. This is where you need a dedicated, third-party solution, and my top recommendation is VeraCrypt.
Best for: Anyone who needs to access their encrypted flash drive on both Windows and Mac computers.
VeraCrypt is a free, open-source, and highly respected encryption software. It has been independently audited and is considered one of the most secure tools available to the public. For cross-platform USB encryption, it’s the gold standard.
Rather than encrypting the entire drive’s structure (which leads to incompatibility), VeraCrypt creates a single, highly encrypted file on your flash drive, known as a “container.” You can view this container as a portable digital vault. You then “mount” this vault using VeraCrypt software, making it appear on your computer as a new virtual drive where you can securely store your files.
Here is a simplified guide to get you started with Veracrypt USB encryption:
- Download and install VeraCrypt on your main computer from its official website. It’s available for Windows, macOS, and Linux.
- Open VeraCrypt and click “Create Volume.”
- Choose “Create an encrypted file container” and click Next.
- Choose a file location on your USB drive. Click “Select File,” browse to your flash drive, name your container (e.g., “SecureVault”), and then click Save.
- Choose your encryption settings. The defaults (AES encryption and SHA-512 hash algorithm) are excellent for almost everyone. Then, set the size for your container. This will determine how secure the storage is.
- Set a very strong password. This is your master key. A long, complex password is crucial here.
- Generate cryptographic strength. Move your mouse randomly within the window for at least 30 seconds. The more you move it, the stronger the encryption keys will be. When the bar is green, click “Format.”
How to use it: To access your files, ensure VeraCrypt is installed on any computer you use (Windows or Mac). Open VeraCrypt, click “Select File” to choose your container on the USB, select a drive letter, and click “Mount.” After entering your password, a new drive will show up in your File Explorer or Finder, ready for use.
5. How to decrypt a flash drive
Sometimes you may want to remove the encryption from a flash drive – perhaps you’re repurposing it for something less sensitive or giving it to a family member. Learning how to decrypt a flash drive is just as important as knowing how to encrypt it. The process is straightforward but different for each method.
For a BitLocker drive (Windows)
Removing BitLocker is a simple process, but it can take a while for the decryption to complete.
- Plug the drive into a Windows PC (Pro edition) and unlock it with your password.
- Open File Explorer, right-click on the drive, and choose “Manage BitLocker.”
- In the BitLocker Drive Encryption control panel window, you’ll see an option to “Turn off BitLocker” for your drive. Click it and confirm.
- The decryption process will start. Keep the drive connected until it’s finished.
For a Mac-encrypted drive
On a Mac, you don’t really “decrypt” the drive in the same way. The easiest and cleanest method is to simply reformat it without encryption.
- Back up all the data from the encrypted flash drive to a safe location on your Mac.
- Plug the drive in and unlock it with your password.
- Open Disk Utility, select the drive, and click “Erase.”
- This time, in the “Format” dropdown, select a non-encrypted format like APFS or ExFAT. ExFAT is particularly good if you want the drive to be readable on both Mac and Windows, though it won’t offer encryption.
- Click “Erase” to reformat the drive.
For a Veracrypt drive
With VeraCrypt, the process is the simplest of all. Because your secure files are stored inside a single “container” file, all you have to do is delete that file.
- Navigate to your flash drive in File Explorer or Finder.
- Find the encrypted container file you created (e.g., “SecureVault”).
- Delete the file just like you would any other file.
Remember to move any data you want to keep out of the container before you delete it
Read more:
- How to encrypt a folder: 4 easy methods for 2025 (Windows & Mac)
- How to encrypt a file with a password: 4 easy methods
- How to encrypt text messages on iPhone & Android (2025 guide)
6. FAQ about how to encrypt a flash drive
Securing your data can bring up a few questions. Here are quick answers to some of the most common questions about encrypting your flash drive.
How do I encrypt a USB flash drive?
The best method depends on your operating system. On Windows (Pro editions), right-click the drive in File Explorer and select “Turn on BitLocker.” On a Mac, use the “Erase” function in Disk Utility and choose the “APFS (Encrypted)” format. If you need to use the drive on both systems, a third-party tool like VeraCrypt is the best solution.
What does it mean if a flash drive is encrypted?
It means the data on the drive has been scrambled into an unreadable code using a complex algorithm. The only way to unscramble the data and make it readable again is to provide the correct password or recovery key. Essentially, it turns your drive into a locked digital safe.
Should I encrypt my USB?
Absolutely. If you are carrying any data that you wouldn’t want a stranger to see – personal documents, financial records, work files, or private photos – you should encrypt the drive. It’s a simple, free precaution that provides immense data security and peace of mind in case the drive is lost or stolen.
How do I open an encrypted flash drive?
When you plug an encrypted flash drive into a compatible computer, it will automatically prompt you to enter the password you set during the encryption process. Once you enter the correct password, the drive will unlock and appear in your file system, allowing you to access your files just like a normal drive.
7. Conclusion
Learning how to encrypt a flash drive is one of the smartest and simplest steps you can take to protect your portable data. Whether you’re using a drive for work, school, or personal files, encryption adds a crucial layer of data security. It helps ensure that a simple mistake, like losing a USB drive, doesn’t lead to a major data breach.
Here are the key takeaways to help you choose the right path:
- For single-platform use: Stick with the powerful, built-in tools. Use BitLocker To Go on Windows and Disk Utility on Mac for a seamless experience.
- For cross-platform compatibility: VeraCrypt is your free, open-source, and highly secure best friend, allowing access on both Windows and macOS.
- The golden rule: The biggest risk in encryption isn’t the technology, but human error. Always choose a strong password and, most importantly, keep your recovery key in a safe, separate place. Without it, your digital safe becomes a digital tomb.
Now that your physical data is secure, it’s time to think about your online presence. Learn how to protect your data in the digital world by exploring more expert guides in our Tech How-To Simplified section here on Safelyo.


