Think of changing your DNS settings as swapping out your internet’s default address book for a faster, smarter, and more private one. This simple action dictates how your computer finds every website you visit, and learning how to change DNS settings on Windows 10 is a powerful first step toward a better online experience.
In a digital world where speed is expected and privacy is paramount, relying on your Internet Service Provider’s (ISP) default settings isn’t always the best choice. Whether you want to load websites faster, block malicious domains, or gain access to parental controls, a custom DNS server provides a critical upgrade.
With over a decade spent troubleshooting sluggish networks and security vulnerabilities, I’ve seen countless times how a poorly chosen DNS server is the silent culprit behind slow browsing and data leaks. This isn’t a tool reserved for tech experts; it’s a fundamental optimization for every Windows user.
In this comprehensive guide, you’ll discover:
- The key benefits of switching your DNS server.
- How to choose the right free DNS provider, like Google or Cloudflare.
- Four step-by-step methods to change your settings, complete with screenshots.
- How to verify the changes and fix common issues effortlessly.
Note: These methods are nearly identical for Windows 11. While some visuals may differ slightly, you can follow this guide perfectly for both Windows 10 and Windows 11.
Don’t settle for the default internet experience. Let me show you exactly how to take control of your connection right now!
1. Why change your DNS settings in the first place?
Before we jump into the step-by-step instructions, you might be wondering if this is even worth the effort. The answer is a resounding yes. When friends or family complain about their “slow internet,” the first thing I always have them do is change their DNS. It’s often the single biggest bottleneck they didn’t even know they had.
Think of it this way: your default DNS from your Internet Service Provider (ISP) is like a free, generic phone book. It works, but it might be outdated or slow. Switching to a high-quality public DNS is like upgrading to a lightning-fast digital assistant.
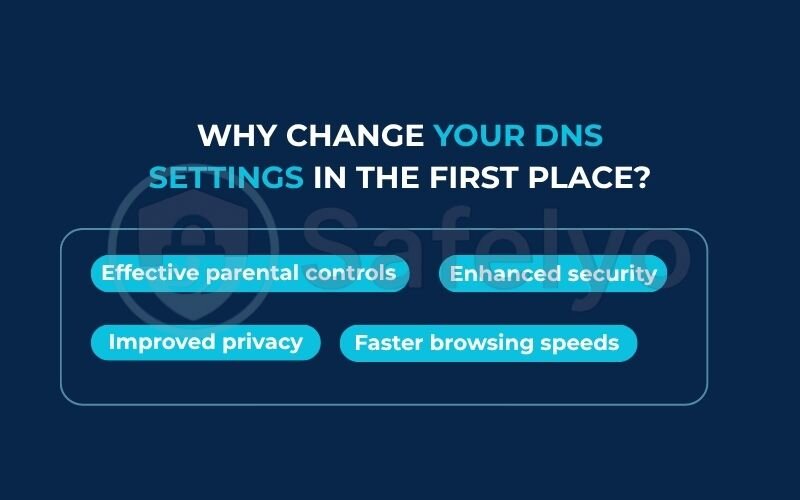
Here’s what that upgrade gets you:
Faster browsing speeds
A high-performance DNS finds the correct “address” for a website more quickly. This tiny delay, called latency, adds up. Shaving milliseconds off every request you make results in a noticeably snappier browsing experience, especially when a page loads content from dozens of different sources.
Enhanced security
Many modern DNS services, like Cloudflare or Quad9, have a built-in security filter. They maintain a blocklist of known malicious websites. If you accidentally click a phishing link, the DNS can block the connection before the harmful site even loads, protecting you automatically.
Improved privacy
Your ISP can see and log every website you visit by monitoring your DNS requests. By switching to a privacy-focused provider, you effectively shield your browsing history from your ISP. They can see you’re online, but they can’t easily see the list of sites you’re visiting.
Effective parental controls
Services like OpenDNS allow you to easily filter out entire categories of content (like adult websites, gambling, or social media) at the network level. Once set up, these rules apply to every device in your home, making it a simple and powerful tool for protecting your kids online.
2. Before you begin: Choosing your new DNS server
Alright, before we start changing any settings, you need to decide which new DNS server you want to use. You can’t reroute your internet traffic without a destination address, and your DNS addresses are exactly that.
I’ve tested dozens of DNS services over the years, and for most people, the choice boils down to one of “the big three” free providers. Each has its own specialty, so think of it like choosing a new utility company: one might be the fastest, another the most reliable, and a third might offer special features.
Here’s a quick rundown:
- Cloudflare (1.1.1.1): This is my personal go-to and the one I recommend most often. It’s built for speed and privacy, consistently ranking as one of the fastest options available and featuring a strict no-logs policy.
- Google Public DNS (8.8.8.8): This is the old faithful. It has been around for ages and is the gold standard for reliability. If you just want something that is stable and universally compatible, Google is a rock-solid choice.
- OpenDNS (now owned by Cisco): This is the go-to choice for content filtering and parental controls. They offer a free “FamilyShield” option that automatically blocks adult content, making it incredibly easy to create a safer online environment for kids.
While you can’t go wrong with these, choosing the absolute best one depends on your specific needs. For a detailed comparison, I highly recommend checking out our comprehensive guide to the best DNS servers for privacy and speed.
For now, just pick one from the table below to get started.
| Provider | Preferred DNS Server | Alternate DNS Server |
| Cloudflare | 1.1.1.1 | 1.0.0.1 |
| Google Public DNS | 8.8.8.8 | 8.8.4.4 |
| OpenDNS FamilyShield | 208.67.222.123 | 208.67.220.123 |
Pick one to start with, copy the addresses, and let’s move on to the next step.
3. A quick comparison of the 4 methods
Windows 10 gives you several ways to change your DNS settings. While they all achieve the same result, some are much easier than others. I’ve laid them all out here so you can pick the path that feels right for you. Honestly, there’s no “wrong” choice, but picking the right tool for your skill level will make the process completely painless.
For most people reading this, I strongly recommend starting with the Settings App method. It’s the most modern, straightforward, and visually guided approach.
Here’s a simple breakdown to help you decide:
| Method | Difficulty | Best For… |
| Settings App | Easy | Most home users and beginners. It’s clean, simple, and the officially recommended way on Windows 10/11. |
| Control Panel | Easy | Users familiar with older Windows versions. If you know your way around the classic Control Panel, this will feel like second nature. |
| Command Prompt | Moderate | Advanced users who prefer a command line. It’s faster if you know the commands, but unforgiving if you make a typo. |
| PowerShell | Advanced | IT professionals and system administrators. This is the most powerful method, ideal for scripting and automating tasks across multiple machines. |
Now that you’ve chosen your path, let’s get into the step-by-step instructions.
4. Method 1: How to change DNS settings using the Settings app
This is the gold standard for changing your DNS on a modern Windows system. It’s the method I walk my own family and friends through because it’s clean, visual, and very hard to get wrong. We’re essentially just going to tell Windows: “Stop using the automatic address book and use these specific ones instead.”
Step 1: Open the Windows Settings app. The quickest way is to press the Windows key + I on your keyboard. Alternatively, you can click the Start menu and select the little gear icon.
Step 2: In the Settings window, click on “Network & Internet”. It’s the one with the globe icon.
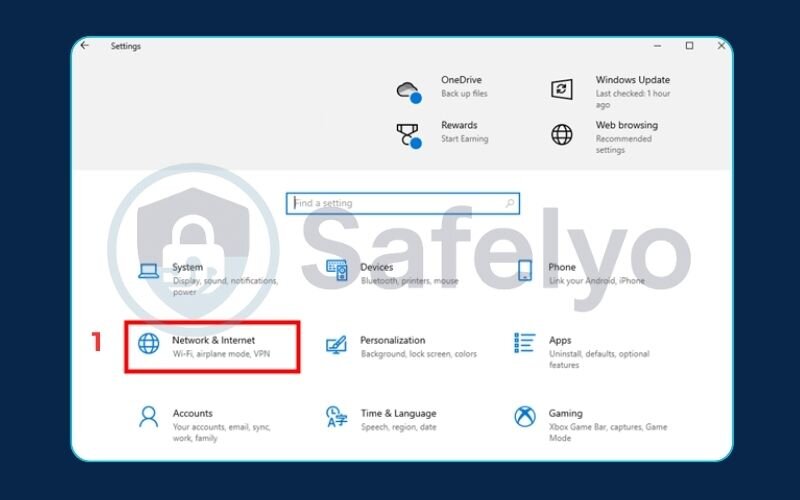
Step 3: On the left-hand menu, choose the connection you are currently using.
- If you’re on a wireless network, click “Wi-Fi”.
- If you’re plugged in with a network cable, click “Ethernet”.
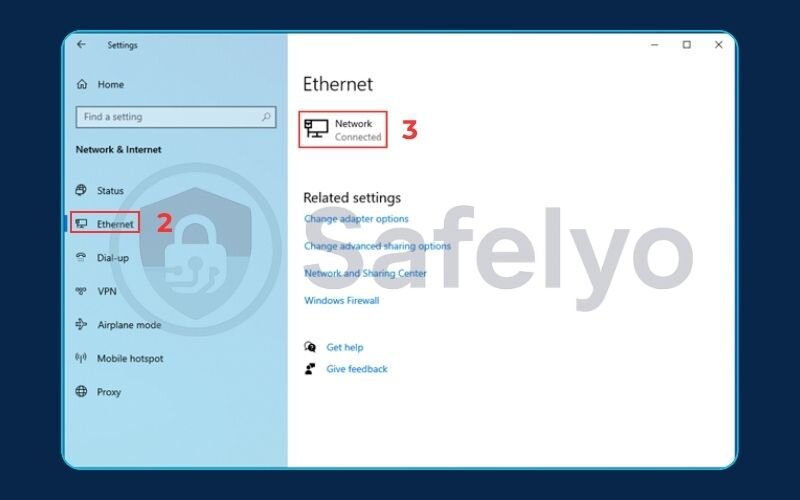
Here’s a pro-tip that saves a lot of headaches:
Make sure you edit the connection you actually use for the internet. I’ve had people edit their Ethernet settings while connected to Wi-Fi and wonder why nothing changed. Double-check which one says “Connected, secured” underneath it.
Step 4: Click on the name of the network you’re connected to. This will open its properties page. Scroll down until you see the “IP settings” section and click the “Edit” button.

Step 5: A new window will pop up. Click the dropdown menu that says “Automatic (DHCP)” and change it to “Manual”.
Step 6: A new toggle for IPv4 will appear. Click it to turn it on. This is the standard for most internet connections today.
Step 7: Now, you’ll see the fields we’re looking for. Type the new DNS addresses you chose earlier into the “Preferred DNS” and “Alternate DNS” boxes. The “Alternate” is just a backup in case the first one is ever down.
Step 8: Click the “Save” button.
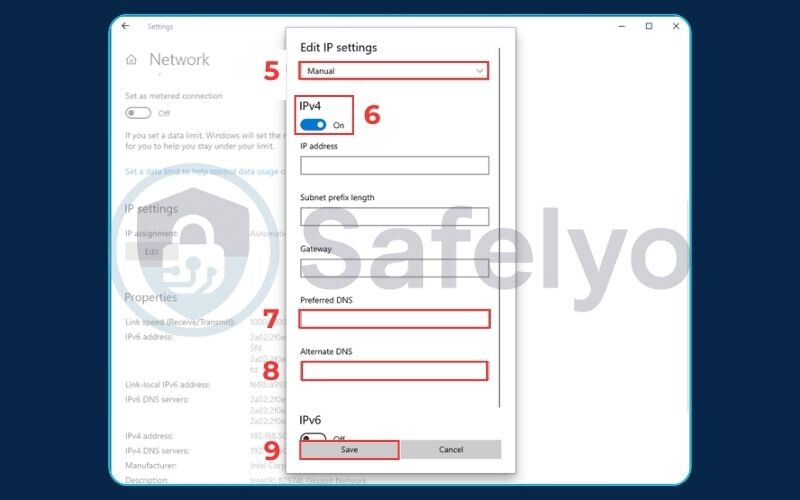
And that’s it! You’ve successfully pointed your computer to its new, faster address book. The changes take effect immediately.
5. Method 2: How to change DNS in Windows 10 Control Panel
If you’ve been using Windows for a long time, this method will probably feel like coming home. The Control Panel was the go-to place for network settings for years, and it still works perfectly. This is the way I did it for a decade before the modern Settings app became so streamlined. Think of it as taking the familiar scenic route instead of the new highway – it gets you to the same place.
Step 1: Open the Control Panel. The easiest way is to click the Start menu, type “Control Panel”, and click the icon when it appears.
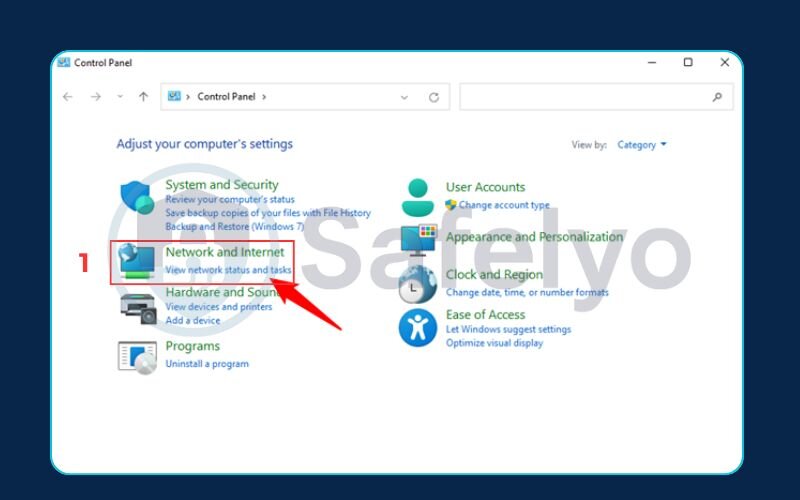
Step 2: Click on “Network and Internet”, and then on the next screen, click “Network and Sharing Center”.
Note: If your Control Panel shows a lot of small icons instead of categories, just look for “Network and Sharing Center” directly. You can also change the “View by:” option in the top-right corner to “Category”.
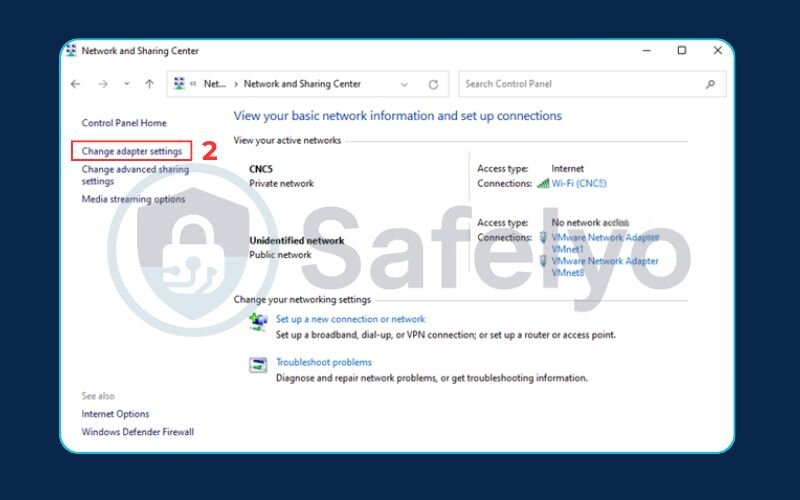
Step 3: In the left-hand menu of the Network and Sharing Center, click on “Change adapter settings”.
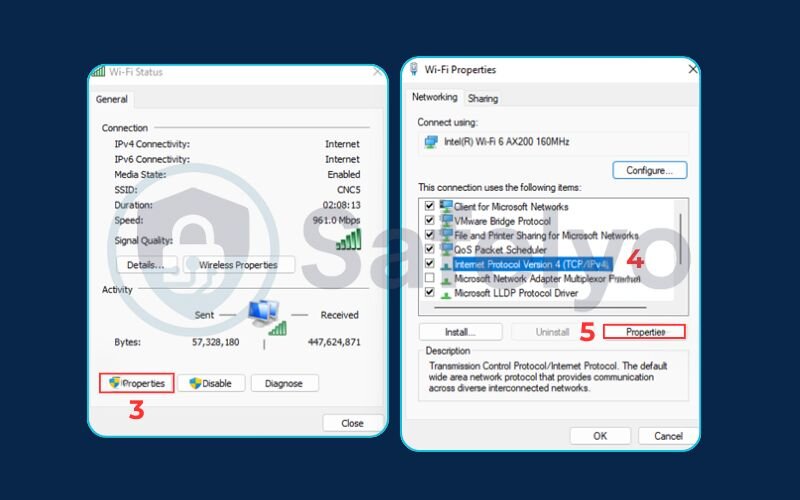
Step 4: You’ll now see a list of your computer’s network connections (Wi-Fi, Ethernet, etc.). This screen can sometimes look a bit technical, but it’s simple. You need to find the connection you are actively using to access the internet. It’s the one that is enabled and doesn’t have a red ‘X’ on it. Right-click on it and select “Properties”.
Step 5: A properties window will pop up with a list of items. Scroll down until you find “Internet Protocol Version 4 (TCP/IPv4)”. Click on the text to highlight it, and then click the “Properties” button.
MY ADVICE:
Be careful not to uncheck the little box next to the item. Just click the words to select them before hitting Properties.
Step 6: You’ve arrived! The window will likely be set to “Obtain DNS server address automatically”. Click the bubble next to “Use the following DNS server addresses”. This will activate the input fields below.
Step 7: Type your chosen “Preferred DNS server” and “Alternate DNS server” addresses into the boxes.
Step 8: Click “OK” to save your DNS settings, then click “Close” on the previous window.
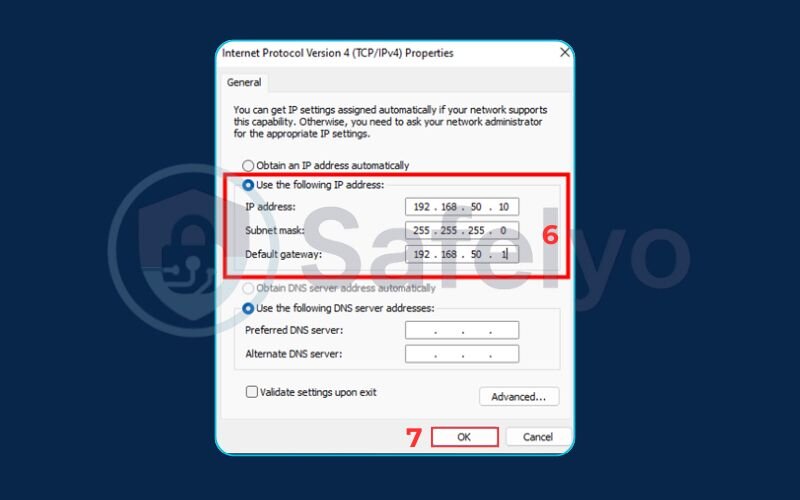
You’re all set! You’ve just configured your DNS the classic way. Now, let’s look at the methods for users who prefer the command line.
6. Method 3: How to set DNS using the command prompt (cmd)
Welcome to the power user’s fast lane. If you’re comfortable typing commands and want to make these changes without clicking through a single menu, this method is for you. Think of it as giving your computer direct, typed instructions instead of navigating a graphical map. It’s incredibly efficient once you know the language.
The most important first step here is that you must run Command Prompt with administrative rights. Otherwise, Windows will deny your request to change system settings.
Step 1: Open Command Prompt as an administrator. Click the Start menu, type cmd, then right-click on “Command Prompt” in the search results and select “Run as administrator”.
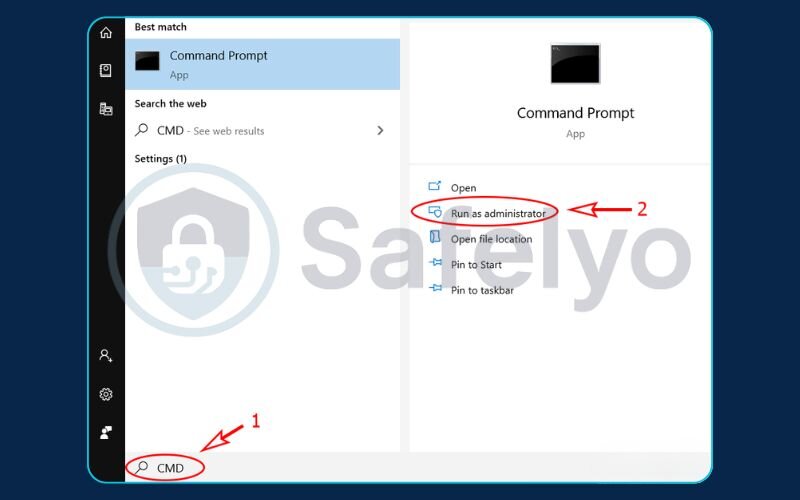
Step 2: First, you need to find the exact name of your network connection. Type the following command and press Enter:
Generated codenetsh interface show interface
This will show you a list of network adapters. Look for the one you’re using – it will likely be named simply “Wi-Fi” or “Ethernet”. Take note of this name exactly as it appears. Getting this name right is the most critical part of the process.
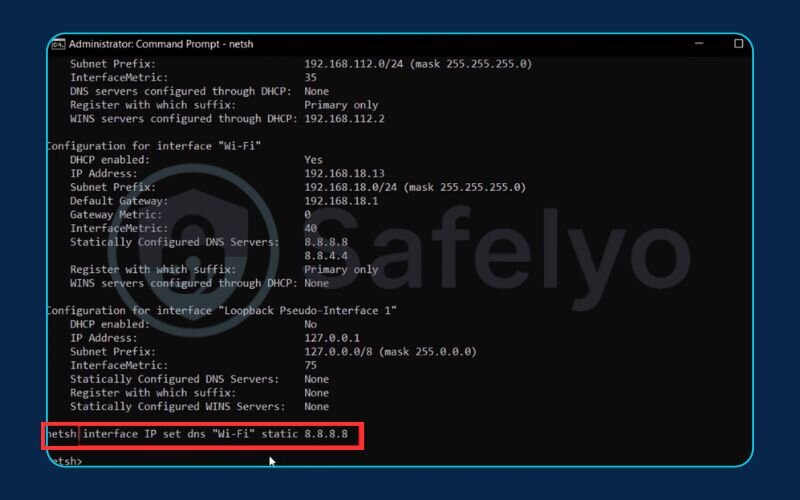
Step 3: Now, use the following command to set your primary (Preferred) DNS server. Replace “Your-Connection-Name” with the name from Step 2, and DNS.Address.Here with your chosen primary DNS address.
Generated codenetsh interface ipv4 set DNSserver name="Your-Connection-Name" static DNS.Address.Here
For example, if your connection is named “Wi-Fi” and you’re using Cloudflare, the command would be:
Generated codenetsh interface ipv4 set DNSserver name="Wi-Fi" static 1.1.1.1
Press Enter. If you don’t see an error, it worked.
Step 4: Finally, use this second command to add your secondary (Alternate) DNS server. It’s slightly different – we’re adding a server at the second position.
Generated codenetsh interface ipv4 add DNSserver name="Your-Connection-Name" DNS.Address.Here index=2
Following our example, to add Cloudflare’s alternate DNS, the command would be:
Generated codenetsh interface ipv4 add DNSserver name="Wi-Fi" 1.0.0.1 index=2
Press Enter. That’s all there is to it. You’ve just reconfigured your network settings like a pro, using only a few lines of text. Next, we’ll look at PowerShell, the modern successor to Command Prompt.
7. Method 4: How to configure DNS using PowerShell
PowerShell is the modern, more powerful evolution of the Command Prompt. While the commands look a bit more complex, it’s the preferred tool for IT professionals and anyone who wants to write scripts to automate tasks on Windows. If Command Prompt is like speaking directly to the computer, PowerShell is like using a more advanced programming language to control it.
Just like with CMD, you must run PowerShell as an administrator to have permission to change these settings.
Step 1: Open PowerShell as an administrator. Click the Start menu, type PowerShell, then right-click on “Windows PowerShell” and select “Run as administrator”.
Step 2: The first command we’ll run is to identify your network connection. PowerShell uses an “Interface Index” number instead of a name. Type the following command and press Enter:
Generated codeGet-NetAdapter
Look through the list for your active connection (e.g., Wi-Fi or Ethernet). In the very first column, you’ll see a number under ifIndex. This is your Interface Index. Take note of this number.
Step 3: Now, we’ll use a single command to set both the primary and alternate DNS servers. This is one area where PowerShell is a bit more efficient than CMD. The structure is:
Generated codeSet-DNSClientServerAddress -InterfaceIndex "Your-Index-Number" -ServerAddresses ("Primary.DNS.Here", "Alternate.DNS.Here")
For example, if your Interface Index from Step 2 was 12 and you want to use Google’s DNS servers, you would type this exact command:
Generated codeSet-DNSClientServerAddress -InterfaceIndex "12" -ServerAddresses ("8.8.8.8", "8.8.4.4")
PRO TIP:
Pay close attention to the syntax! The index number and the DNS addresses must be in quotes, and the two DNS addresses must be separated by a comma inside the parentheses (). A single misplaced comma will cause an error.
Press Enter. If the command prompt just returns to a new line without any red error text, it means your command was successful.
You’ve now mastered the most advanced method for changing DNS settings on Windows. With this skill, you’re well-equipped for any network configuration task.
8. How to verify your new DNS settings are working
Great job! You’ve run the commands or clicked through the settings. But how do you know it actually worked? Trust me, you always want to verify. It takes less than a minute and saves you from future headaches wondering if your changes were applied. It’s like sending a package – you always want to check the tracking to make sure it arrived.
Here are two simple ways to confirm your new DNS settings are active.
8.1. Method 1: Using the command prompt (the quick check)
This is my go-to method for a fast, local confirmation. It’s built right into Windows and gives you a direct answer.
- Open Command Prompt (it doesn’t need to be as an administrator for this).
Type the following command and press Enter:
Generated codeipconfig /all
- You’ll see a lot of text, but don’t be intimidated. Scroll up until you find the network adapter you’re using (it will say “Wireless LAN adapter Wi-Fi” or “Ethernet adapter Ethernet”).
- Look for the lines labeled “DNS Servers”. The addresses listed there should be the new ones you just entered (e.g., 1.1.1.1 and 1.0.0.1). If they are, you’ve successfully changed them on your computer.
8.2. Method 2: Using an online tool (the real-world test)
This method confirms not just that your PC settings are correct, but that your internet traffic is actually going through your new DNS provider. It’s the ultimate proof.
- Open your web browser and go to a site like DNSLeakTest.com.
- The site will automatically run a test and show you the IP addresses and owners of the DNS servers you are currently using.
- The results should show the name of the provider you chose, like Cloudflare, Google, or OpenDNS. If you see your Internet Service Provider’s name (e.g., Comcast, Spectrum, Verizon), something isn’t working right yet. This is where the next step becomes critical.
9. Important final step: How to flush your DNS cache
This is the one step that I see people forget all the time, and it’s often the solution to “why isn’t it working yet?” Your computer keeps a temporary memory, or “cache,” of recent DNS lookups to speed things up. After you change your DNS server, this old memory can still be active, causing your PC to use old information.
Flushing the DNS cache forces your computer to forget everything it knows and ask your new DNS server for fresh information. Think of it as clearing your browser history, but for network addresses.
Here’s how to do it. It’s incredibly simple.
Step 1: Open Command Prompt as an administrator (click Start, type cmd, right-click, and choose “Run as administrator”).
Step 2: Type the following command exactly as shown and press Enter:
Generated codeipconfig /flushDNS
Step 3: You should see a confirmation message: “Successfully flushed the DNS Resolver Cache.”
That’s it! This single command can resolve a surprising number of issues. I make it a habit to run this command every single time I change DNS settings, without fail.
10. Troubleshooting common issues
Even when you follow the steps perfectly, sometimes things don’t go as planned. Over the years, I’ve seen two issues pop up more than any others. Here’s how to fix them quickly.
PROBLEM:
"I have no internet connection after changing DNS!"
This almost always happens because of a simple typo. A single wrong digit in the DNS address (8.8.8.8 vs. 8.8.8.9, for example) will send your requests to a non-existent server, breaking your connection.
The Fix: Go back through the steps for the method you used and double-check that you entered the DNS addresses exactly right. If you’re sure they’re correct and it still doesn’t work, temporarily switch your settings back to “Obtain DNS server address automatically”. This will restore your internet connection immediately. You can then try again, perhaps with a different DNS provider like Google instead of Cloudflare, just in case one is having a temporary issue.
Problem:
"I changed my DNS, but some websites are still blocked or not loading correctly."
This is the classic symptom of an old, stubborn DNS cache on your computer or even in your browser.
The Fix: This is the perfect time to use the command we just learned! Follow the steps in section 9 to run ipconfig /flushDNS. After that, it’s also a good idea to completely close and reopen your web browser to clear its internal cache as well. This combination solves the problem 99% of the time.
11. FAQ about how to change DNS settings on Windows 10
Changing something as fundamental as your DNS can bring up a few questions. Here are the answers to some of the most common ones I hear from users who are doing this for the first time.
What is the difference between the preferred and alternate DNS servers?
Think of it as a primary contact and a backup. Your computer will always try the Preferred DNS server first. If that server is busy, offline, or doesn’t respond quickly enough, your computer automatically switches to the Alternate DNS server. Using both significantly increases the reliability of your connection.
Is it safe to change my DNS settings?
Yes, it is completely safe, as long as you use a reputable provider. Sticking with well-known services like Google, Cloudflare, or OpenDNS is a standard, secure practice used by millions to improve internet performance and privacy. The risk only comes if you use a random, unknown DNS server.
Will changing my DNS always make my internet faster?
Not always, but it often can. If your Internet Service Provider’s (ISP) default DNS servers are slow or overloaded, switching to a high-performance public DNS can noticeably reduce the lookup time for websites. This makes your day-to-day browsing feel quicker and more responsive, even if your maximum download speed remains the same.
Should I change the DNS on my router or my computer?
Changing the DNS settings on your router is the most efficient method. When you change it on the router, the new settings apply to every single device connected to your Wi-Fi network (laptops, phones, smart TVs, etc.). Changing it on your computer, as we’ve shown in this guide, only affects that one machine. If you’re comfortable accessing your router’s settings, doing it there is the best approach for your whole home.
12. Conclusion
You now have a complete toolkit for taking control of your internet connection. Knowing exactly how to change DNS settings on Windows 10 is a valuable skill that empowers you to customize your online experience for better speed, security, and privacy. It’s one of the simplest changes you can make with the biggest impact.
To recap the key points from our guide:
- We covered four distinct methods: the user-friendly Settings app, the traditional Control Panel, and the powerful Command Prompt and PowerShell options.
- We explained how to choose a reliable public DNS provider like Cloudflare or Google.
- Most importantly, we showed you how to verify the change and flush your DNS cache to ensure everything works perfectly.
Changing your DNS is an excellent first step towards a more private and efficient online life. For the ultimate in privacy and security that encrypts all your internet traffic – not just your DNS lookups – consider pairing your new settings with a trusted VPN. Explore more expert guides and tips from Safelyo in the Tech How-To Simplified category to become a master of your digital domain.


