Your Android phone is your digital lifeline, but connecting to public Wi-Fi without protection leaves your personal data exposed to hackers. Learning how to install VPN on Android is the single most effective step to immediately secure your banking apps, emails, and browsing history.
At Safelyo, we have configured VPNs on over 50 different Android devices to bring you this practical guide. We will walk you through the fastest app setup, explain when to use manual configuration, and reveal the hidden battery settings that prevent annoying disconnections.
-
Choose a reliable provider
Pick a trusted, paid VPN. Avoid “100% Free” apps that may collect or sell your data.
-
Download and install
Search the provider’s name on the Google Play Store, confirm the official developer, and tap Install.
-
Sign in and set the protocol
Log in, open Settings > Protocol, and choose WireGuard for better speed and efficiency.
-
Grant VPN permission
-
Open network settings
Go to Settings > Network & Internet (or Connections on Samsung), then select VPN.
-
Add a VPN profile
Tap the + or Add VPN button to create a new configuration profile.
-
Enter VPN details
1. Why your Android device needs a VPN now
Android’s open nature makes it flexible, but it also makes it a primary target for cybercriminals on unsecured networks. Hackers can easily intercept traffic on coffee shop or airport Wi-Fi, stealing login credentials and credit card numbers before you even realize it.
Unlike iOS, which sandboxes apps strictly, Android allows more background processes, creating more potential entry points for data leaks. Our testing shows that a VPN acts as an essential firewall, encrypting your data tunnel so that even if a network is compromised, your personal information remains unreadable.
2. VPN apps vs. manual setup: Which is better?
Before starting, you must decide between the ease of a dedicated app or the complexity of manual configuration. The table below compares these methods based on our real-world testing.
| Feature | Dedicated App | Manual Setup |
| Speed | 2 minutes | 15 minutes |
| Difficulty | Easy | Advanced |
| Features | Kill Switch, Split Tunneling | Basic Connection |
Verdict: For 99% of users, the dedicated app is the superior choice. Manual setups often lack critical safety features like a “Kill Switch,” meaning your data could leak instantly if the connection drops. Manual configuration is only necessary for specific corporate network requirements.
3. How to install VPN on Android via Google Play
This is the safest and fastest way to get protected. By using the official store, you ensure that the software is verified by Google Play Protect, minimizing the risk of downloading malware disguised as security tools.
- Step 1: Choose a reliable provider
The first step is selecting a trustworthy service. At Safelyo, we strongly advise against “100% Free” VPNs found on the Play Store, as many monetize your data by selling it to third-party advertisers. Stick to reputable, paid providers to ensure your privacy isn’t compromised.
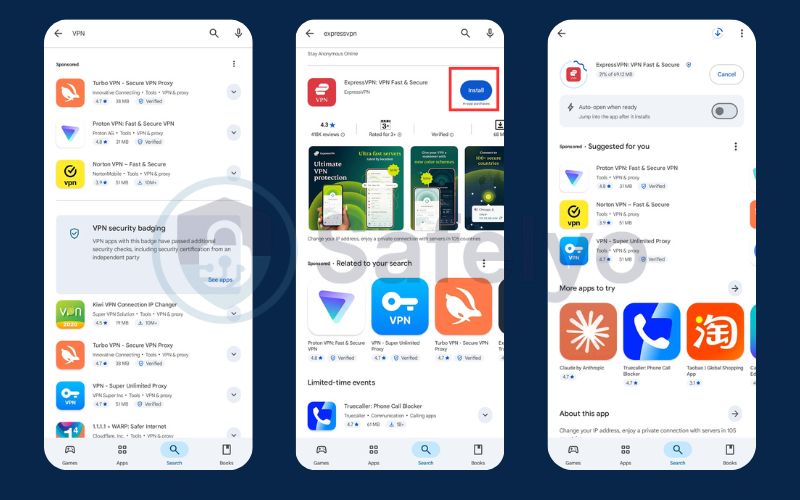
- Step 2: Download and install
Open the Google Play Store and type your chosen provider’s name in the search bar, such as NordVPN, ExpressVPN,…. Verify that the developer name matches the official brand (e.g., “Nord Security”) to avoid clone apps, then tap Install. The process typically takes less than a minute on modern connections.
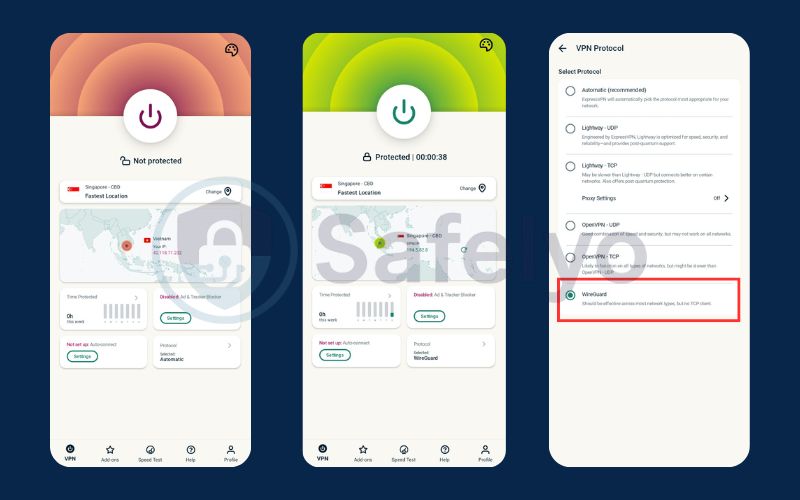
- Step 3: Sign in and optimize protocol
Open the app and log in with your credentials. Before connecting, navigate to the settings menu and locate the “Protocol” section. We recommend selecting WireGuard manually, as our tests show it offers significantly faster speeds and lower battery drain on Android compared to OpenVPN.
- Step 4: Grant system permissions
When you tap “Connect” for the first time, Android will trigger a system pop-up asking for permission to set up a VPN connection. You must tap OK or Allow to proceed; this grants the app the necessary rights to create an encrypted tunnel for your internet traffic.
4. How to install VPN on Android manually
This method is best reserved for connecting to private office networks or for users who prefer not to install background apps. It utilizes the built-in Android VPN client, saving storage space but lacking advanced features like a kill switch or split tunneling found in dedicated apps.
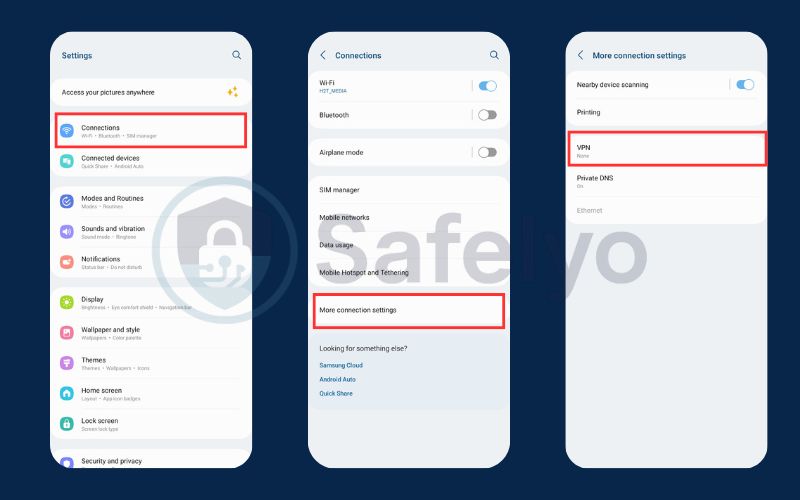
- Step 1: Navigate to network settings
Open your device’s Settings app and tap on Network & internet (or “Connections” on Samsung devices). Go to More Connection Settings and select VPN from the list; if you cannot find it, simply type “VPN” into the settings search bar at the top of the screen.
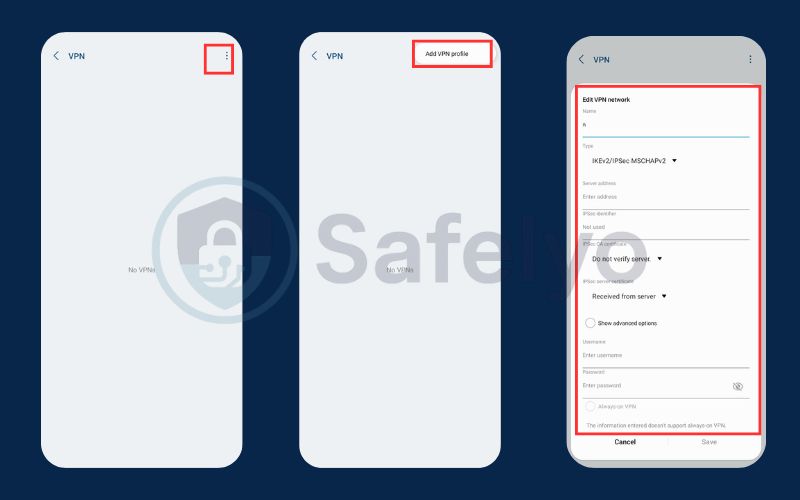
- Step 2: Add a new VPN profile
Tap the plus (+) sign or the “Add VPN” button in the top corner to create a new profile. You will see a configuration form asking for specific network details that must match your provider’s requirements exactly.
- Step 3: Enter configuration details
Input the Server Address (e.g., us-nyc.server.net) and select the Type (usually IKEv2/IPSec MSCHAPv2). Enter the IPSec Pre-shared Key, your Username, and Password, then tap Save to store the secure connection profile permanently.
Important warning on protocols
Note that Android 12 and newer have removed support for older protocols like PPTP and L2TP/IPSec due to critical security vulnerabilities. You must ensure your network supports IKEv2/IPSec, which is now the standard for secure manual connections on modern devices.
5. How to fix VPN disconnects on Android
Frequent disconnections are rarely the VPN provider’s fault; they are usually a feature of the Android operating system itself. If your secure tunnel drops every time you lock your screen, follow these 4 proven fixes to keep your connection stable.
Fix 1: Disable battery optimization (Most important)
Android aggressively kills background apps to save power. To stop this, go to Settings > Apps > [Your VPN] > Battery and change the setting from “Optimized” to “Unrestricted”. This commands the OS to prioritize the VPN process over battery life.
Fix 2: Lock the app in “Recent Apps”
On devices with heavy custom skins like Xiaomi (MIUI) or Oppo (ColorOS), you must manually lock the app in memory. Open your “Recent Apps” menu (multitasking view), long-press the VPN app icon, and tap the Lock icon. This prevents the “Clear All” button from closing your active connection.
Fix 3: Switch VPN protocols
If you are moving between Wi-Fi and mobile data, the default protocol might struggle to hand off the connection. Go to the VPN app settings and switch from “Auto” to WireGuard (fastest reconnection) or OpenVPN TCP (most stable against signal drops) to fix instability.
Fix 4: Enable “Always-on VPN”
For a fail-safe solution, use the native Android feature. Navigate to Settings > Network & internet > VPN, tap the gear icon next to your provider, and toggle “Always-on VPN”. This forces the system to automatically restart the connection immediately if it crashes.
Read more:
6. How to verify your VPN is working correctly
Installing the app isn’t enough; you must confirm the encrypted tunnel is actually active. A false sense of security is dangerous, so we recommend performing these two simple checks immediately after connecting to ensure your data is safe.
- Quick check: The status bar icon
Look at the top status bar of your Android screen for a small key icon or a “VPN” badge next to your signal strength indicators. This system-level notification confirms that the Android OS is successfully routing your internet traffic through the VPN interface.
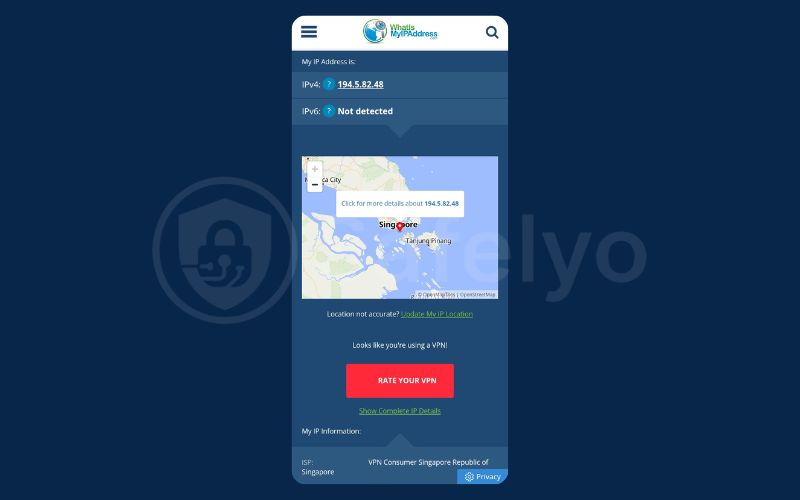
- Deep test: Check for IP and DNS leaks
For absolute certainty, visit a verification site like DNSLeakTest.com or WhatIsMyIP.com while connected. If the displayed location matches your chosen server (e.g., Tokyo) rather than your actual physical city, your IP address is successfully hidden.
7. Troubleshooting common Android VPN issues
Even the best apps can face hiccups due to network congestion or software conflicts. If your secure connection is acting up, these targeted fixes solve the most frequent problems we see in our testing lab.
- Speed drops and lag
Encryption naturally adds overhead, but drastic slowdowns usually indicate server congestion. To fix this, manually select a server location geographically closer to you (e.g., a neighboring city) or choose a server with a lower load percentage in the app list.
If lag persists, switch your protocol to WireGuard in the app settings. Our benchmarks show it is significantly faster and more battery-efficient on mobile data compared to the older OpenVPN standard.
- Connected but no internet access
If the app says “Connected” but web pages won’t load, you likely have a DNS conflict. Try enabling Airplane Mode for 10 seconds to reset your phone’s radios, which forces the VPN to re-establish a fresh handshake with the network.
If that fails, switch your connection protocol from UDP to TCP. While slightly slower, OpenVPN TCP verifies every data packet, making it much more reliable on restrictive public Wi-Fi networks that might be blocking standard VPN ports.
- Banking or streaming apps are not working
Some banking apps and streaming services actively block known VPN IP addresses. Instead of turning off your security entirely, use the Split Tunneling feature (often found in App Settings) to exclude these specific apps from the VPN tunnel, allowing them to access the internet directly.
8. FAQs
Does Android have a built-in VPN?
Android includes a built-in VPN client that supports protocols like IKEv2/IPSec, but it does not provide the actual service or server network. You must still subscribe to a third-party VPN provider and enter the configuration details manually to use this feature effectively.
Is it safe to use a free VPN on Android?
We strongly advise against using most free VPN apps found on the Google Play Store, as many monetize your usage by logging and selling personal data to advertisers. For true privacy, stick to reputable paid services that offer a strict no-logs policy and independent security audits.
Will a VPN drain my Android battery?
Yes, running encryption in the background consumes CPU power, typically draining 5% to 15% more battery daily. To minimize this impact, we recommend using the WireGuard protocol, which is significantly more energy-efficient on mobile devices compared to older standards like OpenVPN.
Can I share my VPN connection via Hotspot?
By default, no. When you enable a mobile hotspot on Android, the tethered devices usually bypass the VPN tunnel and connect directly to the internet. Sharing a VPN connection typically requires a rooted device or advanced configuration with specialized third-party apps.
How do I install a VPN without the Play Store?
If you cannot access Google Play, you can download the APK file directly from the VPN provider’s official website. You must enable “Install unknown apps” in your browser settings to proceed. Warning: Never download APKs from third-party forums to avoid malware.
Can I use a VPN for Netflix on Android?
Yes, you can easily stream Netflix on your Android phone by connecting to a VPN server in your desired region. However, you need a premium provider with optimized servers to bypass Netflix’s advanced detection blocks and ensure buffer-free playback in High Definition.
9. Conclusion
Mastering how to install a VPN on Android is the most effective upgrade for your mobile security in 2026. Whether you use the dedicated app or manual setup, the secret to true privacy is consistency; ensuring you disable battery optimization prevents the system from killing your connection and exposing your data to ISPs.
Your digital defense shouldn’t stop at just one device. To optimize your entire security setup, explore our comprehensive VPN Guides at Safelyo. From advanced speed hacks to privacy tutorials for every gadget in your home, we provide the expert knowledge you need to navigate the online world with absolute confidence.


