Whether you need to connect to a corporate network, access a school’s system, or bypass simple content restrictions, knowing how to set up a proxy server on Mac is an invaluable technical skill. Think of it as giving your Mac a specific new route for its internet traffic to follow, provided by your organization or a service you’ve chosen.
As a tech specialist who has guided hundreds of users through network configurations, I’ve seen firsthand that the process isn’t difficult, but it requires precision. A single misplaced digit in a server address or the wrong protocol selected is often all that stands between a successful connection and a frustrating error message. This guide is built to prevent that.
In this comprehensive walkthrough, you will learn:
- What essential information do you need to gather before you start?
- How to locate the settings on the latest macOS versions, like Sonoma and Ventura.
- Step-by-step instructions for both manual (HTTP, SOCKS) and automatic (.PAC) configurations.
- A simple way to verify that your new proxy connection is working correctly.
This guide focuses on configuring your Mac to use an existing proxy service. Let me walk you through every click to get you connected confidently and securely.
1. What you’ll need before you start
Before we dive into your Mac’s settings, let’s get our ingredients ready. Trying to set up a proxy without the correct details is like trying to unlock a door with the wrong key – it simply won’t work. Your Mac needs to know exactly where to send its traffic, and that information must come from your proxy provider (your company’s IT department, your school’s network administrator, or the commercial proxy service you’ve subscribed to).
Here is a simple checklist of the information you need to have on hand:
- The proxy server’s address. This will look either like a set of numbers (an IP address, for example, 10.10.1.100) or a web-like address (a hostname, like proxy.yourschool.edu).
- The port number. This is a specific number that acts like a designated gateway on the server. Common examples are 8080 or 3128.
- The proxy type (protocol). Your provider must tell you which protocol to use. It will usually be HTTP, HTTPS, or SOCKS5. Choosing the wrong one is a common mistake.
- A username and password. This is only necessary if your proxy requires you to log in for access.
- For automatic setups: You might just get a single web address ending in .pac (Proxy Auto-Config). This one file contains all the settings.
Trust me on this one. After troubleshooting this for years, I can tell you that the most common reason a proxy setup fails is a simple typo in the server address or port number. A 3128 accidentally typed as 3182 is all it takes to break the connection. If you can, copy and paste these details directly from the email or document your provider sent you.
2. Locating proxy settings on macOS (Sonoma & Ventura)
Alright, with your proxy details in hand, it’s time to navigate to the right place in macOS. Apple has streamlined its settings in recent versions, so the path is quite straightforward once you know where to look. We’ll walk you through it, click by click.
Here is the exact path for modern macOS versions like Sonoma and Ventura:
- Click the iconic Apple logo in the top-left corner of your screen and select System Settings.
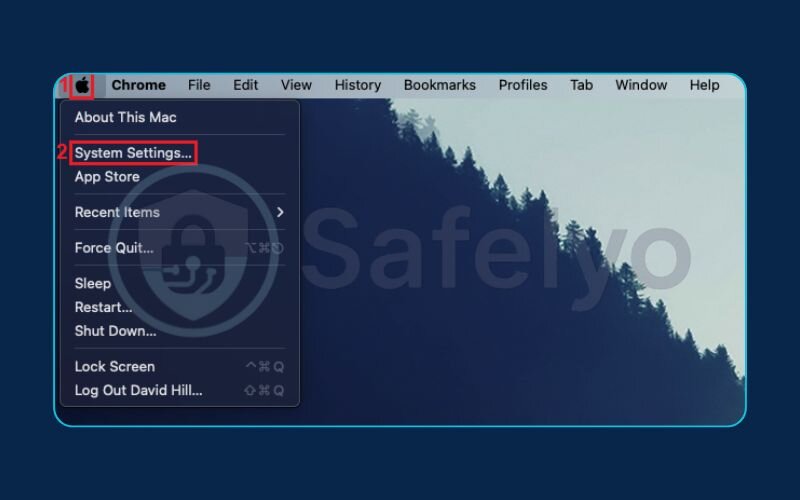
- In the window that opens, scroll down the left-hand sidebar and click on Network.
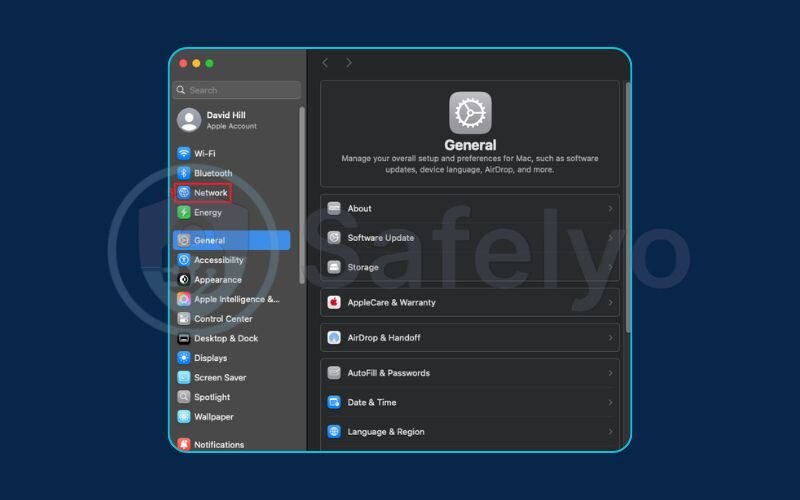
- Now, select the network service you are actively using from the list (this is usually Wi-Fi or Ethernet).
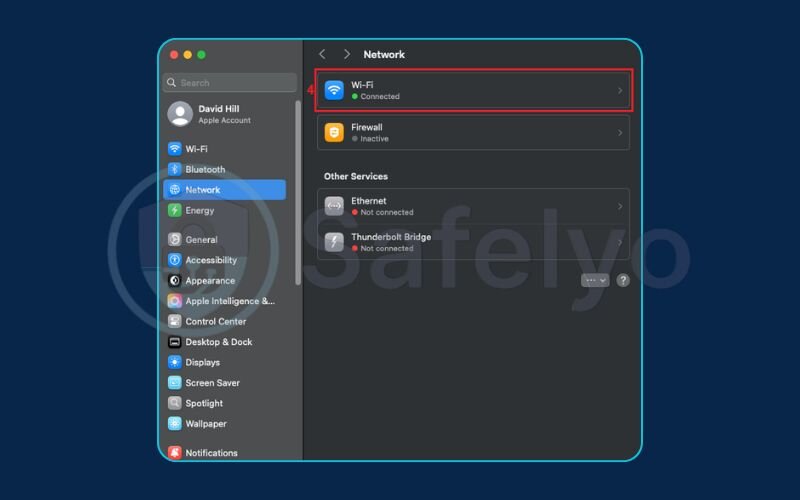
- Click the “Details…” button for that specific network service.
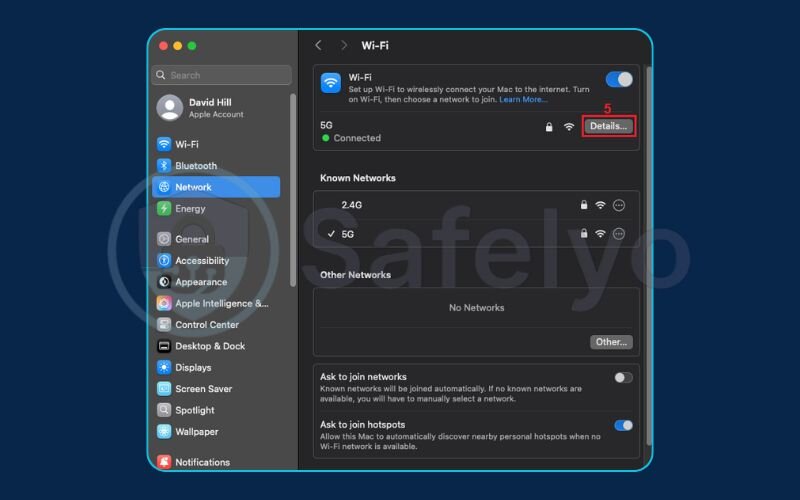
- In the new, smaller window, select the Proxies tab from its sidebar.
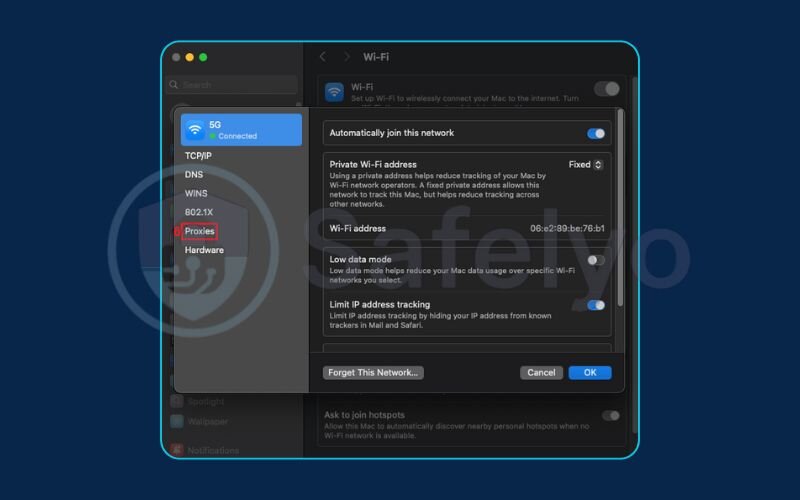
And that’s it! You should now be looking at the main proxy configuration panel, where all the magic happens. We’ve laid out this exact click path in the screenshot below to make it impossible to get lost.
A quick note for older macOS versions
If you’re running macOS Monterey or an earlier version, your journey is nearly identical, just with slightly different names. You’ll find these settings under System Preferences > Network. From there, select your network service, click the Advanced… button, and then select the Proxies tab.
Read more:
3. Configuring the proxy: The main methods
You’ve successfully navigated to the proxy panel. This is where you’ll input the details you gathered earlier. Your Mac offers two primary ways to do this: Manual configuration, which is the most common, and automatic configuration, which is often used by large organizations.
3.1. Manual configuration (for HTTP, HTTPS, and SOCKS proxies)
This method gives you direct control and is likely the one you’ll use if you were given a server address and port number.
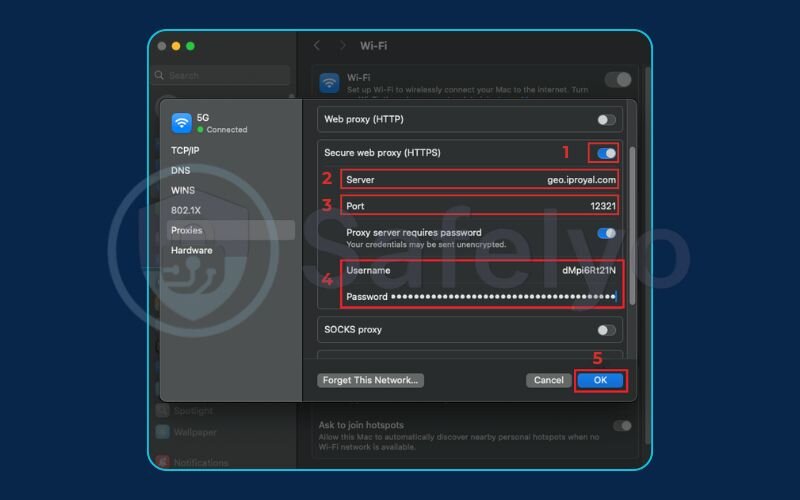
First, and this is critical, you must select the correct protocol from the list on the left. Your proxy provider will have specified this. For standard web browsing, this is usually Web Proxy (HTTP) and Secure Web Proxy (HTTPS). For other applications or specific setups, you might be instructed to use a SOCKS Proxy.
- Check the box next to the correct proxy protocol (e.g., Web Proxy (HTTP)).
- In the fields that appear on the right, enter the Server address and Port number you prepared earlier.
- If your proxy requires a login, check the box for “Proxy server requires password”. This will reveal fields for you to enter your Username and Password.
- Click OK to close the details window, and then – this is the most important step – click Apply in the main Network window.
From my experience, I can’t count the number of times I’ve seen someone configure everything perfectly, only to close the window and wonder why nothing changed. The Apply button is what makes your settings stick!
At the bottom of the manual proxy configuration window, you’ll see a field labeled “Bypass proxy settings for these hosts & domains”. This is a handy feature if you want to connect directly to certain websites (like internal company sites or a local printer’s web interface) without going through the proxy. Simply enter the addresses separated by commas (e.g., *.local, yourcompany.com).
3.2. Automatic proxy configuration (using a PAC file)
This method is the “set it and forget it” option, often provided by large companies or universities to make life easier for everyone. If you were given a single URL ending in .pac, this is for you.
- Check the box next to Automatic Proxy Configuration in the protocol list.
- Paste the full .pac file URL into the URL field on the right.
- Click OK, and then click Apply.
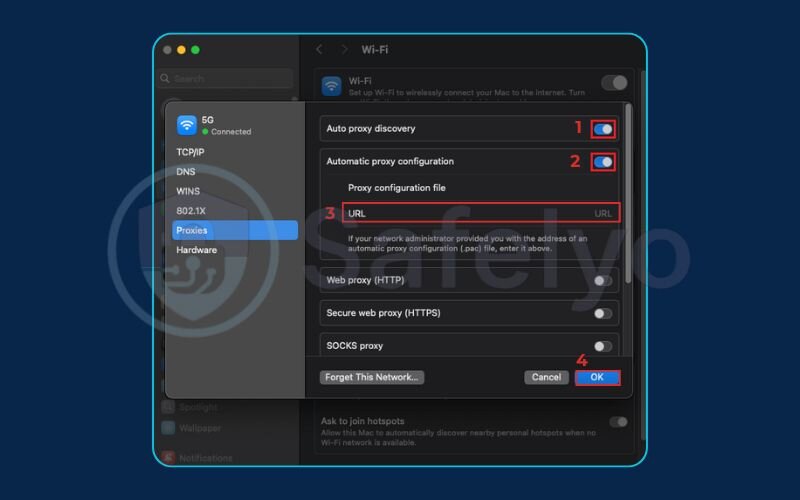
It’s as simple as that. Your Mac will now use that file to determine how to route all of your traffic. Just make sure the URL is correct, as a mistake here will prevent your internet from working at all.
4. How to verify your proxy is working
You’ve clicked “Apply” and your settings are saved, but how do you know it’s actually working? Don’t just assume it is. Verifying the connection takes less than a minute and confirms that all your hard work paid off.
The easiest way to check is to see what the internet thinks your location is.
- Open your preferred web browser, like Safari or Chrome.
- Navigate to a simple IP-checking website. My go-to is WhatIsMyIP.com.
- The website will display the public IP address it sees you connecting from.
If the setup was successful, the IP address shown should belong to the proxy server, not your home or office network. It will likely be in a completely different city or even country, depending on where the proxy server is located. If you see the proxy’s IP, congratulations, you’ve successfully configured your proxy! If you still see your regular IP, go back and double-check your settings, especially for typos.
5. How to quickly disable the proxy on your Mac
There will come a time when you no longer need the proxy – perhaps you’ve left the office for the day or finished your work on the school network. Leaving a proxy active when you don’t need it can sometimes slow down your connection or prevent you from accessing certain local services.
From my own experience, I often switch off my work proxy when I get home to stream media, as my direct home connection is much faster for that purpose. Thankfully, disabling it is even easier than setting it up.
Here's how to turn it off in seconds:
- Navigate back to the same Proxies panel by following the steps in Section 2 of this guide (System Settings > Network > Details…).
- Look at the list of protocols on the left.
- Simply uncheck all the boxes that you previously checked in the configuration step.
- Click OK, and then the crucial final step: click Apply.
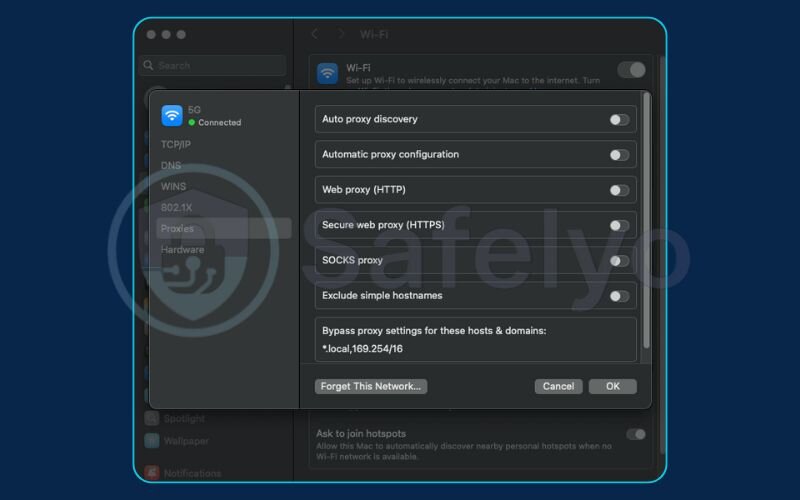
Your Mac’s internet traffic will instantly revert to its normal, direct connection. You don’t need to delete the server details – you can leave them there, unchecked, ready to be quickly re-enabled the next time you need them. It’s like a light switch for your internet route.
6. Proxy vs. VPN on Mac
Now that you’re a pro at setting up proxies on your Mac, it’s vital to understand what a proxy does and, more importantly, what it doesn’t do. People often confuse proxies with VPNs (Virtual Private Networks), but they serve very different purposes, especially concerning your security and privacy.
Think of a proxy server as a simple mail forwarder. It receives your web traffic (from a specific app, like your browser) and sends it out on your behalf, masking your IP address in the process. It’s great for getting around simple geo-blocks or accessing a private network.
A VPN, on the other hand, is like an armored truck for your data. It creates a secure, encrypted VPN tunnel for all internet traffic, leaving your Mac – not just your browser, but your email client, gaming apps, and everything else. It doesn’t just change your IP; it makes your entire connection invisible to your internet service provider, hackers on public Wi-Fi, and other prying eyes.
>> Read more for the detailed comparison: Proxy vs VPN: What’s best for your online privacy?
Here’s a clear breakdown of the key differences:
| Feature | Proxy Server | VPN (Virtual Private Network) |
|---|---|---|
| Encryption | None or very weak | Strong (AES-256 standard) |
| Scope of Traffic | Usually app-specific (e.g., your browser) | Entire device (all apps) |
| Privacy & Anonymity | Your data can be logged by the proxy owner | Top providers have strict no-logs policies |
| Speed | Can be slow, depending on the server | Optimized for speed and stability |
| Best For | Accessing school/work networks, simple geo-unblocking | Total security, privacy, and serious unblocking |
While a proxy is a useful tool for specific tasks, it does not protect your data. I always advise friends and family that for true online privacy and security on their Mac – whether at a café, airport, or even at home – a VPN is the essential tool. It’s the difference between rerouting your mail and putting it in a locked safe before sending it.
>> For a deeper dive into protecting your Mac, discover the best VPNs for Mac in our comprehensive review.
7. FAQ about how to set up a proxy server on Mac
Even with a straightforward guide, network settings can sometimes raise a few questions. Over the years, I’ve seen the same issues pop up time and again. Here are the answers to the most common questions about setting up a proxy on your Mac.
Why is my Mac proxy not working after setup?
This is almost always due to a simple input error. The most common reasons are: a typo in the server address or port number, selecting the wrong proxy type (e.g., choosing HTTP when your provider requires SOCKS), or entering an incorrect username/password. Carefully double-check every single detail against the information your provider gave you.
Do I need to set up the proxy for Chrome separately?
No. One of the best things about macOS is that these proxy settings are system-wide. When you configure them in System Settings, they automatically apply to almost all applications that access the internet, including Chrome, Safari, Firefox, and many others. You only need to set it up once.
Is it safe to use a free proxy I found online?
We strongly recommend against it. Free proxies are notoriously insecure and have to make money somehow, often by monitoring your traffic, selling your data, or even injecting malware into your connection. For your own safety, only use a proxy from a trusted source like your work, your school, or a reputable paid service.
How do I set a proxy for the command line (Terminal)?
This is an advanced step that isn’t controlled by the System Settings panel. To set a proxy for your current Terminal session, you need to use a command to export environment variables, like: export HTTP_PROXY=”http://username:password@your.proxy.address:port”. Note that this setting is temporary and will reset when you close the Terminal window.
Why is my internet completely down after setting up the proxy?
This scary scenario almost always means one of two things: the proxy server itself is offline, or you cannot reach it from your current network. The first step is to disable the proxy using our guide (Section 5) to confirm that your regular internet works. If it does, the problem is with the proxy. Double-check the server address and port number. If they are correct, you’ll need to contact your proxy provider for support.
8. Conclusion
You are now fully equipped to confidently set up, verify, and manage a proxy server on your Mac. By taking control of these settings, you can easily connect to private networks and access the content you need. This guide on how to set up a proxy server on Mac was designed to make the process as clear and error-free as possible.
To recap, here are the key takeaways:
- Always gather your proxy details first (address, port, type, and credentials).
- The settings are located in System Settings > Network > Details… > Proxies on modern macOS.
- You can configure proxies manually (for HTTP/SOCKS) or automatically (with a .PAC file).
- A proxy reroutes traffic but does not provide the encryption and total privacy of a VPN.
Remember to use this new skill wisely, always prioritizing trusted proxy sources to keep your data safe. To elevate your Mac’s security to the next level with full encryption and learn more powerful ways to master your digital privacy, explore more expert guides from Safelyo in our Tech How-To Simplified category.

