
Managing multiple email accounts for sales, support, and billing often leads to missed messages and wasted time. Instead of constantly switching between inboxes, you can streamline your workflow by redirecting everything to one place.
Learning how to set up email forwarding in cPanel provides a simple, automated solution to keep your communication organized.
-
Forward a single account
Log in → Access “Forwarders” → Click “Add Forwarder” → Enter source and destination addresses → Click “Add Forwarder”.
-
Redirect an entire domain
Open “Forwarders” → Navigate to “Domain Forwarders” tab → Click “Add Domain Forwarder” → Set source and destination domains → Click “Add Domain Forwarder”.
-
Send to multiple recipients
Create a forwarder for the first recipient → Click “Add Forwarder” → Repeat the process for each additional recipient using the same source address.
1. What is email forwarding in cPanel?
Email forwarding in cPanel is a feature that automatically sends incoming emails from one address to another. It works by redirecting incoming emails from one mailbox to another in real time. This allows users to consolidate emails, reduce inbox monitoring time, and improve communication flow. Forwarders can be created at the individual account level or across an entire domain.
When you learn how to set up email forwarding in cPanel, you gain better control over email management, especially useful for small businesses, domain migrations, or consolidating departmental communication. There are two types of forwarding available in cPanel:
- Account-level forwarding: Redirects emails from a specific address (e.g., support@example.com) to another (e.g., team@example.com).
- Domain-level forwarding: Sends all emails from one domain to another (e.g., all@example1.com → all@example2.com).
This is especially useful for:
- Centralizing messages across departments
- Managing role-based emails (e.g., info@, sales@, contact@)
- Creating automatic backups by forwarding copies to a secure archive
Example: Imagine your company has a shared address like sales@company.com for incoming customer requests. Instead of having just one person log in and check it, you can set up email forwarding so that every message sent to sales@company.com is automatically redirected to alice@company.com and bob@company.com. Both can respond quickly without missing anything, and there’s no need to log into the sales inbox separately.
According to cPanel documentation, email forwarders have a specific function. They allow a copy of every email sent to one address to be automatically forwarded to another address. This feature enables you to manage multiple addresses easily. You won’t need to log in separately to each inbox.
In one of my early consulting projects, I used this feature to redirect inquiries from multiple department aliases into a single shared inbox. This not only reduced missed emails but also made task delegation smoother for a lean team.
By understanding how cPanel handles email redirection, you can design a more efficient email workflow for both individual and business use.
Let’s now explore how to set up email forwarding for a single address in cPanel.
2. How to set up email forwarding in cPanel for a single email account
If you’re wondering how to forward a single email address in cPanel, the process is simple and only takes a few minutes. Setting up email forwarding allows you to redirect messages from one address to another – useful for consolidating communication without switching accounts.
Here’s how to do it step by step:
Step 1: Log in to your cPanel dashboard
Use your hosting provider’s link or go to yourdomain.com/cpanel and enter your login credentials.
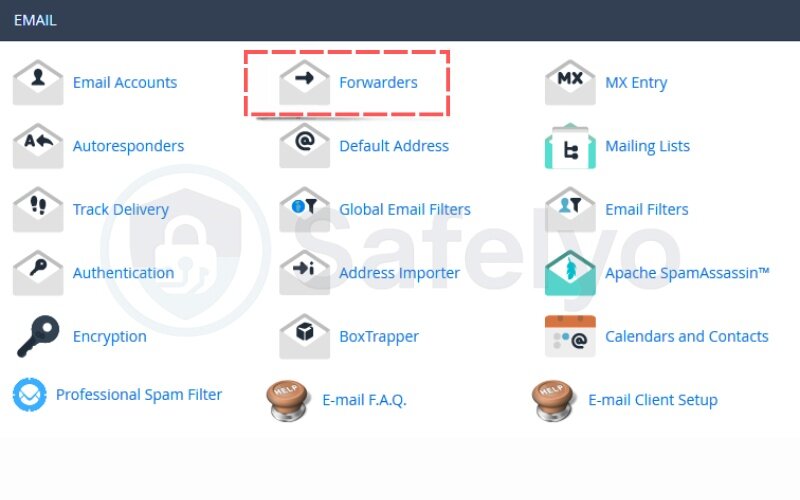
Step 2: Access the “Forwarders” tool
Once logged in:
- Scroll down to the Email section
- Click on “Forwarders”
This tool manages all forwarding rules for your domain.
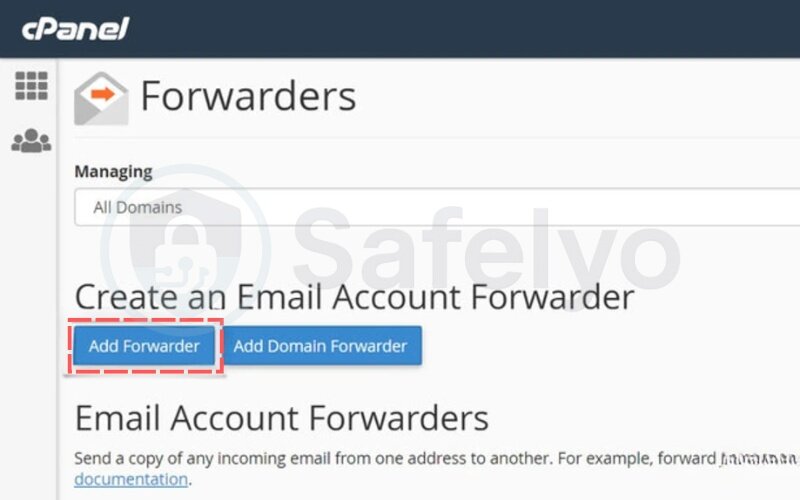
Step 3: Click “Add Forwarder”
In the Forwarders interface, click on “Add Forwarder” to create a new rule.
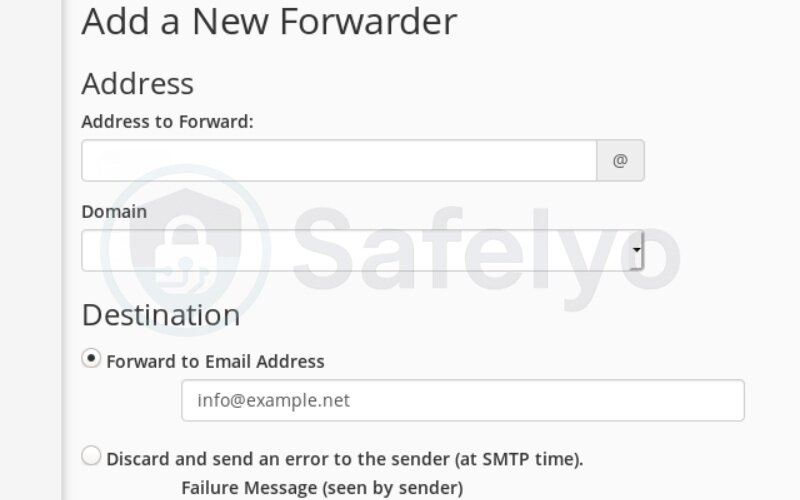
Step 4: Enter source and destination email addresses
You’ll be prompted to fill in:
- Address to forward: Enter the user portion of the email (e.g., “info” for info@yourdomain.com)
- Domain: Select the domain name (e.g., yourdomain.com)
- Destination: Enter the full email address where the messages should be forwarded (e.g., yourname@gmail.com)
Step 5: Choose whether to keep a copy on the server
You can choose to:
- Keep a copy of the original address (useful for backup)
- Or choose to discard email after forwarding if you don’t want duplicates.
For most users, keeping a copy ensures nothing gets lost during delivery issues.
Step 6: Click “Add Forwarder” to save
Once confirmed, cPanel will begin forwarding all new emails sent to that address immediately.
Example scenario: Let’s say you’ve created team@yourdomain.com for project collaboration. Instead of asking everyone to log into that shared inbox, you forward all incoming mail to millie@yourdomain.com, bobby@yourdomain.com, and yourself. This keeps your team in sync without needing to manage another login.
According to Hostinger’s support portal, “Email forwarders are a reliable way to direct incoming messages to one or more addresses while retaining control of your mail flow.”
In one project, I used a personal domain email (e.g., john@freelancerportfolio.com) and forwarded it to my main Gmail address. This saved time and made it easier to manage client responses in one place, especially while working on the go.
Setting up a forwarder for one email account is a small change that can make a big impact on how efficiently you manage communication. This makes each email account easier to manage without separate logins. Always double-check that the destination email address is valid to avoid delivery failures.
Next, let’s look at how to forward all emails for an entire domain in cPanel.
3. How to forward all emails for a domain in cPanel
If you’re wondering how to set up email forwarding in cPanel for an entire domain, the process is simple using the domain forwarder feature. This allows you to redirect all emails from one domain (e.g., @oldcompany.com) to another (e.g., @newcompany.com) without configuring each account individually.
This is especially useful during rebranding or domain transitions.
Step 1: Log in to cPanel and open “Forwarders”
From the cPanel dashboard, scroll to the Email section and click on Forwarders.
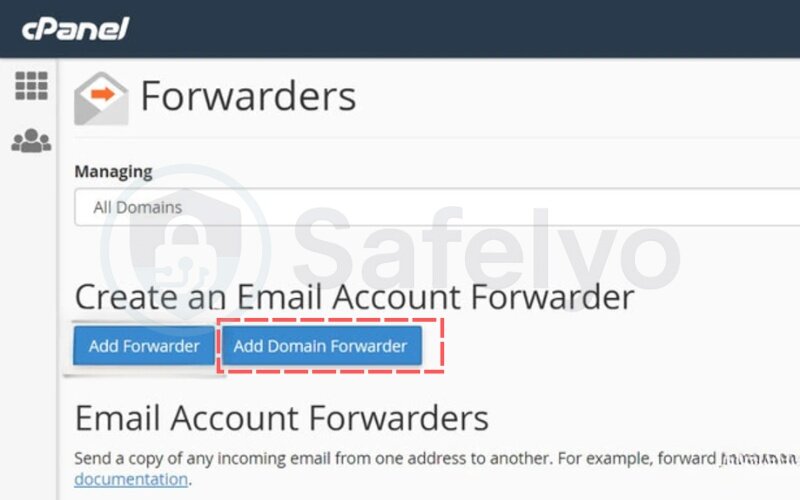
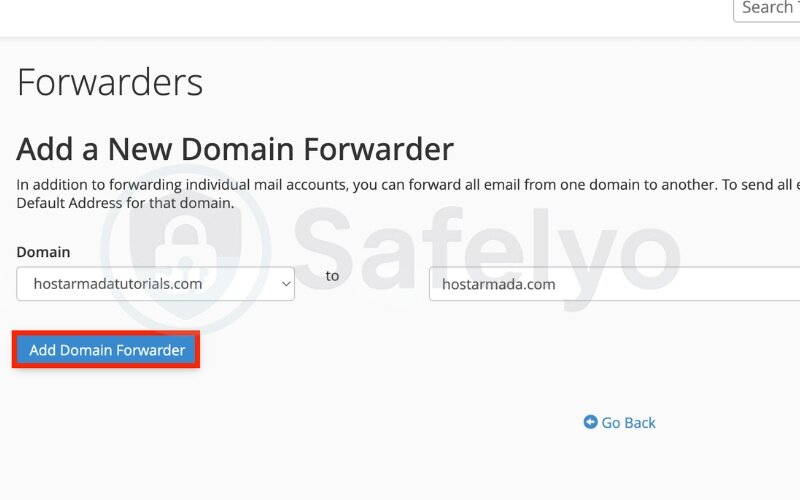
Step 2: Choose “Add Domain Forwarder”
Navigate to the Domain Forwarders tab and select Add Domain Forwarder. The domain forwarders option is designed to handle entire domains at once, saving you from creating multiple individual rules.
Step 3: Set the source and destination domains
- Source domain: Choose the domain you want to forward from (e.g., oldcompany.com)
- Destination domain: Enter the domain to forward to (e.g., newcompany.com)
Every address under the source domain will now forward from the old address to its counterpart at the new one. Make sure your new address is active before enabling domain-wide forwarding. (e.g., support@oldcompany.com → support@newcompany.com).
When I helped migrate a client from an older domain to a new one, setting up domain-wide email forwarding in cPanel saved us hours of manual setup. Instead of re-creating dozens of email accounts, we redirected everything in minutes. I also enabled SPF and DKIM on the new domain to prevent spoofing and made sure to monitor spam filters for a few days post-switch.
Step 4: Save the configuration
Click Add Domain Forwarder to activate the rule. Always review the forwarding configuration carefully to prevent misrouted mail.
Step 5: Tip: Use caution with catch-all forwarding
In some setups, a wildcard redirect can act similarly, but it should be used with caution to avoid spam overload. Catch-all forwarding can attract high volumes of spam. Always use email authentication tools like SPF, DKIM, and DMARC to protect your domain. A wildcard redirect can sometimes be used as an alternative, but it should be configured carefully to avoid misrouting or spam exposure.
According to CISA, unauthenticated email forwarding can increase the risk of phishing and domain spoofing. Secure your setup accordingly.
Next, let’s explore how to forward an email to multiple recipients, especially useful for teams or shared responsibilities.
4. How to forward an email to multiple recipients in cPanel
If you want to send incoming emails to several people at once, cPanel allows you to forward emails to multiple addresses by creating individual forwarders for each recipient. This is ideal for team inboxes, project groups, or shared responsibilities.
There’s no built-in “group forwarder” in cPanel, but setting up multiple forwarders achieves the same result. However, cPanel lets you forward to multiple addresses by creating separate rules.
Step 1: Go to Forwarders in cPanel
Log in to your cPanel account and click on Forwarders under the Email section.
Step 2: Create a forwarder for each recipient
Click Add Forwarder, then:
- Enter the source email address (e.g., projects@yourdomain.com)
- Enter the first destination address (e.g., alice@example.com)
- Click Add Forwarder
Repeat the process for each additional recipient (e.g., bob@example.com, carol@example.com, etc.)
Each forwarder uses the same source but sends to a different destination.
Step 3: Consider using a distribution list
If you’re managing a large group, consider using mailing list software or an external service like Google Groups. cPanel isn’t ideal for managing or editing large recipient lists.
I used this method to keep a small team of developers in sync. All updates sent to dev@ourdomain.com were forwarded to each team member’s personal inbox. It was simple to manage and ensured no one missed critical announcements. To prevent server strain, I avoided forwarding to more than 10 recipients and monitored mail queue performance regularly.
Step 4: Best practices for multi-recipient forwarding
- Keep the recipient list short to avoid delivery delays
- Avoid looping forwarders (e.g., forwarding back to the sender)
- Test with a small email to confirm all recipients receive it
Up next, let’s look at how to manage or delete email forwarders to keep your setup clean and secure.
5. How to manage or delete existing email forwarders
Over time, you may need to manage email forwarders in cPanel to update addresses, remove outdated ones, or reduce clutter. Keeping your forwarders clean helps avoid misrouted emails, spam buildup, and forwarding loops.
Here’s how to view, edit, and delete them easily.
5.1. Access your list of email forwarders
Log in to cPanel and click on Forwarders in the Email section.
You’ll see two sections:
- Email Account Forwarders for individual addresses
- Domain Forwarders for domain-wide rules. Using domain forwarders is especially efficient during migrations.
5.2. Delete or edit a forwarder
Find the forwarder you want to change, then:
- Click Delete Forwarder next to an entry if you no longer need it.
- To change the destination, delete the current one and create a new forwarder with the updated address
There’s no direct “edit” button, so you’ll need to recreate forwarders when making changes.
5.3. Regularly audit your forwarders
- Remove any that point to outdated or unused accounts
- Check for any forwarders that duplicate delivery unnecessarily
- Ensure no forwarders send mail to suspicious or untrusted domains
After a few months of running a team inbox, I realized several old forwarders were still active – some were pointing to team members who had already left the company. Cleaning them up helped cut down spam and ensured messages only reached the right people. I now set a monthly reminder to review and audit our cPanel forwarders.
A clean forwarding setup makes email delivery faster, more secure, and easier to troubleshoot.
Next, let’s go over common issues with email forwarding in cPanel and how to fix them.
6. Troubleshooting issues with email forwarding in cPanel
If your cPanel email forwarding is not working, several factors could be causing the issue. This section will help you identify and fix the most common problems quickly and effectively.
6.1. Common problems and how to fix them
- Forwarder is not working at all
→ Double-check that the forwarder is correctly configured in cPanel under Forwarders. Make sure there are no typos in the source or destination address. - Emails are going to spam
→ This is often due to missing SPF or DKIM records. Enabling BoxTrapper in cPanel can also filter suspicious senders before messages are delivered. You can also apply email filters in cPanel to block unwanted messages before they reach your destination inbox. These DNS settings help verify that forwarded emails are legitimate. - SPF/DKIM conflicts
→ In some cases, forwarding may fail if the SMTP server blocks unauthenticated relays. If the original domain uses strict SPF/DKIM settings, the forwarded email might be flagged as spoofed. Adjust the SPF policy to allow forwarding or use SRS (Sender Rewriting Scheme) if supported. - Forwarding loop detected
→ Avoid forwarding to an address that eventually redirects back to the original sender. This can create loops and result in message rejection. - Emails not received by the destination
→ Test delivery using cPanel’s built-in Track Delivery tool or by sending test emails and checking the server logs under Email Trace. You can also trace a forwarder directly in cPanel to confirm whether the routing is working correctly. - Mailbox full or blacklisted
→ Ensure the destination inbox isn’t over quota or blacklisted by spam filters.
I once helped a client troubleshoot an issue where forwarded emails were being marked as spam. After reviewing their DNS settings, I noticed they had no SPF or DKIM records in place. Once we added proper authentication records via their DNS zone editor in cPanel, the deliverability improved significantly. This small change made a big impact on their lead management workflow.
6.2. Tools for troubleshooting
Reviewing email logs is another way to confirm if a message was delivered or blocked. You can also trace a forwarder in cPanel to see the exact delivery route.. Use the following tools in cPanel:
- Email Trace: Shows delivery logs and routing paths. Checking the SMTP settings can also reveal whether your server is blocking outgoing or relayed messages.
- MX Entry: Verify mail routing setup. If routing errors occur, reviewing your domain forwarders can help identify misconfigured rules.
- Email Authentication: Enable or confirm SPF/DKIM settings
- Webmail access: Check if the email is received at the source inbox before forwarding
When in doubt, contact your hosting provider’s support, they can help analyze log files and suggest server-level fixes.
In the next section, I’ll cover best practices for setting up email forwarding in cPanel to prevent these issues from happening in the first place.
7. Best practices for email forwarding setup in cPanel
Here are the key best practices when using email forwarding in cPanel to maintain security, avoid errors, and improve deliverability.
7.1. Avoid forwarding loops
Never set up a forwarder that routes emails back to the original sender or creates circular routes between accounts. This leads to delivery failures and server strain.
7.2. Enable SPF and DKIM authentication
SPF (Sender Policy Framework) and DKIM (DomainKeys Identified Mail) are DNS records that verify the legitimacy of your email. These records work together with your SMTP server to ensure smooth delivery and reduce the chance of being flagged as spam. Enabling them helps prevent your forwarded emails from being flagged as spam.
You can manage these settings in cPanel by navigating to Email → Email Deliverability and checking for errors or missing records.
In my own setup, adding SPF and DKIM records significantly reduced the number of forwarded emails ending up in junk folders. It also improved our domain’s overall reputation with receiving servers like Gmail and Outlook.
7.3. Avoid using catch-all forwarders unless necessary
Tools like BoxTrapper can also help filter automated spam before it clutters your inbox. For domains that receive high volumes of unsolicited mail, BoxTrapper provides a verification layer by requiring unknown senders to confirm their identity. A catch-all email address may sound useful, but it often attracts unwanted spam.
Use them temporarily, and always combine with spam filtering rules or CAPTCHA-protected forms. Combine catch-all rules with email filters to reduce junk mail.
7.4. Forward to reliable, secure inboxes
Use verified, secured addresses as forwarding destinations, preferably under your control or organization domain. Avoid forwarding sensitive content to free public email services unless absolutely necessary.
7.5. Regularly audit forwarders
Old or forgotten forwarders can lead to lost messages or unauthorized access. Make it a habit to review your Forwarders list monthly to clean up unused entries.
Following these best practices will help you maintain a clean, secure, and effective email forwarding system in cPanel.
Up next: we’ll explore an advanced option, email piping to a program, and when it makes sense to use it.
8. Advanced option – Piping email to a program
If you need more than simple forwarding, email piping in cPanel lets you route incoming mails directly to a script or application – perfect for automation.
8.1. What is email piping?
Email piping is a process where messages sent to a specific email address are delivered to a server-side script instead of a mailbox. This script can then process the content, trigger workflows, or store data.
It’s commonly used in:
- Helpdesk and ticketing systems (e.g., WHMCS, osTicket)
- CRMs
- Custom auto-reply or content parsing tools
Unlike standard forwarding, email piping gives you full control over how the message is handled.
8.2. When to use it (and when not to)
Piping is ideal when:
- You want to automate email handling (e.g., open support tickets)
- You need to trigger internal scripts on message arrival
- You trust and maintain your server environment
Avoid it if:
- You’re unfamiliar with scripting or command-line interfaces
- Your hosting provider restricts script execution
- You prefer GUI-based tools
I once configured email piping for a small customer support team using osTicket. Instead of checking multiple inboxes, the team received structured tickets instantly in the dashboard, streamlining response time and eliminating email clutter.
8.3. How to set up email piping in cPanel
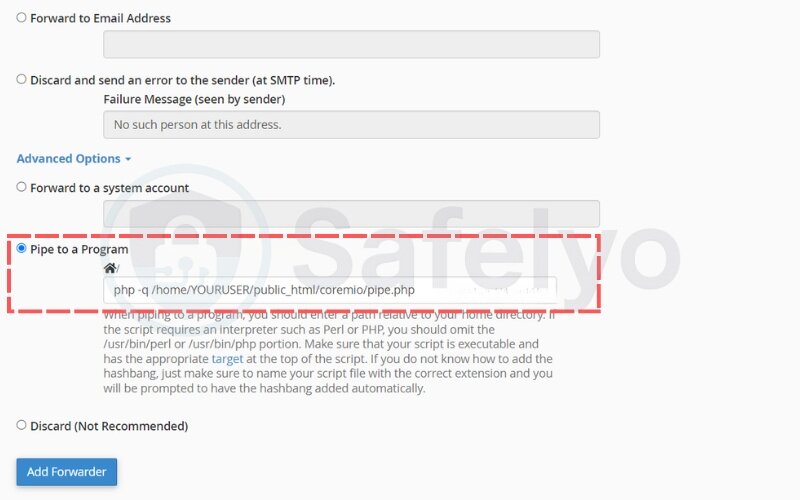
To pipe an email to a program:
- Log in to cPanel
- Go to Email → Forwarders
- Click Add Forwarder
- In the destination section, choose Pipe to a Program
- Enter the absolute path to your script (e.g., /home/username/public_html/scripts/parse.php)
- Ensure the script has execute permissions (chmod 755) and the correct shebang line
Always test thoroughly to ensure your script is receiving and processing data as expected.
This method is powerful but should be used carefully. Up next, I’ll answer some of the most frequently asked questions about email forwarding in cPanel.
Read more:
9. FAQs about How to set up email forwarding in cPanel
This section addresses common questions about how to set up email forwarding in cPanel, especially for users who want clarity before making changes.
Can I forward emails without keeping a copy?
Yes. When setting up a forwarder in cPanel, you can choose not to retain a copy of the email on the original account. In this case, the system will discard email after redirecting it, which helps reduce storage usage. This helps reduce storage usage and keeps email flow clean.
What’s the difference between a forwarder and an alias?
A forwarder redirects incoming emails from one address to another. An alias, on the other hand, is a secondary name for an email address and often also forwards mail, but may exist purely for naming flexibility.
In most shared hosting environments, aliases are implemented as forwarders under the hood.
Can I use multiple forwarders for one address?
Yes, cPanel allows you to forward one address to multiple addresses by creating separate forwarder entries for each destination. However, too many forwarders may increase spam exposure or delivery failures if limits are exceeded.
Can I forward emails between different domains?
Yes – and to keep your forwarded messages cleaner, you may enable BoxTrapper on the source domain so that only verified senders are redirected. Forwarded messages can still be accessed in your preferred email client, like Outlook or Gmail. You can forward emails across different domains hosted on the same or separate servers. For example, forwarding from support@mycompany.com to helpdesk@othersite.net is fully supported.
10. Conclusion
Learning how to set up email forwarding in cPanel is a powerful step toward simplifying how you manage your inboxes and streamlining communication across domains and departments.
Here’s a quick summary of what you’ve learned:
- Forward individual emails by adding account-level forwarders
- Redirect all domain emails using domain forwarders or domain-level (catch-all) forwarding for quick setup during transitions.
- Send emails to multiple recipients by creating layered forwarders
- Manage or delete unused forwarders to reduce clutter and errors
- Enable SPF/DKIM to improve email deliverability and security
- Use advanced tools like email piping for automation
From my own experience managing multiple websites and team inboxes, properly setting up email forwarders in cPanel saved hours of manual checking and helped avoid missing client leads.
If you’re ready to take control of your inbox, understanding how to set up email forwarding in cPanel is a great place to start. Want more guides like this? Visit Safelyo – where we make Tech How-To Simplified.


