Learning how to VPN into home network is like being given a secret, secure key to your own digital castle. It lets you access files, stream from your media server, or manage smart home devices from anywhere, almost like you’re sitting on your couch.
But let’s clear up a common and frustrating point of confusion right away. Many guides discuss using a commercial VPN to connect to the internet. This guide is about the opposite, and arguably more powerful, concept: creating your own private VPN server so you can securely connect back to your home.
As someone who relies on my home VPN daily to access my work files and check on my home lab while traveling, I know it’s a game-changing skill. It’s not just for tech experts; it’s for any remote worker, frequent traveler, or individual who wants full control over their online security.
Key takeaways:
- You’re Building a Bridge Home: The goal is to create a VPN server to connect to your network, not a client to connect out.
- Prerequisites Are Not Optional: Setting up Dynamic DNS (your permanent address) and Port Forwarding (your secure mailbox) is crucial for success.
- You Have Multiple Paths: Your best method – from a simple router to a powerful Raspberry Pi – depends entirely on your budget, technical skill, and needs.
- The Config File is the Key: That .oVPN or .conf file is the master key to your network. Treat it with care and never share it.
It’s time to build your own private bridge to your digital world. Let’s get started.
1. VPN server vs. VPN client: Understanding the key difference
Before we touch a single setting, let’s clear up the most common point of confusion. Getting this right is the key to successfully setting up your home VPN. You’ll encounter two terms: VPN client and VPN server. They sound similar, but their jobs are polar opposites.
Here’s a simple breakdown:
| Feature | VPN Client (Commercial Service) | Home VPN Server (Your Setup) |
| Main Goal | Hides your identity and location from the internet. | Gives you secure access to your home network from afar. |
| Traffic Direction | From your device -> Out to the world. | From your remote device -> Into your home. |
| Analogy | A secret chauffeur driving you out of town. | A private bridge leading back to your house. |
| Key Use Case | Watching geo-blocked Netflix and browsing on public Wi-Fi. | Accessing your files, cameras, or smart devices at home. |
Think of a VPN client – the app you get from commercial services like NordVPN or ExpressVPN – as hiring a secure chauffeur. Its purpose is to take you from your home and drive you out to the public internet anonymously. The chauffeur uses a secret route through their company’s private garage (the commercial VPN server) so no one knows where you’re really going online.
A home VPN server, which is our entire focus in this guide, is different. Instead of hiring a chauffeur to go out, you are building your own secure, private bridge back to your house. When you’re at a hotel or café, this private bridge uses encryption to create a tunnel back to your home network. You are the only one with the key.
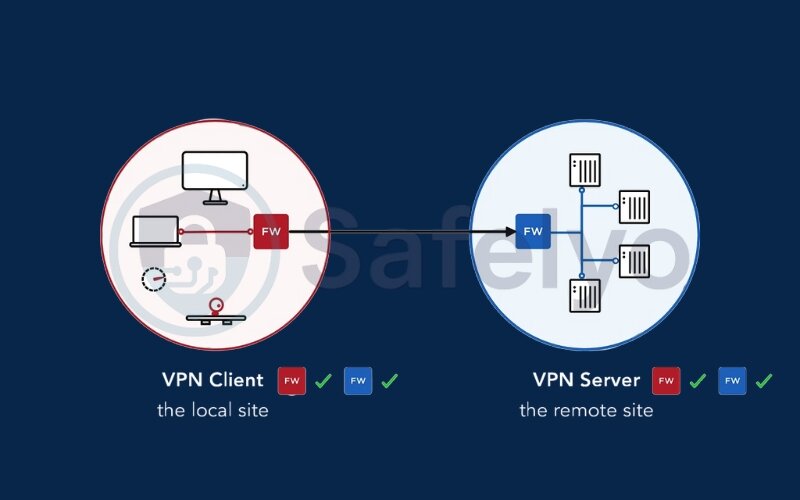
So for the rest of this guide, remember: We are building the bridge that leads back home. This is the secret to true, secure remote access to your home network.
2. How to VPN into home network? Choosing your path
Now that you understand our goal – building a bridge back home – you’re at a crossroads. There are several ways to build this bridge, and there’s no single “best” method for everyone. The right choice depends on your budget, your technical comfort level, and what you want to achieve.
I’ve personally traveled this road, starting with a simple VPN-on-a-router setup and eventually graduating to a dedicated Raspberry Pi server for more flexibility. To save you the time and headaches of trial and error, I’ve created this quick comparison table. Think of it as your personal roadmap to select the perfect route for your needs.
A COMPARISON OF HOME VPN SERVER METHODS
| Method | Technical Difficulty | Estimated Cost | Performance | Best For… |
|---|---|---|---|---|
| Method 1. VPN-Capable Router |
Easy | $50 – $200+ (if you need a new one) |
Good to Excellent | The ‘set it and forget it’ person who wants a simple, reliable setup with minimal fuss. |
| Method 2. Custom Firmware |
Medium | Free (if your router is compatible) |
Varies (depends on the router’s CPU) |
The tinkerer who loves squeezing more power out of their existing gear and isn’t afraid to get their hands dirty. |
| Method 3. Dedicated Server |
Hard | Low to Free (repurposing hardware) |
Excellent (limited only by your hardware) |
The power user or hobbyist who wants maximum control, top performance, and might run other services too. |
| Method 4. Cloud VPS |
Expert | $5 – $10+ per month (recurring) |
Excellent (not limited by home upload speed) |
The serious remote worker who needs rock-solid reliability that’s completely separate from their home internet. |
Take a moment to review the table. Which path sounds most like you? Once you have an idea, we can move on to the essential preparations you’ll need for any of these methods.
>> You might also like these related articles:
3. Essential prerequisites: What you need before you start
Alright, before you roll up your sleeves and start building, every single method we’ll discuss requires two crucial pieces of foundation work. Trust me on this: spending 20 minutes getting these right will save you hours of “why isn’t this working?!” frustration later.
Think of it like this: To get mail delivered, you need a permanent street address and a specific mailbox. For your home VPN, you need the digital equivalent: A Dynamic DNS for your address and Port Forwarding for your mailbox.
3.1. Setting up dynamic DNS (DDNS): Your stable internet address
Here’s the problem: Your internet service provider (ISP) usually gives your home a “dynamic” public IP address. This means it can change without warning – every day, every week, or every time your router restarts.
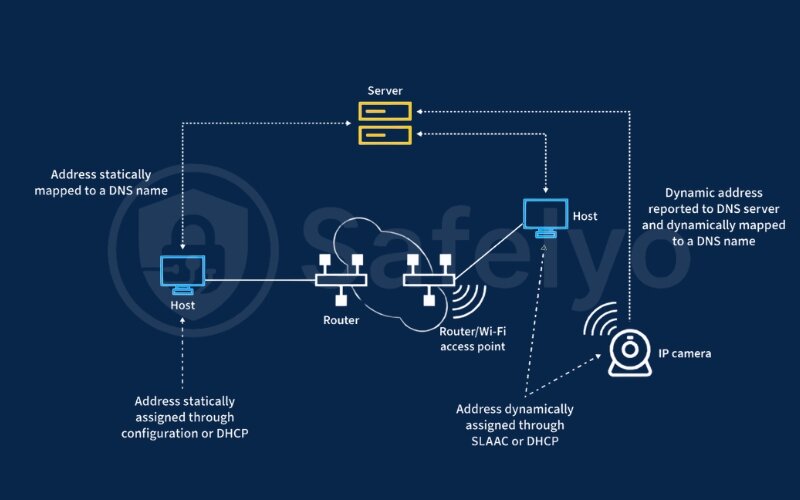
It’s like trying to find a friend whose phone number changes daily. You can’t reliably call them.
A Dynamic DNS (or DDNS) service solves this. It acts like a contact saved in your phone. You get a simple, permanent hostname (e.g., myhomeserver.ddns.net) that never changes. The DDNS service works silently in the background, constantly checking your home’s public IP and pointing your hostname to the new address whenever it changes.
When I first started, I skipped this step. My VPN worked perfectly for a day, then mysteriously broke. The reason? My home’s IP address had changed overnight, and my laptop in the coffee shop had no idea how to find it anymore.
What you need to do:
- Go to a free DDNS provider like No-IP or DuckDNS.
- Sign up for a free account.
- Choose a memorable hostname. This will be the permanent address you use to connect to your home VPN.
3.2. Configuring port forwarding: Opening the right door for your VPN
Your router’s firewall is like a very strict security guard at the front door of an apartment building. By default, it refuses entry to all unsolicited visitors from the Internet.
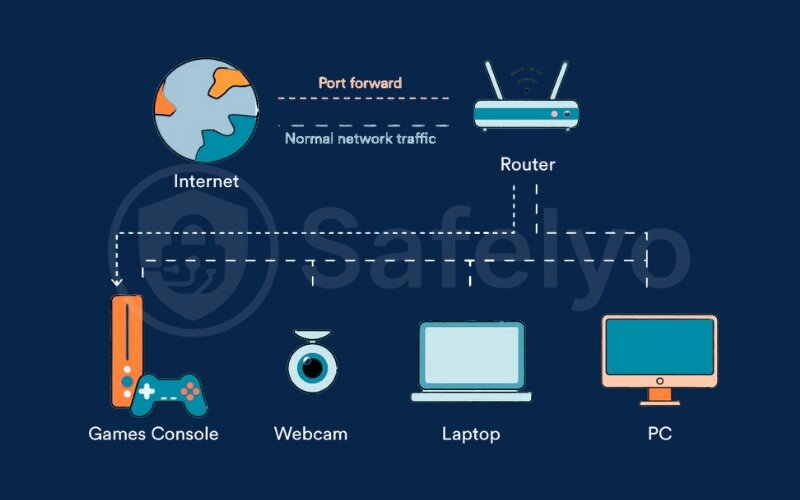
Port forwarding is simply giving that security guard a special instruction. You’re telling your router to create an access control rule, allowing requests at a specific port and forwarding them to your VPN server.
Without this rule, your VPN connection will arrive at your router’s front door and be turned away.
Here’s a common pitfall I learned the hard way
You need to forward the port to the correct internal IP of the device hosting your VPN server, whether it’s a router, PC, or Raspberry Pi. I once spent an hour on troubleshooting before realizing the rule was targeting my smart TV instead of the server. Always confirm the local address of your VPN machine, such as 192.168.1.50.
3.3. Security best practices: A quick checklist
Building a bridge to your home network is powerful, but you need to make sure you’re the only one with the keys to the gate. Setting this up is safe, but only if you follow some basic rules. Here’s your essential security checklist:
- Use incredibly strong passwords for both encryption and access. This applies to both the user accounts for your VPN and the admin password for your router or server itself. Think long, random, and unique.
- Keep everything updated. Your router’s firmware and any software on your PC or Raspberry Pi should always be on the latest version to protect against vulnerabilities.
- Treat your configuration file like a master key. The .oVPN or .conf file you will generate is all someone needs to access your network. Never share it or leave it on a public computer.
ADVANCED TIP
Consider changing the default VPN port (e.g., from 1194 to something random like 41194) to avoid automated scans from bots looking for open doors.
4. Method 1: The easy way with a VPN-capable router
If you’re looking for the most straightforward, “set it and forget it” path to VPN into your home network, this is it. Many modern routers, especially those from brands like Asus, TP-Link, and Netgear, come with a built-in VPN server feature. You just need to turn it on.
If you’re looking for the most straightforward, “set it and forget it” path to VPN into your home network, this is it. Many modern routers from brands like Asus, TP-Link, and Netgear come with a built-in VPN server. You just need to turn it on. This was the first method I used, and it ran flawlessly for years.
Quick Setup Guide

Log In > Find VPN Server > Activate & Add User > Export File
This was the very first method I used for my own home VPN, and it ran flawlessly for years. It’s the perfect entry point because the router manufacturer has done most of the hard work for you.
Pros
- Extremely simple setup
- Always on & reliable
- Official manufacturer support
Cons
- May require buying a new router
- Limited customization options
Pros of this method:
- Incredibly simple setup. The user interface is designed for regular consumers, not network engineers. If you can set up Wi-Fi, you can do this.
- It’s always on. Your router is powered on 24/7, which means your VPN server is always ready and waiting for you to connect. No need to boot up a PC.
- Reliable and stable. Because it’s an official feature, it’s supported by the manufacturer and optimized to run well on the hardware.
Cons of this method:
- Potential cost. If your current router (especially one from your ISP) doesn’t support this feature, you’ll need to buy a new one.
- Less flexible. You’re limited to the options the manufacturer gives you. You can’t install other cool software on it like you could with a dedicated server.
Setting up the VPN server on a modern router is less like programming and more like just filling out a form. On my Asus router, the entire process takes less than five minutes. Here are the typical steps:
- Log in to your router’s admin dashboard (usually by typing 192.168.1.1 or router.asus.com into your browser).
- Navigate to the VPN Server section. Look for a “VPN” tab in the main menu, then click on the “VPN Server” sub-tab.
- Enable the server and add a user. You’ll likely see options for different protocols. Choose OpenVPN as it’s the most common and widely supported. Click the “On” switch, then press the “+” button to add a new user. Create a very strong, unique password for this user. This is the key to your digital castle’s gate.
- Export the magic file. After creating the user, you’ll see a button that says “Export”. Clicking this will download a file named something like client.oVPN. This little file is the golden ticket. It contains all the settings your phone or laptop needs to connect securely to your new server. Save it somewhere safe.
That’s it! Your router is now running a personal VPN server, ready for you to connect to.
>> The easiest way to get started is with a powerful router that takes the guesswork out of the process. Check out Safelyo’s latest roundup of the best routers with a built-in VPN server.
5. Method 2: Upgrading your existing router with custom firmware
Alright, so what if you’re the tinkering type? You look at your existing router and think, “I know you can do more.” If that’s you, welcome to the world of custom router firmware like DD-WRT, OpenWRT, or Tomato. This is like replacing your car’s basic software with a high-performance engine management system to unlock hidden power.
Quick Setup Guide

Log In > Find VPN Server > Activate & Add User > Export File
Think of it like this: Your router’s default software (firmware) is like the basic operating system that came with your car. It works, but it’s locked down. Installing custom firmware like DD-WRT, OpenWRT, or Tomato is like replacing it with a high-performance engine management system. You unlock a ton of powerful new features that the manufacturer hid from you, including a robust VPN server.
Pros
- Zero cost (uses existing gear)
- High risk of “bricking” the router
- Unlocks powerful features
Cons
- No official support (community only)
- Total network control
- Steeper learning curve
The Process at a Glance
- Identify Router: Find your router’s exact model AND hardware version number. This is critical.
- Check Compatibility: Go to the official firmware site (e.g., DD-WRT) and confirm your router is on their supported list.
- Download & Read: Download the correct firmware file and read the specific flashing instructions for your model.
- Flash Firmware: Carefully follow the instructions to install the new firmware.
- Configure VPN: Once installed, navigate the new interface to set up and enable the VPN server.
Pros of this method:
- It’s free! This is the biggest draw. You can breathe new life into an older, compatible router, saving you from buying a new one.
- Total control and customization. You gain access to advanced settings like split tunneling, giving you far more control than a standard router.
Cons of this method (and a serious warning):
- You can permanently break your router. This is not an exaggeration. The process of “flashing” new firmware is delicate. If you use the wrong file or apply it incorrectly, you can brick the router and turn it into a useless plastic block.
- You are your own tech support. There’s no customer service line to call if something goes wrong. You’ll be relying on community forums and your own research skills.
I have to be completely honest here: in my early days of exploring home networks, I got a little too confident. I found a firmware that was for a similar model to my Linksys router and thought, “Eh, close enough.” It wasn’t. The router never turned on again. It became a very expensive lesson in the importance of precision.
Because of that, my advice is absolute: Before you even download a file, go to the official DD-WRT or OpenWRT website and find their hardware compatibility list. You must match your router’s brand, exact model number, and even the hardware revision number (often found on a sticker on the bottom).
If you find a perfect match and are comfortable with the risk, this method can be incredibly rewarding. It’s how you turn a $40 router into a $200 networking powerhouse.
6. Method 3: Building a dedicated home VPN server
If the first two methods are like driving a standard car, this method is like building your own custom vehicle from the ground up. You choose the engine, the chassis, and every component. This path offers the ultimate in performance, control, and flexibility, and it’s my personal favorite for its sheer power.
Pros
- Highest possible performance
- Complete control over the software
- Can run other services (e.g., file server)
Cons
- More complex setup process
- Requires a device to run 24/7
- Involves some command-line work
The General Workflow
- Choose Your Hardware: Pick a device that will be your server (Pi, old PC, NAS).
- Install the OS: Set up a lightweight operating system like Linux.
- Install VPN Software: Use a script or package manager to install OpenVPN or WireGuard.
- Configure & Run: Tweak settings, generate your client configuration file, and start the service.
This approach means having a separate device on your network whose main job is to be your VPN server. Let’s look at the most popular hardware choices.
6.1. Using a Raspberry Pi: The low-cost, energy-efficient choice
A Raspberry Pi is a tiny, credit-card-sized computer. It’s the perfect device for this job because it’s a silent, energy-sipping workhorse. It uses a minuscule amount of electricity, so you can leave it on 24/7 without worrying about your power bill.

For anyone intimidated by this method, there’s a fantastic project called PiVPN. It’s a simple script that automates almost the entire installation of a super-secure OpenVPN or WireGuard server. I’ve used PiVPN on several setups, and it turns a potentially complex, hour-long process into a simple, 10-minute questionnaire. It is the single best way to set up a home VPN server on a Pi.
6.2. Turning an old PC or laptop into a VPN server: Reuse your hardware
Have an old laptop gathering dust in a closet? Give it a new, noble purpose. Even a decade-old PC has significantly more processing power than most routers or a Raspberry Pi. This extra horsepower can mean faster connection speeds and the ability to handle more simultaneous connections if your family members also need access.
The best approach is to wipe the old machine and install a lightweight operating system like Ubuntu Server, which is free and has no graphical interface to slow it down. From there, you can follow one of the many excellent guides online to install OpenVPN or WireGuard. It’s more hands-on, but it’s a fantastic way to get maximum performance for zero hardware cost.
6.3. Leveraging your NAS device: A hidden, built-in solution
This is one of my favorite “hidden” features. If you own a Network Attached Storage (NAS) device from a brand like Synology or QNAP, you probably already own a powerful, ready-made VPN server. It’s a superpower you might not have known your file server had.

Simply log into your NAS’s web interface, open its app store (called Package Center on Synology or App Center on QNAP), and search for “VPN Server.” You can install it with a single click. The configuration is very similar to the router method – a simple, graphical interface where you enable the service, add users, and export the configuration file. It’s the perfect way to access your home NAS remotely via VPN because the server is running on the exact same box as your files.
>> You may also be interested in How to set up a NAS for home use: Step-by-step guide 2026
6.4. The cloud alternative: Using a virtual private server (VPS)
This final option flips the script: Instead of hosting the server at home, you rent a tiny, private server on the internet for a few dollars a month. This is called a Virtual Private Server (VPS).
Why would you do this? Two huge reasons.
- First, your VPN connection speed is no longer limited by your home’s often slow upload speed.
- Second, a VPS comes with a static public IP address, meaning you don’t need to set up DDNS.

I recommend this for serious remote workers or anyone who needs absolute, rock-solid reliability that isn’t dependent on their home internet connection or power staying on. It requires comfort with the command line to set up, but it provides an enterprise-grade connection for the price of a coffee.
7. Connecting to your new home VPN: The final step
Congratulations! You’ve done the hard part. The bridge is built, the security guard has their instructions, and the door is ready. Now for the final, satisfying step: walking across that bridge for the first time.
This is where that little .oVPN or .conf file you exported earlier comes into play. That file contains the public keys and settings, and all you need now is a client to use it. That keyhole is a VPN client application on your laptop, phone, or tablet.
| Device | Recommended Client App | Where to Get It |
| Windows/Mac/Linux | Official OpenVPN Connect or WireGuard app | Official websites (free download) |
| iOS (iPhone/iPad) | OpenVPN Connect or WireGuard app | Apple App Store |
| Android | OpenVPN for Android or the WireGuard app | Google Play Store |
The Connection Workflow
- Transfer the File: Get the .oVPN or .conf file onto the device you want to connect from (e.g., your laptop or phone). You can email it to yourself, use a cloud drive, or transfer it via USB.
- Install the Client: Download and install the appropriate VPN client app from the table above.
- Import and Connect: Open the client app and choose the option to import a profile from a file. Select your configuration file, give the connection a name, and tap “Connect.”
Importing your configuration file (a step-by-step example)
This process is incredibly simple and visually similar across all devices. Let’s walk through it on a smartphone.
- After installing the OpenVPN Connect app, open it. You’ll be greeted by an import screen.
- Choose the “File” tab. Navigate to wherever you saved your .oVPN file (e.g., your Downloads folder or iCloud Drive).
- Tap on the .oVPN file. The app will automatically read it and show you the connection details.
- You’ll be prompted to enter the username and password you created back when you set up the server. Check the box to save the password if you trust the security of your device.
- Tap the “Connect” or toggle the switch.
The switch will turn green, and you’ll see a small “VPN” icon appear in your phone’s status bar. That’s it! You are now connected. All of your device’s internet traffic is being securely tunneled through your home network. You can now open a browser to access your router’s admin page, browse NAS files, or connect to home devices as if you were there.
8. FAQ about home VPN setups
OpenVPN vs. WireGuard: Which protocol is best for a home VPN?
Think of it like this: WireGuard is the modern, faster sports car, while OpenVPN is the reliable, time-tested sedan. If your hardware supports it, start with WireGuard as it uses more modern cryptography. It’s newer, much faster, and uses less battery on mobile devices. OpenVPN is the classic choice, universally supported on almost all routers, and known for its rock-solid security. You can’t go wrong with either, but WireGuard is the future.
Will setting up a VPN server slow down my home internet?
No. A common misconception is that the server will slow down your home network for everyone else. Your VPN server only uses bandwidth when you are actively connected to it from outside. It has zero impact on the internet speed for your family watching Netflix or browsing at home. However, your remote connection speed will be limited by your home internet’s upload speed, which is typically much slower than your download speed.
Is it safe to open a port on my router?
Yes, it is safe if you do it correctly. The risk comes from careless configuration. By forwarding a specific port only to the dedicated, secure device running your VPN server, you are creating a single, guarded entrance. The danger lies in opening many ports you don’t need or forwarding them to insecure devices (like a smart TV or an old, un-updated PC). Follow the security checklist, and the risk is minimal.
Can I just use my ISP’s router to do this?
Almost certainly not. The routers provided by Internet Service Providers (ISPs) are notoriously basic and locked down. They are built to deliver the internet and nothing more. They almost never include advanced features like a built-in VPN server. To do this properly, you will need to purchase your own capable router or use one of the dedicated server methods.
9. Conclusion
Successfully learning how to VPN into home network is a monumental step in taking full control of your digital life. You’ve essentially built your own private, encrypted highway that connects you directly to your most important files and services, no matter where you are in the world. It’s a skill that provides both immense convenience and powerful security.
Don’t be afraid to start with the simplest method. A VPN server running on a capable router is more than enough for most people’s needs and delivers incredible peace of mind. As you grow more confident, you can always explore the more advanced options later.
For more in-depth guides and security tips from Safelyo, continue to explore the Tech How-To Simplified section. If building your own server still seems a bit too complex, consider an alternative like NordVPN’s Meshnet, which offers similar functionality with zero hardware setup. Read our full review to see if it’s the right choice for you.

