You fire up your virtual private network, confident that your online activity is completely invisible. But what if your private data is still leaking straight to your internet provider without you even realizing it? If you are wondering what is DNS leak, it is a silent but critical flaw that shatters your digital privacy, turning your secure tunnel into a glass window.
This guide covers the causes, signs, testing, and steps to secure your device against these exposures.
Key takeaways:
- A DNS leak is a critical routing flaw that exposes your website requests and browsing history to your internet provider, completely bypassing your active VPN tunnel.
- Common triggers include IPv6 incompatibility, conflicting browser features like DNS over HTTPS (DoH), Windows network settings (SMHNR), and manual IP configurations.
- You can easily verify your connection security by comparing your real IP against your VPN IP using browser-based tests (like dnsleaktest.com) or command-line tools.
- The most effective fixes involve enabling your VPN’s built-in leak protection, disabling IPv6, setting device DNS to automatic, and activating a kill switch for long-term prevention.
1. What is DNS leak?
To understand this error, you first need to know how two basic internet technologies work together: the Domain Name System (DNS) and your Virtual Private Network (VPN).
Whenever you type a website name into your browser, the DNS translates that readable name into a numeric IP address so your computer can connect to it. A VPN, on the other hand, is a privacy tool designed to encrypt your internet connection and keep your data inside a secure tunnel.
When you use a secure connection app properly, the VPN takes full control of the DNS translation process. It routes all your website requests through its own encrypted servers, ensuring your internet provider cannot see which websites you are asking to visit.
A DNS leak is a security flaw that happens when this protection fails. It occurs when your device’s translation requests move outside the encrypted tunnel and are sent directly to the servers of your Internet Service Provider (ISP).

Here is exactly what happens during a leak:
- Your website requests bypass the secure application tunnel completely.
- The requests become entirely visible to your internet provider.
- Your browsing activity, including your IP address, physical location, and web searches, goes through the provider’s servers.
- Your data is exposed exactly as it would be if you were not using a security application at all.
2. How does a DNS leak happen?
Several technical conflicts can cause your computer to bypass your secure connection:
- Misconfigured applications: When you install a VPN, it must actively change your device’s default internet settings. If the app lacks the proper system permissions, it fails to override the default network settings, meaning your computer will simply ignore the secure tunnel and use standard, unencrypted paths.
- IPv6 incompatibility: The internet uses two types of IP addresses: the older IPv4 and the newer IPv6. Many VPNs can only route older IPv4 traffic. If you visit a modern website that uses an IPv6 address, the VPN cannot process it, leaving that specific request completely exposed to your internet provider.
- Transparent proxies: Sometimes, your internet provider is the one causing the issue. They can use a transparent proxy that actively intercepts your web requests before the VPN can encrypt them, forcing the traffic to resolve on their own visible servers instead.
- Windows network features: Windows includes a tool called Smart Multi-Homed Name Resolution designed to speed up browsing. It sends your website request to all your available networks simultaneously and uses the fastest response. Since your regular, unencrypted connection is often faster than the VPN tunnel, Windows frequently chooses the unsafe route.
- Manual DNS configurations: If you previously adjusted your device settings to use third-party servers (like Google or Cloudflare) to boost your internet speed, this can backfire. These manual adjustments often override the built-in protection protocols of your security app, pushing your traffic outside the safe zone.
3. Why is a DNS leak a privacy risk?
When your browsing requests escape the encrypted tunnel, several privacy risks emerge:
- Internet provider tracking: Your provider logs the domains you visit, which they might store or sell to third-party advertising companies.
- Network interception: Unencrypted queries on public Wi-Fi networks can be intercepted by network administrators or other users on the same connection.
- Government monitoring: Authorities can monitor exposed requests to track individuals accessing restricted content in specific regions.
- Targeted attacks: Malicious actors can intercept the exposed data to understand your browsing habits and build targeted phishing campaigns.
It is important to clarify that this error does not expose the specific pages you read, your passwords, or your private messages. Secure HTTPS protocols protect those details separately, meaning only the main website domains are revealed.
4. Signs of a DNS leak
You can often spot potential routing errors during your regular browsing sessions without needing a formal test. Keep in mind that slow internet speeds are not direct symptoms of a leak; instead, you should look out for these specific operational indicators:
- Persistent geo-blocking: You connect to a server in another country to watch a show, but streaming platforms still block you based on your actual physical location.
- Localized search results: Your search engine suddenly displays weather updates, results, or advertisements based on your real location rather than your chosen remote server.
- Copyright notices: You receive a warning from your internet provider for P2P downloading, even though your security app was actively running.
If your VPN interface shows a successful connection but you still encounter these location-based anomalies or internet provider warnings, your privacy is likely compromised. These real-world signs act as an early warning system, signaling that you should immediately run a dedicated test to verify your actual connection security.
5. How to test for a DNS leak
We recommend verifying your connection security using a reliable browser tool. To get the most accurate results, you should establish a baseline before testing your active connection. Follow this step-by-step process:
Step 1: Establish your baseline (Without VPN)
- Ensure your VPN application is turned off.
- Go to dnsleaktest.com.
- Note the internet provider and location displayed on the homepage. This represents your real, unencrypted connection data.
Step 2: Connect to your secure tunnel
- Open your VPN application and connect to a server of your choice (for example, a server in London, UK).
- Wait for the connection to fully establish.
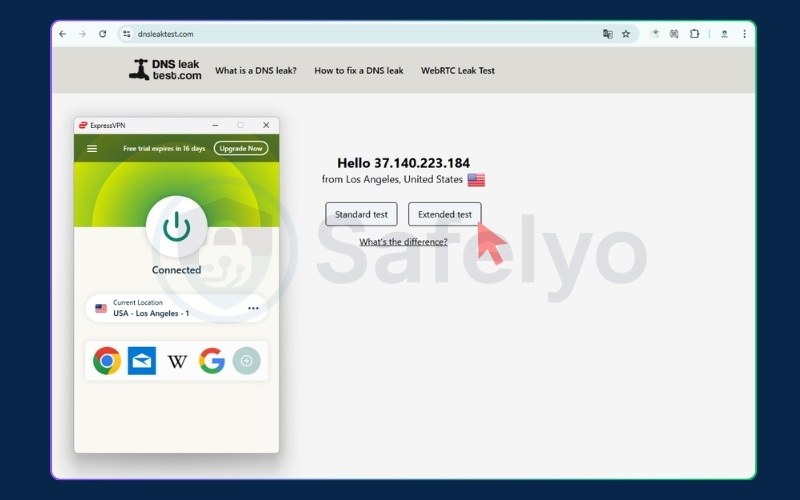
Step 3: Run the extended test
- Refresh the dnsleaktest.com webpage. The homepage should now show your new virtual IP and location.
- Click the “Extended test” button. This forces your browser to perform a deep analysis of your routing paths.
- Wait a few moments for the scan to complete.
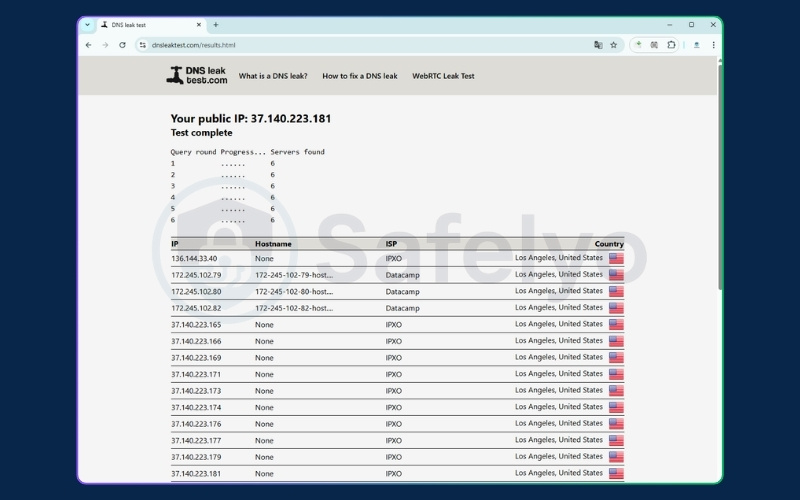
Step 4: Analyze the final results
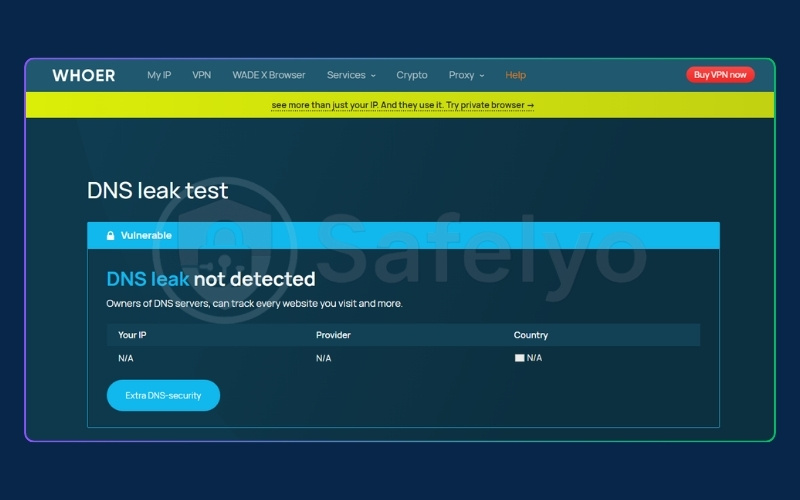
- Leaking: If the final results table displays your actual internet provider (the one you noted in Step 1) or your real physical location, your connection is leaking data.
- Safe: If the results table only shows the server information and location belonging to your security provider, your connection is fully secure.
For added peace of mind, you can cross-verify your connection using other reputable testing platforms such as ipleak.net, browserleaks.com/dns, and whoer.net/dns-leak-test.

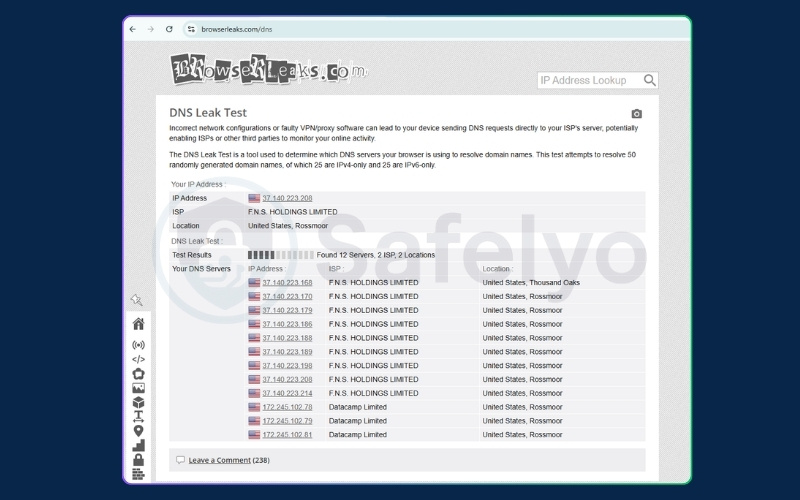
Beyond DNS leaks, these comprehensive tools can also test your connection for other vulnerabilities, including WebRTC leaks, IPv6 exposures, and browser fingerprinting.
6. How does a DNS leak test work?
The testing mechanism relies on forcing your computer to perform a brand-new lookup. When you start the scan, the website generates a series of unique, randomized domain names that your system has never encountered before.
Because these domains are completely new, your computer cannot rely on its temporary memory (cache). It is forced to send a fresh request to a DNS server to find the matching IP addresses.
These requests are routed across the internet until they reach the authoritative server controlled by the testing website.
The testing tool simply monitors its own server and records the IP address of the machine asking for the information. If the tool sees that the request came from a server owned by your regular internet provider instead of your VPN provider, it flags the connection as a DNS leak.
7. Advanced testing method: using Command Prompt
For users comfortable with the command line, you can perform a manual check using built-in network tools instead of a web browser. Follow these exact steps to query a specialized server:
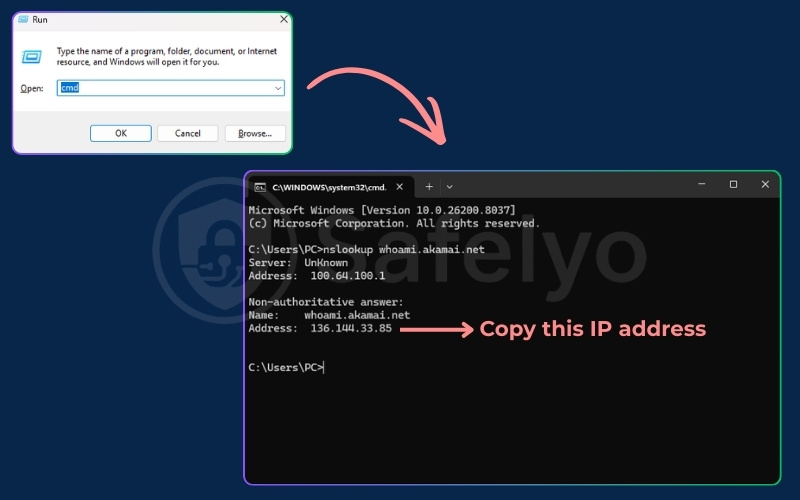
- Open your command tool: Launch Command Prompt for Windows (press Win + R, type cmd, and hit Enter) or Terminal for macOS (press Cmd + Space, type Terminal, and hit Return).
- Run the query command: Type the specific command for your operating system and press enter. This contacts a secure server designed to echo back the IP address of your resolver.
- Windows users: Type nslookup whoami.akamai.net
- Mac users: Type dig +short whoami.akamai.net
- Copy the result: Your screen will display a few lines of text. Look for the IP address listed in the “answer” section and copy it.
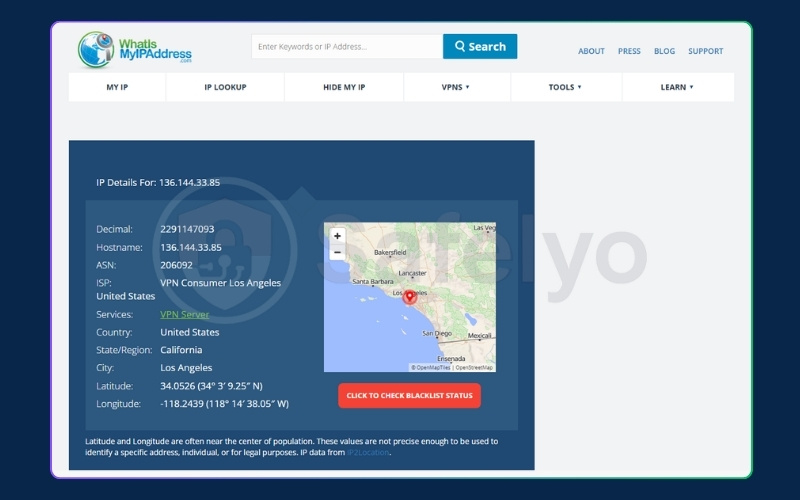
- Verify the owner: Paste this IP address into any free online IP lookup tool (such as whatismyipaddress.com/ip-lookup) to see who owns that server.
- If the owner is your regular internet provider, your connection is leaking.
- If the owner is your security application provider, your connection is safe.

While this manual method is highly accurate, the simple browser-based test remains the easiest approach for most users.
8. How to fix a DNS leak on any device
We will explore several practical solutions that apply across different operating systems to secure your connection.
8.1. Fix 1: Resolving leaks on Windows 10 & 11
Follow these instructions to adjust your Windows network settings and stop data exposure.
Quick step:
- Press the Windows key + R to open the Run dialog.
- Type ncpa.cpl and press Enter to directly open your Network Connections.
- Right-click your active connection (Wi-Fi or Ethernet) and select Properties.
- Uncheck the box for Internet Protocol Version 6 (TCP/IPv6) and click OK.
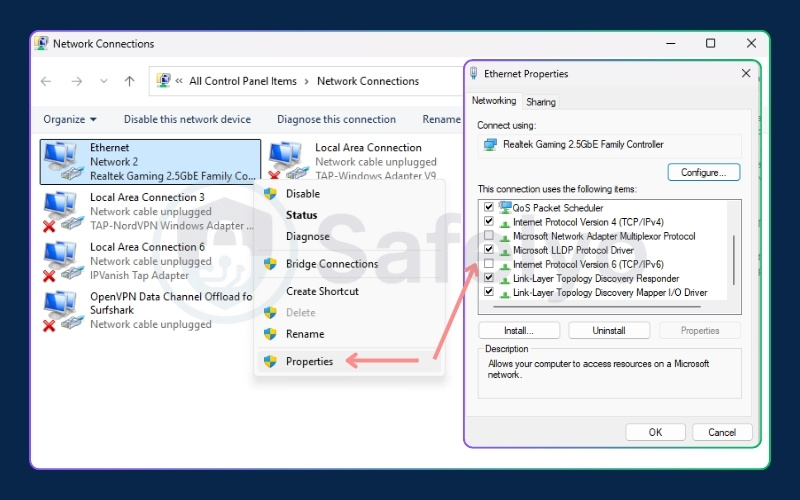
Disabling IPv6 is the most common and effective solution for Windows users. Advanced users can also disable the Smart Multi-Homed Name Resolution feature through the Local Group Policy Editor to prevent the system from querying multiple adapters simultaneously.
8.2. Fix 2: Resolving leaks on macOS
Apple users can secure their connection by adjusting their system preferences.
Quick step:
- Open the Apple menu and select System Settings (or System Preferences on older versions).
- Click Network and select your active connection.
- Click Details… (or Advanced… on older versions), then choose the DNS tab.
- Select any custom IP addresses under “DNS Servers” and remove them using the minus (–) button, then click OK.
Leaving your settings on automatic ensures the active security application can properly take over and route requests through its own encrypted servers. Manually adding third-party servers will override your protection protocols and cause immediate data exposure.
8.3. Fix 3: Fixing leaks on Android & iOS
Mobile users need to ensure their device settings do not conflict with their security apps.
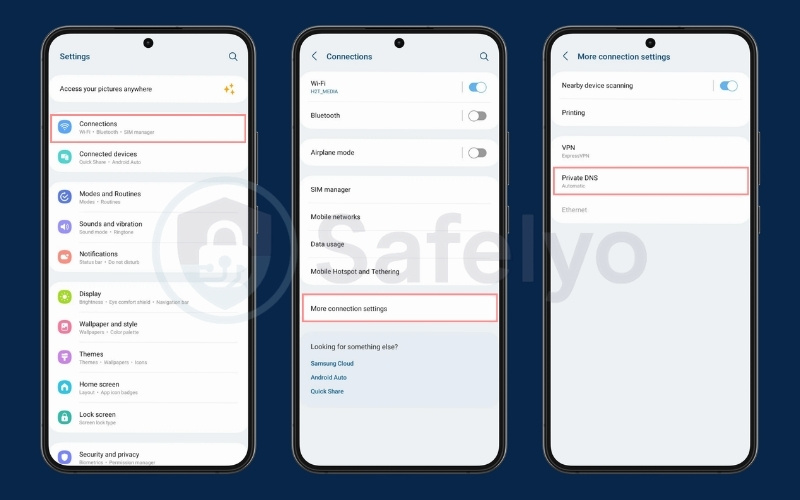
Quick step (Android):
- Open Settings and tap Network & internet (or Connections).
- Tap on Private DNS (you may need to expand the “Advanced” section or select More connection settings first).
- Select Automatic or Off and save.
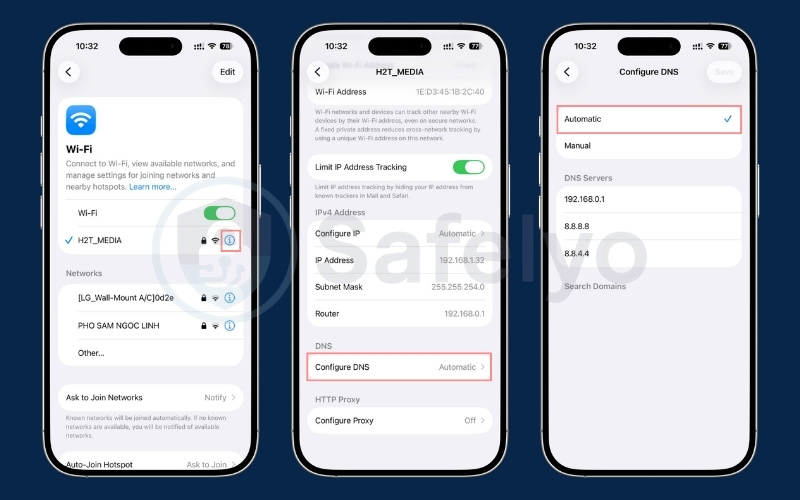
Quick step (iOS):
- Open Settings and tap Wi-Fi.
- Tap the “i” (information) icon next to your active network.
- Scroll down, tap Configure DNS, and select Automatic.
Similar to macOS, setting your mobile configuration to automatic allows the application to control the native routing flow. This simple adjustment prevents the conflicts that typically lead to exposed browsing data on smartphones.
8.4. Fix 4: Resolving conflicts with DNS over HTTPS (DoH) in browsers
Modern web browsers include features that can unintentionally bypass your system-wide protection.
When DNS over HTTPS (DoH) is active, it sends queries through an encrypted HTTPS connection on port 443. While this traffic travels safely through the secure tunnel, conflicts arise because the browser sends the query to a third-party server instead of the secure provider server. This causes the application to lose control over the routing process.
Quick step:
- Chrome: Open Settings > Privacy and security > Security. Scroll down and toggle off Use secure DNS.
- Firefox: Open Settings > Privacy & Security. Scroll down to DNS over HTTPS and select Off.
- Edge: Open Settings > Privacy, search, and services. Scroll down to the Security section and turn off Use secure DNS.

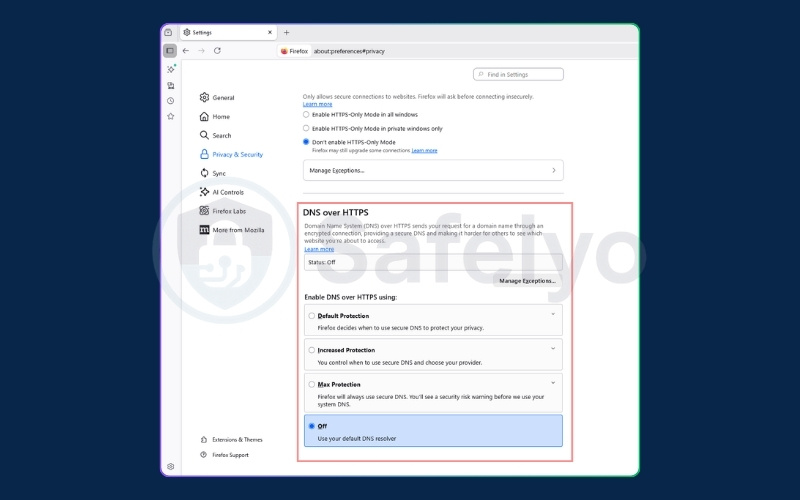
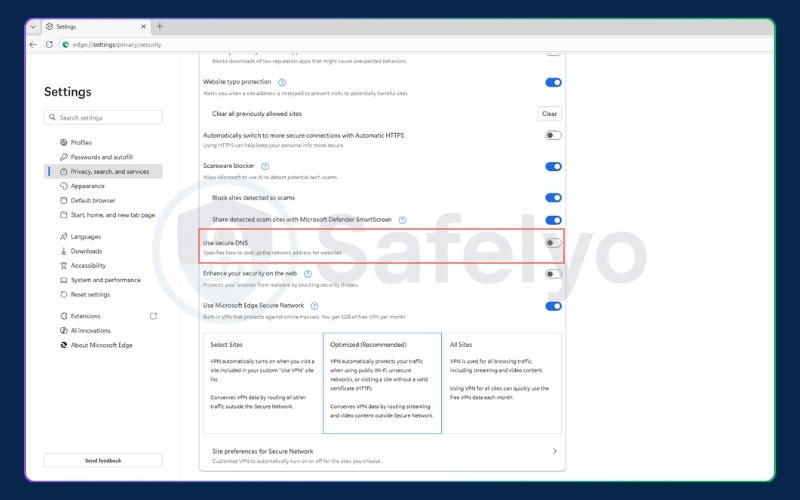
Disabling DoH in your browser settings when using a security application ensures that your VPN maintains full control over your routing process.
8.5. Fix 5: Configuring an OS-level firewall (manual kill switch)
If your application lacks a built-in safety mechanism, your operating system firewall can act as a reliable failsafe.
You can configure the Windows Defender Firewall or macOS Firewall to block all outbound traffic that does not travel through the specific network adapter created by your security software. This custom rule ensures no data escapes if the connection drops unexpectedly.
Things to keep in mind with this manual setup: While this method provides a strong failsafe, it does require a bit of ongoing management on your end:
- Manual toggling for internet access: Because this rule strictly blocks non-VPN traffic, you must manually disable it whenever your VPN is turned off; otherwise, your device will have no internet connectivity.
- Routine IP maintenance: If your VPN provider updates or changes its server IP addresses, you will need to manually adjust your custom firewall rules to match.
- Public Wi-Fi limitations: This strict blocking typically prevents “Captive Portal” login pages from loading. You will likely need to temporarily disable the rule to authenticate on public networks at hotels or cafes.
8.6. Fix 6: The nonexistent DNS failsafe (advanced)
This highly technical fallback method forces your system to rely entirely on your secure connection.
You can configure your local network adapter server to a non-existent address like 0.0.0.0 or 127.0.0.1. This prevents the computer from resolving names locally, forcing the operating system to rely completely on the application proxy.
There are significant risks associated with this method. If your connection drops, your system will completely lose internet access until you manually revert the settings to automatic.
Furthermore, this setup will prevent your device from connecting to public Wi-Fi networks that require a captive portal login. This is because those networks require local resolution to redirect you to their sign-in page.
8.7. Fix 7: Enabling your VPN’s built-in protection
Many modern security applications come with dedicated settings designed specifically to prevent routing errors.
Quick step:
- Open your VPN application and navigate to Settings or Preferences.
- Look for the Security, Privacy, or Advanced section.
- Locate the feature labeled DNS Leak Protection or IPv6 Leak Protection.
- Switch the toggle to the ON position and reconnect to your server.
Keep in mind that the exact name of this feature can vary depending on your provider. Furthermore, many top-tier VPNs integrate this protection directly into their core protocol so it is always active by default. Because it is built-in automatically, you might not even find a manual toggle for it in the settings menu.
However, if the toggle is available in your app, verifying that it is turned on is a quick way to seal a leak without changing any system configurations.
9. How to prevent DNS leaks in the future
Fixing a leak is only half the battle; preventing it from happening again requires proactive habits and the right technical setup. Here are the best practices to maintain your privacy over time:
- Always enable the Kill Switch: This is your primary safety net. A kill switch automatically blocks all internet access if your secure connection drops unexpectedly, preventing any unencrypted data from escaping the tunnel. Ensure this feature is permanently toggled to the active position in your app settings.
- Choose a premium VPN with built-in protection: Not all security apps are created equal. Avoid free or sketchy VPNs, as they often lack the infrastructure to route requests properly. Invest in a reputable provider that explicitly offers built-in DNS leak protection and dedicated secure servers.
- Perform routine browser tests: Do not assume you are safe forever just because you fixed an issue once. Make it a habit to run a quick test on dnsleaktest.com or ipleak.net whenever you connect to a new public Wi-Fi network, after a major operating system update, or if you change your security provider.
- Keep your software updated: VPN providers constantly patch vulnerabilities and improve their routing protocols. Always keep your security application and your device’s operating system updated to the latest versions to prevent compatibility issues that could lead to data exposure.
10. DNS leak vs. WebRTC leak: what’s the difference?
It is important to understand the technical distinctions between common connection vulnerabilities to troubleshoot them effectively.
Here is a quick comparison of the different types of data exposure:
| Vulnerability type | Technical description |
|---|---|
| DNS Leak | This exposes the website domain names you visit directly to your internet provider. |
| WebRTC Leak | This reveals your true physical IP address through browser-based voice and video chat protocols. |
| IP Leak | The application completely fails to route traffic, exposing your actual IP address and physical location to the websites you visit. |
11. FAQs about what is a DNS leak
Here are clear answers to common questions about connection vulnerabilities.
Can a public Wi-Fi cause a DNS leak?
Yes, the local network configuration or captive portals on public Wi-Fi networks can force your device to use their specific servers, bypassing your secure tunnel.
Can a DNS leak expose my real location?
Indirectly. It exposes the server belonging to your local internet provider, which typically corresponds to your specific city or geographic region.
How do I check if I have a DNS leak?
You can verify your connection security by visiting dnsleaktest.com and running an extended test, or by using command prompt tools to ping a public testing server.
Does disabling IPv6 fix DNS leaks?
Yes, disabling this protocol prevents exposures specifically caused by security applications that either do not support or fail to properly route IPv6 data traffic.
How do you fix a DNS leak?
The most effective methods include disabling IPv6, setting your device configuration to automatic, turning off DoH features in your browser, and enabling your application kill switch.
12. Conclusion
Understanding exactly what is DNS leak is the first step toward securing your online privacy. By recognizing the technical causes and monitoring the signs, you can prevent your internet provider from tracking your browsing habits.
Always remember to run a quick browser test after applying these fixes or whenever you connect to a new public network. Make sure your application kill switch is turned on, and explore comprehensive VPN Guides for more strategies to keep your data protected with Safelyo.