
If you’ve ever tried to play Call of Duty: Warzone on a busy network, you know how frustrating lag and server restrictions can be. Learning how to setup OpenVPN for Warzone helps you control your connection, reduce ping, and even access different server regions.
In this guide, you’ll find:
- Quick checks before setup
- Step-by-step OpenVPN setup for PC, mobile, and router
- The best settings to lower ping
- What Warzone’s rules allow with VPNs
- Troubleshooting for common errors
Let’s begin with the key prerequisites you need before setting up OpenVPN.
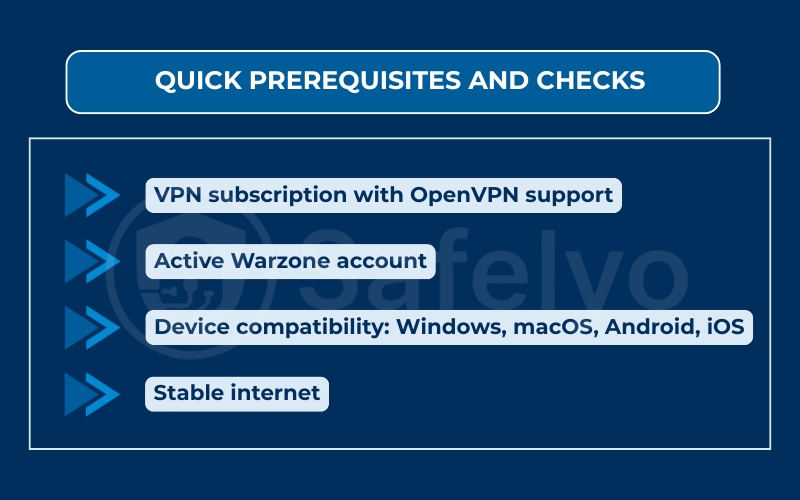
1. Quick prerequisites and checks
Before installing or configuring OpenVPN, confirm these essentials to avoid problems:
- VPN subscription with OpenVPN support: OpenVPN itself is free, but you’ll need a VPN provider that supplies .ovpn configuration files.
- Active Warzone account: Make sure your Activision profile is in good standing, since a VPN won’t fix account restrictions.
- Device compatibility: Windows, macOS, Android, and iOS all support OpenVPN apps. Consoles require router setup or a shared PC connection.
- Stable internet: At least 10 Mbps download and 3 Mbps upload is recommended for smooth gameplay.
From real-world experience, players who skip these checks often end up with errors or unstable connections. Doing this groundwork first saves time and frustration later.
Not every VPN service offers OpenVPN configuration files, so you’ll need a provider that supports manual setup. From Safelyo’s tests, these are reliable choices for gaming:
- NordVPN – Fast servers optimized for gaming, full OpenVPN support with easy .ovpn downloads, strong DDoS protection.
- Surfshark – Unlimited devices, clean UI, split tunneling features to route only Warzone traffic.
- ProtonVPN – Privacy-first provider with audited no-logs policy, good performance on both PC and console setups.
Always download the .ovpn files directly from your provider’s official dashboard, not from third-party sources, to avoid corrupted configs.
2. How to setup OpenVPN for Warzone
Whether you’re on PC, mobile, or console, the goal is to import your VPN provider’s configuration files into OpenVPN and connect before launching Warzone. Below are step-by-step instructions for each device type.
2.1. How to setup OpenVPN for Warzone: Windows steps
On Windows, the official OpenVPN GUI is the recommended client.
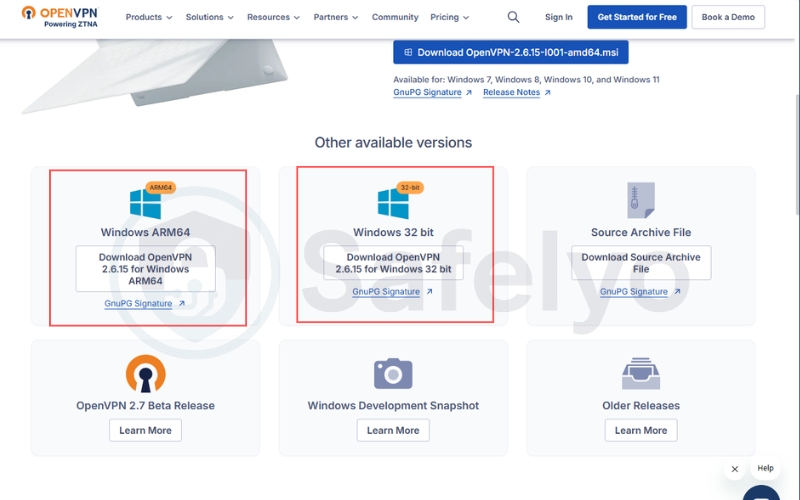
Step 1. Download the OpenVPN client
- Go to the official download page: https://openvpn.net/community/
- Select the Windows installer (64-bit or 32-bit).
- Wait for the .exe file to download.
Step 2. Install the client
- Open the downloaded .exe file.
- Click Run and follow the installation wizard.
- Keep the default settings unless you need advanced options.
- After installation, you’ll see OpenVPN GUI available in your programs.
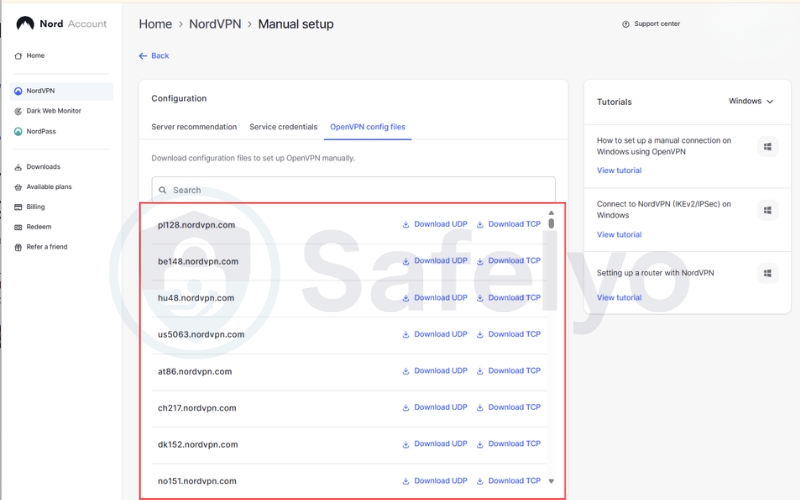
Step 3. Get your configuration files
- Log in to your VPN provider’s dashboard.
- Find the section for manual configuration or OpenVPN files.
- Download the .ovpn file for the server region you want (Note: choose the UDP file).
- Save it to your Desktop or Downloads folder.
Step 4. Import the configuration
- Right-click the OpenVPN GUI icon in the taskbar (monitor with a lock symbol).
- Select Import file… and choose the .ovpn file.
- Enter your VPN account username and password when prompted.
Step 5. Connect and verify
- Right-click the OpenVPN GUI icon again.
- Choose your imported profile → click Connect.
- Wait for the icon to turn green and show “Connected.”
- Open your browser and search “what’s my IP” to check that your IP has changed.
- Launch Warzone and confirm smooth matchmaking.
2.2. How to setup OpenVPN for Warzone: MacOS steps
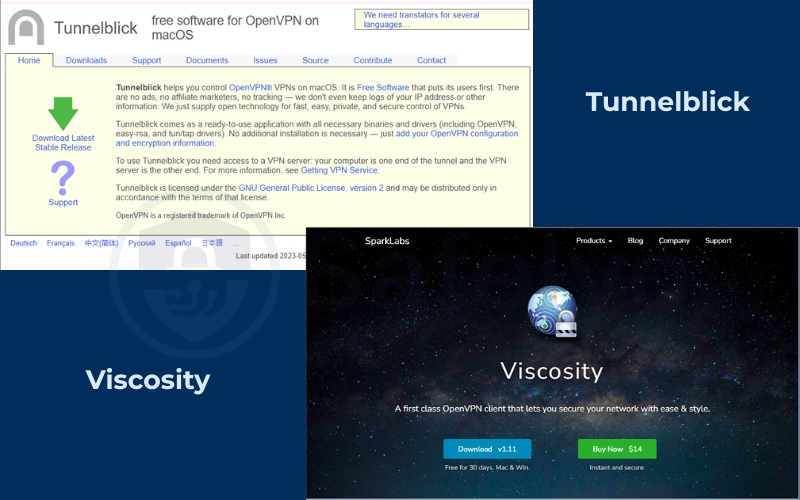
On macOS, you need a third-party client like Tunnelblick or Viscosity, since OpenVPN doesn’t provide an official macOS installer.
Step 1. Download the client
- Go to https://tunnelblick.net and download Tunnelblick (free, open source).
- Or, for a premium option, download Viscosity at https://www.sparklabs.com/viscosity/.
Step 2. Install the client
- Open the downloaded .dmg file.
- Drag the Tunnelblick/Viscosity icon into your Applications folder.
- If macOS blocks the app, go to System Settings > Privacy & Security and click Allow.
Step 3. Get your configuration files
- Log in to your VPN provider’s account dashboard.
- Download the .ovpn file for your preferred server region. (Note: choose the UDP file)
- Save it in your Downloads folder.
Step 4. Import the configuration
- Double-click the .ovpn file.
- Choose to open it with Tunnelblick (or Viscosity).
- The app will import the profile automatically.
- Enter your VPN username and password.
Step 5. Connect and verify
- Click the Tunnelblick/Viscosity icon in the macOS menu bar.
- Select your imported VPN profile → click Connect.
- Wait until the status shows “Connected” (icon changes color, usually green).
- Open Safari/Chrome and search “what’s my IP” to confirm your IP address has changed.
- Launch Warzone and test your connection.
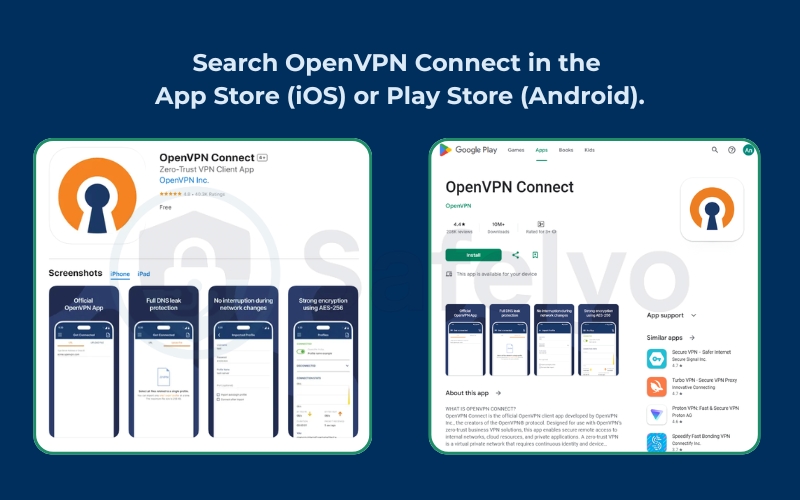
2.3. Android and iOS steps
Mobile devices need the OpenVPN Connect app. It’s lightweight and works with most providers.
Steps:
- Install the app
- Search OpenVPN Connect in the App Store (iOS) or Play Store (Android).
- Download and install it.
- Transfer the config file
- Send yourself the .ovpn file via email, cloud storage (Google Drive, iCloud, Dropbox), or a direct download from your provider’s site.
- On iOS, choose Open in OpenVPN Connect when tapping the file.
- On Android, just locate the file and import through the app.
- Add credentials
- Enter your VPN username and password.
- Save credentials if you want one-tap connection next time.
- Connect
- Tap the profile > slide the toggle to connect.
- Grant the VPN permission request.
- Verify
- Check the small VPN key icon in your status bar (Android) or the VPN badge (iOS).
- Launch Warzone Mobile and confirm reduced lag.
If you experience frequent disconnects on iOS, disable Low Power Mode, as it can pause VPN background activity.
2.4. Router setup and policy routing
Consoles like Xbox or PlayStation can’t install VPN apps, so the router has to handle OpenVPN.
Steps:
- Access your router dashboard
- Open a browser on your PC.
- Enter your router’s IP (commonly 192.168.0.1 or 192.168.1.1).
- Log in with your admin credentials.
- Check firmware support
- Look under VPN or Advanced settings.
- If OpenVPN isn’t supported, install compatible firmware like DD-WRT, AsusWRT-Merlin, or OpenWRT (check your router model carefully before flashing).
- Upload OpenVPN config
- Download .ovpn config files from your VPN provider.
- In the router panel, go to VPN client settings.
- Upload the file and enter your VPN credentials.
- Apply and restart
- Save the changes and restart the router.
- Wait until the router shows a successful VPN connection.
- Connect your console
- On your PlayStation or Xbox, connect to the router’s Wi-Fi.
- Test internet connection in console settings before opening Warzone.
In routers with advanced firmware, you can choose which devices use the VPN. Add only your console’s IP to the VPN route while keeping other devices on normal internet. This avoids slowing down everything else in your home.
3. Which OpenVPN settings reduce ping?
Even if you’ve set up OpenVPN correctly, the wrong settings can cause high latency. Tweaking just a few options can make the difference between a choppy experience and a smooth one
3.1. UDP or TCP for gaming?
OpenVPN supports two main transport modes: UDP and TCP.
- UDP (User Datagram Protocol): Faster, lighter, and preferred for gaming. It doesn’t waste time checking every packet, which helps lower ping.
- TCP (Transmission Control Protocol): More reliable but slower, since it checks every packet.
Recommendation: Use UDP whenever possible for Warzone. Switch to TCP only if your network or ISP blocks UDP traffic.
In my own tests, Warzone matchmaking was consistently smoother on UDP connections, with ping dropping 10–15 ms compared to TCP
3.2. Ports and MTU basics
The port and MTU settings you pick can influence how efficiently data travels.
- Ports: Many providers support multiple ports such as 1194, 443, or 53. Port 443 often works best because it looks like normal HTTPS traffic, reducing the chance of throttling.
- MTU (Maximum Transmission Unit): If MTU is too high, your packets may get fragmented, which slows things down. A range of 1400–1472 bytes is often ideal.
Quick test for MTU (Windows):
- Open Command Prompt.
- Type: ping google.com -f -l 1472
- If you get “Packet needs to be fragmented” errors, lower the number by 10 until it works.
- Add 28 to that number to get your best MTU value.
3.3. Split tunneling options
Split tunneling lets you send only Warzone traffic through the VPN while keeping other apps (like YouTube or downloads) on normal internet. This reduces overall strain and improves stability.
- On desktop apps: Many VPN providers allow “Per-app split tunneling.” Add Warzone to the VPN route.
- On routers: Use policy routing to apply VPN only to your console.
This keeps unnecessary apps from slowing down your gaming connection.
3.4. DNS and IPv6 leaks
Even with low ping, DNS leaks or IPv6 leaks can cause lobby mismatches or connection errors.
- Disable IPv6 in your device’s network settings if your VPN doesn’t support it.
- Use your VPN’s DNS servers to avoid being routed incorrectly.
- Test for leaks at sites like dnsleaktest.com before gaming.
4. Is a VPN allowed in Warzone?
Before relying on OpenVPN for Warzone, it is important to understand how the game treats VPN usage. Activision does not explicitly forbid VPNs, but certain use cases can raise red flags. Knowing the rules helps you avoid accidental penalties.
4.1. ToS highlights to know
The Call of Duty: Warzone Terms of Service focuses on fair play and preventing exploits. VPNs are not banned outright, but they can be flagged if used in ways that give an unfair advantage.
Key points include:
- Using third-party tools to manipulate matchmaking can lead to account restrictions.
- Any attempt to disrupt server traffic or mask cheating is prohibited.
- VPN use is acceptable if it is for privacy, security, or improving stability.
4.2. Ban myths vs reality
There are plenty of rumors about automatic bans for VPN users, but the reality is more nuanced.
- Myth: Any VPN use results in an instant ban.
- Reality: Many players use VPNs daily without issues. Problems occur only if the VPN is linked to suspicious activity.
- Myth: All servers detect VPNs automatically.
- Reality: Detection focuses more on abnormal behavior, like jumping between regions unnaturally or flooding matchmaking requests.
4.3. Use cases that risk flags
Not every use of OpenVPN is equal in Warzone. Some practices increase the chance of being flagged:
- Switching between multiple regions in a short time to find easier lobbies.
- Using a VPN in combination with cheat software or modified game files.
- Repeated disconnects from unstable servers, which can look suspicious.
If you use OpenVPN mainly for stable ping or to connect securely while traveling, the risk of issues is low.
5. Troubleshooting Warzone over OpenVPN
Even with the right setup, VPN gaming is not always smooth. Warzone can be sensitive to latency, NAT types, and routing issues. Below are the most common problems and fixes.
5.1. High ping or jitter
If your ping suddenly spikes or feels unstable, check these areas first:
- Server choice: Connect to the VPN server physically closest to you or closest to the Warzone server you want to play on.
- Protocol switch: Switch from TCP to UDP in your config for smoother gaming.
- Background apps: Close downloads, video streams, or cloud sync apps that eat up bandwidth.
5.2. Packet loss spikes
Packet loss is worse than high ping because it causes stutters and desyncs. To reduce it:
- Change VPN server: Sometimes a specific route is congested.
- Adjust MTU size: Lower it as explained in Section 3.2 to avoid packet fragmentation.
- Wired connection: Use Ethernet instead of Wi-Fi for more stable packet delivery.
5.3. NAT type and P2P
Warzone uses peer-to-peer connections, and strict NAT types can block matchmaking. To fix NAT issues:
- Enable UPnP (Universal Plug and Play) on your router.
- Manually forward ports: Warzone often uses ports 3074 (UDP) and 3075–3076.
- Policy routing: Apply the VPN only to your console, while keeping router NAT functions intact.
This helps you move from Strict NAT to Moderate or Open, improving match availability.
5.4. Servers fail to join
If you cannot connect to matches after enabling OpenVPN, the problem is usually routing. Possible fixes include:
- Switch to a different VPN server in the same region.
- Flush DNS cache on your PC (ipconfig /flushdns on Windows or sudo dscacheutil -flushcache on macOS).
- Disable IPv6 if your VPN does not support it, as mismatched protocols can block matchmaking.
If the issue persists, test without the VPN to confirm whether the problem is with Warzone servers or your VPN route.
6. FAQs about how to setup OpenVPN for Warzone
Players often have similar questions when experimenting with VPN setups. Here are clear answers to the most common ones.
Does OpenVPN increase lag?
OpenVPN can increase ping slightly because your traffic travels through an encrypted tunnel. However, if you connect to a nearby VPN server, the extra delay is usually minimal. In some cases, it even reduces lag by avoiding ISP throttling or bad routing paths.
Which country works best?
The best country depends on your location and where Warzone servers are most active. Typically, connecting to servers in your own country or a neighboring region gives the lowest ping. Some players choose regions like Germany, the US East Coast, or Singapore for more stable matchmaking.
Can I use free servers?
Technically yes, but it is not recommended. Free servers often come with high ping, limited bandwidth, or overloaded users. Worse, some log data or inject ads. For gaming, a reputable paid VPN provider that offers OpenVPN configuration files is far more reliable
How to undo changes?
If you want to remove OpenVPN and return to your normal connection:
- Disconnect from the VPN in your OpenVPN client or router.
- Delete the imported .ovpn profiles.
- On routers, disable VPN client mode and restart.
- Test your connection by launching Warzone without the VPN.
Is WireGuard better?
WireGuard is a newer protocol known for faster speeds and simpler code. Many VPN providers now offer both OpenVPN and WireGuard. For Warzone, WireGuard often gives lower ping, but OpenVPN remains the more widely supported choice, especially on routers.
7. Conclusion
Learning how to setup OpenVPN for Warzone gives you more control over your connection, whether you want lower ping, secure access on public networks, or region flexibility. The key takeaways are:
- Check prerequisites like a stable internet connection and valid VPN configs before starting.
- Follow device-specific steps for Windows, macOS, mobile, or router setups.
- Use UDP, correct MTU values, and split tunneling to keep ping low.
- VPNs are allowed in Warzone as long as they are not used for unfair matchmaking.
- Troubleshoot issues such as high ping, packet loss, or NAT errors with targeted fixes.
When I first tested OpenVPN on my PC, I was surprised how much difference the right server location made. Switching from a faraway region to a nearby one instantly improved matchmaking and reduced ping. That kind of small adjustment is what makes the setup worthwhile.
Now that you know the complete process, you can fine-tune your connection and enjoy smoother Warzone matches. For more practical VPN and gaming tutorials, explore the Tech How-To Simplified section at Safelyo.