It is unsettling to open the peers tab in your torrent client and see your real IP address exposed to strangers. The fear of receiving a DMCA notice or a warning letter from your internet service provider is a valid concern.
Learning how to use a VPN with qBittorrent is essential to anonymize your downloads. However, simply turning your VPN on is often not enough to prevent a real IP leak if the connection drops unexpectedly.
There are 3 main methods for how to use a VPN with qBittorrent. They can be used independently or combined for layered protection: Method 1 and Method 2 work especially well together.
-
Method 1: Use your VPN app (Simplest)
Open your VPN app → enable the kill switch → select a P2P server → connect.
-
Method 2: Bind qBittorrent to your VPN interface (Most reliable)
Find your VPN adapter name → open qBittorrent advanced settings → select the network interface → restart the application.
-
Method 3: Configure a SOCKS5 proxy (Speed-focused)
Get your proxy credentials → open qBittorrent connection settings → enter the host and port → check the authentication box.
1. How to use a VPN with qBittorrent: Is running your VPN app enough?
No, simply running your VPN in the background is not always enough.
Your VPN might disconnect during a torrent download. If the built-in kill switch fails to react, your system will automatically default back to your real internet connection.
This immediately exposes your true IP address to everyone in the swarm. To prevent this, you must choose a setup method that guarantees your traffic will stop if the secure tunnel fails.
Here is a comparison of the three primary configuration methods to help you choose the right approach.
| Criterion | VPN App Only | Interface Binding | SOCKS5 Proxy |
|---|---|---|---|
| Ease of setup | Very easy | Moderate | Advanced |
| Encrypts traffic? | Yes | Yes | No |
| Acts as kill switch? | Requires separate setting | Built-in by design | No |
| IP leak risk if VPN drops | High (without kill switch) | None | High |
2. Method 1: Use your VPN app (Simplest setup)
Quick step:
- Open your VPN application.
- Navigate to the settings menu and enable the kill switch.
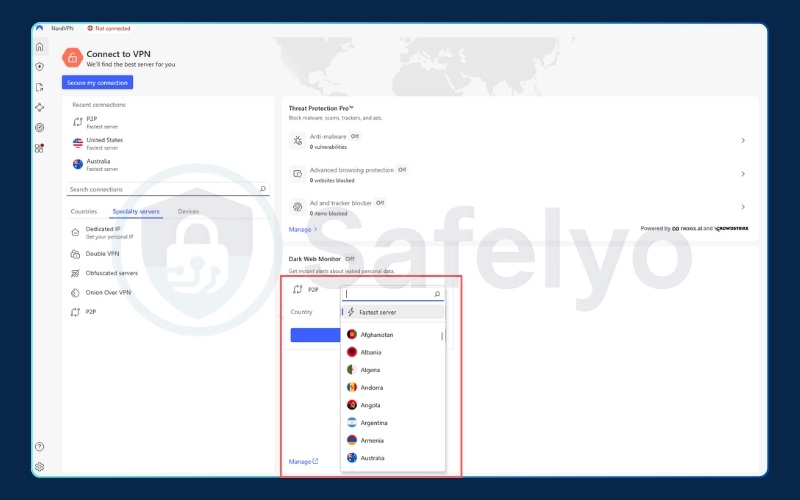
- Select a server optimized for peer-to-peer traffic.
- Connect to the server before launching qBittorrent.
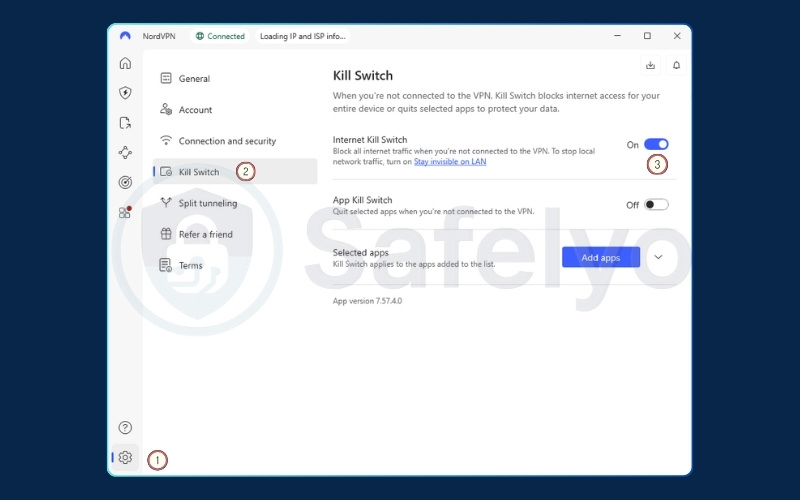
This is the baseline method that most users start with. It requires no technical configuration inside the torrent client itself. You rely entirely on the VPN software to encrypt your traffic and mask your IP address from the swarm.
For this method to be safe, you must manually enable the kill switch feature in your VPN settings. The kill switch acts as a safety net that blocks all internet access if the VPN connection drops unexpectedly.
Without it, a brief network hiccup could expose your downloading activity to your internet service provider.
When selecting your connection settings, always choose a P2P-optimized server if your provider offers them. Additionally, we recommend selecting the WireGuard protocol over OpenVPN.
WireGuard generally offers faster speeds and uses fewer system resources. This helps maintain high download speeds without consuming excessive processing power.
Your VPN app’s kill switch operates at the OS level, catching all general traffic. You can combine this setup with Method 2 (interface binding) to create a practical backup system. If one method fails, the other is still there to prevent leaks.
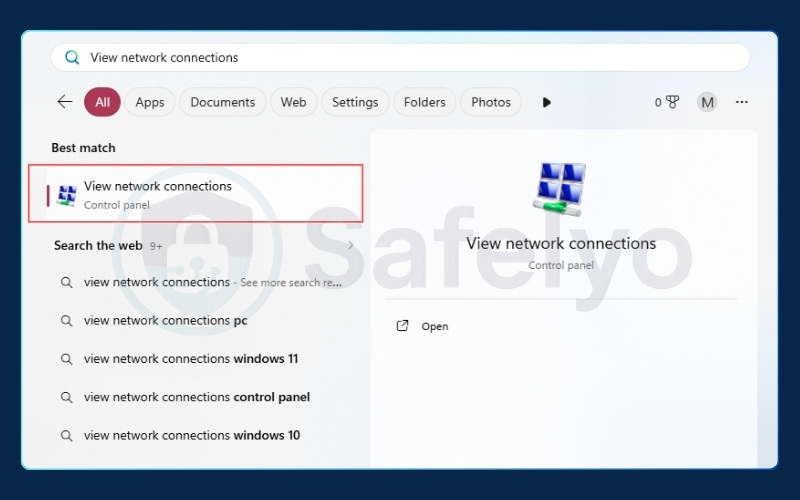
3. Method 2: Bind qBittorrent to your VPN interface (Most reliable)
Quick step:
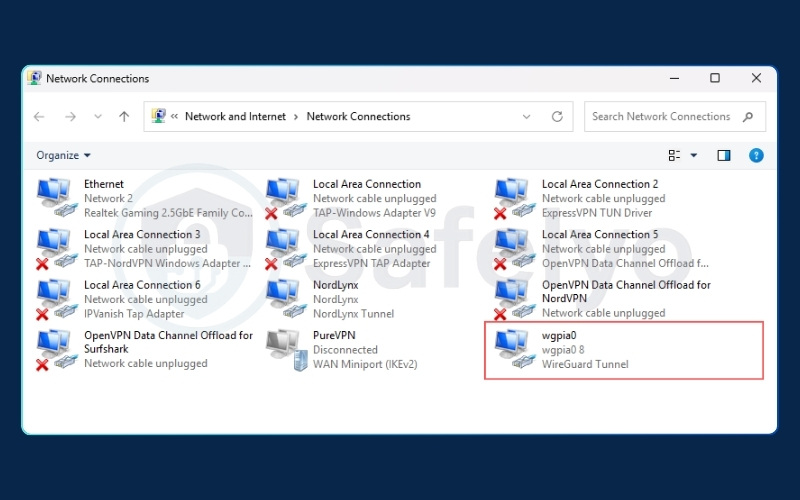
- Search “View network connections” in your system menu to find the exact name of your active VPN adapter (such as tun0, NordLynx (NordVPN), a TAP adapter, or wgpia0 (PIA)…).
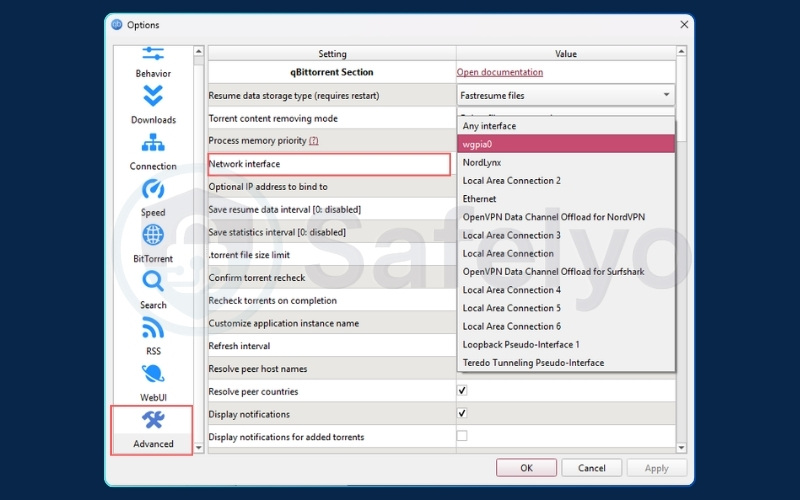
- Open qBittorrent and navigate to Tools, then Options, and click Advanced.
- Locate the Network Interface dropdown menu.
- Select your specific VPN adapter and restart the application.

This is a highly reliable method to prevent IP leaks. Binding your network interface qBittorrent settings is recommended for maximum privacy.
It is essentially telling qBittorrent: “Only use the VPN tunnel, and never touch my real internet connection under any circumstances.”
When you connect to a VPN, it creates a virtual network adapter on your computer. By binding the torrent client to this specific adapter, you create an effective built-in kill switch.
If the VPN disconnects, that virtual adapter disappears. Because qBittorrent is strictly instructed to only use that adapter, all downloading and uploading activity stops immediately.
If you are having trouble identifying the correct name in the network connections window, you can use one of these two alternative methods:
- Method A: Check via Command Prompt. Open the Command Prompt on Windows and type ipconfig. Look through the list for an adapter that shares the name of your VPN protocol (such as “NordLynx” or “TAP-Windows Adapter”). Its assigned IP address will usually differ completely from your local home network.
- Method B: Check inside qBittorrent. Open qBittorrent’s Network Interface dropdown menu while the VPN is connected and note the available options. Next, disconnect the VPN and check the dropdown again. The adapter name that disappeared from the list is the exact one you need to select when you reconnect.
4. Method 3: Configure a SOCKS5 proxy in qBittorrent
Quick step:
- Obtain your specific proxy service credentials from your VPN account dashboard.
- Open qBittorrent and navigate to the Connection settings tab.
- Enter the SOCKS5 host address and the required port number.
- Check the authentication box and input your service credentials.
This method is highly popular among users looking for a setup that prioritizes download speed. A SOCKS5 proxy routes your torrent packets through a remote server to change your visible IP address. This bypasses some local network restrictions and often delivers faster speeds than a standard VPN connection.
However, you must be aware of a critical trade-off. A SOCKS5 proxy does not encrypt your internet traffic. It only changes your IP address.
Furthermore, a proxy does not have a kill switch. If the proxy server fails, your client will simply route the unencrypted traffic back through your normal internet connection.
This setup is strictly for speed optimization and basic IP masking. It is not recommended if you require high security and data encryption against internet service provider monitoring.
Example: Private Internet Access (PIA) SOCKS5 configuration
If you are using Private Internet Access, follow these exact steps to configure the proxy correctly from start to finish:
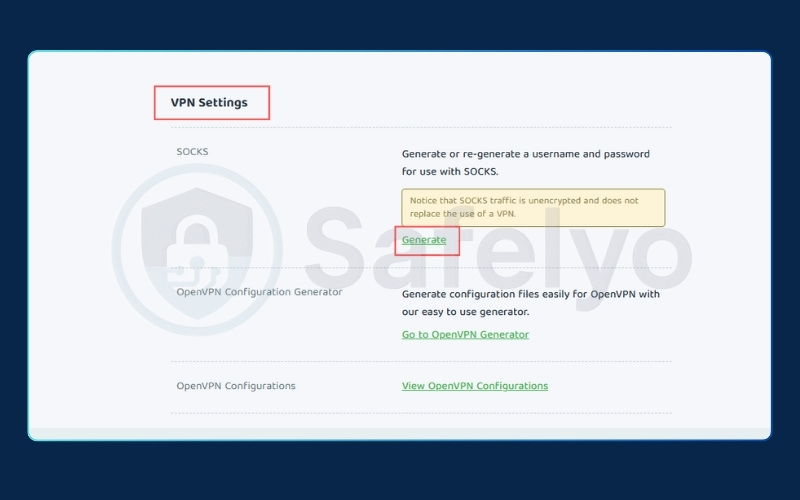
- Retrieve your credentials: Log in to your Client Control Panel (CCP) on the PIA website (https://www.privateinternetaccess.com/account/client-sign-in). Navigate to the Downloads tab, scroll down to the VPN Settings section, and generate a specific SOCKS5 username and password. This is entirely different from the credentials you use to log into the app.
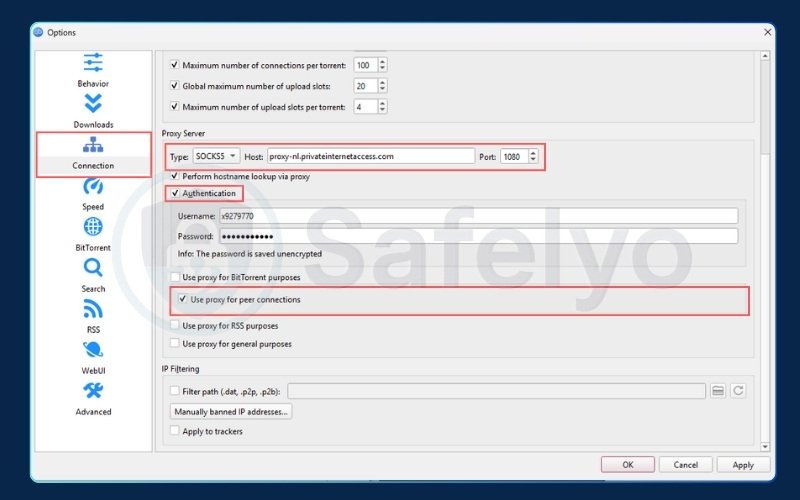
- Open connection settings: Launch qBittorrent and navigate to Tools > Options > Connection.
- Select proxy type: In the Proxy Server section, change the Type dropdown menu to SOCKS5.
- Enter host and port details: For the Host, input the proxy server address proxy-nl.privateinternetaccess.com. For the Port, enter exactly 1080.
- Authenticate: Check the Authentication box, then input the unique SOCKS5 username and password you generated in the first step.
- Apply changes: Ensure you check the boxes for “Use proxy for peer connections”. Click Apply, then completely restart your torrent client.

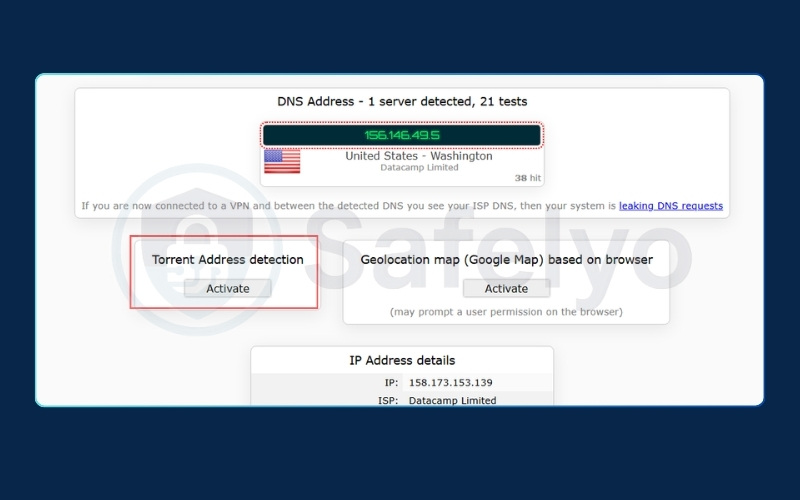
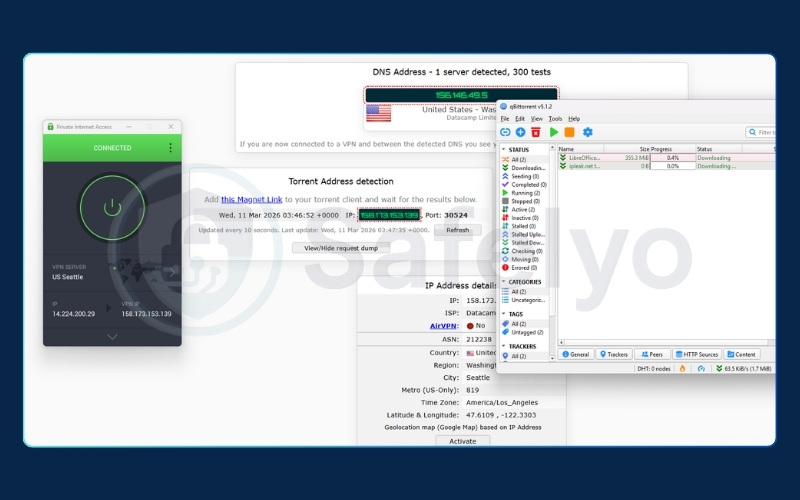
5. How to verify your VPN is actually protecting qBittorrent
Quick step:
- Visit the ipleak.net website while your VPN is connected.
- Scroll down to the Torrent Address Detection section.
- Click the Activate button and click to add the generated magnet link into qBittorrent.
- Compare the IP address shown on the website with your real IP.
Setting up your privacy tools is only half the job. You must prove that the configuration actually works before you start downloading large files. Many users skip this verification step and assume the software is operating correctly.
To perform a real-world test, navigate to ipleak.net. This tool generates a unique tracking magnet link. When you add this link to your torrent client, it attempts to download a fake file.
During this process, the website monitors exactly which IP address your client broadcasts to the swarm.
Watching the Torrent Address Detection tool update in real-time provides immediate confirmation. If the webpage displays the IP address provided by your VPN, your setup is secure. However, if your actual home IP address appears on the screen, you have a leak and must recheck your interface binding or kill switch settings immediately.
6. How to choose the right VPN for qBittorrent
Before evaluating specific providers, you need to know what makes a service suitable for torrenting. Many consumer networks actively block peer-to-peer traffic or lack the necessary security infrastructure to keep your identity hidden during large downloads.
When selecting a VPN for your downloading needs, ensure it includes the following essential features:
- P2P servers: Ensures your traffic is not throttled or blocked by the internet service provider.
- No-logs policy: Guarantees your download history is never recorded, provided it has been independently audited.
- Kill switch: Prevents your real IP address from leaking during sudden connection drops.
- WireGuard protocol: Delivers faster download speeds compared to older tunneling standards.
- Port forwarding: Maximizes your seeding efficiency and allows you to connect to more peers globally.
It is worth noting that several major VPN providers no longer offer the port forwarding feature. While it is beneficial for seeding torrents, the industry has gradually shifted away from it due to security concerns.
Open ports are frequently targeted for network abuse. When individuals use forwarded ports to host malicious content, the VPN’s shared IP addresses often get flagged by website administrators.
Additionally, port forwarding introduces a specific security trade-off. Opening a port creates a bypass through the VPN’s built-in NAT firewall. This direct pathway can expose your personal device to unwanted inbound traffic and potential internet vulnerabilities.
7. Best VPN for qBittorrent (Free and paid options)
Choosing a reliable provider is just as important as configuring the software correctly. Finding a provider that checks all the boxes is becoming difficult, especially since many companies have dropped port forwarding.
Here is a comparison of top providers that currently meet the essential criteria for secure and efficient torrenting.
| VPN | P2P Servers | Kill Switch | WireGuard | Port Forwarding | No-Logs Audit | Note |
|---|---|---|---|---|---|---|
| Proton VPN | All premium servers | Yes | Yes | Yes (Dynamic) | Audited | P2P & port forwarding only on select servers; requires Plus plan or higher |
| Private Internet Access | Most servers | Yes | Yes | Yes | Audited | Port forwarding unavailable on all US server locations |
| hide.me | Specialized servers | Yes | Yes | Yes (Dynamic) | Audited | Ports reset on each reconnect; not suitable if a static port is required |
| TorGuard | Most servers | Yes | Yes | Yes (Multiple) | Audited | No P2P support on US servers due to a 2022 legal ruling |
Many users search for a Proton VPN qBittorrent setup specifically to utilize their well-known free tier. While Proton VPN is respected for its audited privacy practices, it is important to understand the reality of free VPNs for torrenting.
The free tier strictly blocks P2P traffic to prevent server overload. You must upgrade to a paid plan to unlock torrenting capabilities, ensuring you get the bandwidth, port forwarding, and speed required for large downloads.
Based on our testing, these four providers currently meet the necessary criteria for P2P file sharing. They offer the essential features needed for a secure and private torrenting setup. We recommend reviewing their individual plans to see which service best aligns with your specific downloading needs.
8. Advanced setups: Docker and TrueNAS
Quick step:
- Set up a dedicated VPN container within your Docker environment.
- Route your qBittorrent container’s network through the VPN container.
- Configure iptables to block non-VPN outbound traffic.
- Verify the external IP address via the container terminal.
For home media server enthusiasts running headless setups, basic application binding is not always applicable. When running torrent clients on network-attached storage or home servers, you need to manage traffic routing at the container level.
A highly secure method is to deploy a VPN client container alongside your torrent container. You can then configure the torrent container to use the VPN container’s network stack exclusively.
This ensures that the torrent application simply has no path to the public internet if the VPN container stops running or loses its connection.
9. Common problems and fixes
If you encounter issues after completing your setup, the fixes are usually straightforward adjustments to your settings.
9.1. Torrent not downloading after binding
If your downloads stall completely after applying the interface binding method, you have likely selected the wrong adapter. Your system may have multiple virtual Ethernet connections from old software.
You must open your network settings, identify the exact adapter currently passing traffic, and update the selection in your advanced options.
9.2. VPN IP not showing in ipleak
If the tracking website does not update or shows an error, the tracking torrent may be stalled. You must completely restart the torrent application to force it to announce itself to the trackers again. Ensure the tracking magnet link is set to “Downloading” status within the client.
9.3. SOCKS5 authentication failing
A common mistake when setting up a proxy is using your standard website login credentials. Providers like NordVPN require you to use a specific set of service credentials for proxy authentication. You can generate these unique usernames and passwords within your account dashboard on the provider’s website.
10. Legal and safe ways to use a VPN with qBittorrent
Using torrents with a VPN doesn’t automatically make everything legal. Depending on where you live, downloading or even seeding copyrighted material can carry risks.
Always check torrent-friendly jurisdictions before starting. That is why understanding how to use a VPN with qBittorrent responsibly is just as important as setting it up correctly.
10.1. Legal risks and safe practices
Here is what you need to know regarding the legal landscape of peer-to-peer downloading:
- In the US and Germany, torrenting copyrighted content can result in fines or DMCA notices.
- Using a VPN helps protect your IP address, but it doesn’t exempt you from the law.
- Torrent responsibly by sticking to files you are legally allowed to download or share.
- VPNs with no-log policies and outside the 14 Eyes Alliance offer added peace of mind for users who want anonymous torrenting.
10.2. Use public domain and Creative Commons torrents
There are many safer sources available for downloading content legally. These include:
- Archive.org for films, books, and music.
- Linux Tracker for various Linux distributions.
- Etree.org for live concert recordings.
Always look for clear license indicators like “CC-BY” or “Public Domain” before initiating a download to ensure compliance.
10.3. Tips for responsible torrenting (no seeding pirated files)
Even if you download legally, seeding pirated content can expose you to unnecessary risks. Here is how to stay cautious while managing your client:
- Set a seeding ratio limit (such as 1.5) in your client settings.
- Disable automatic seeding after a download is complete.
- Review tracker information thoroughly to ensure the files are legitimate.
For those wanting a clearer picture of the potential threats to their personal data, we have put together a detailed article covering Why is torrenting without a VPN unsafe.
11. FAQs about how to use a VPN with qBittorrent
Do I really need a VPN for qBittorrent?
Yes, a VPN is highly recommended. Without one, your internet service provider can throttle your bandwidth, and your real IP address is completely visible to every stranger in the swarm.
What does binding a VPN to qBittorrent do?
It forces the application to solely use the encrypted VPN tunnel for all network traffic. If the secure connection drops, it acts as a reliable kill switch and stops all downloads instantly.
Which VPN is best for qBittorrent?
Proton VPN, Private Internet Access, and hide.me are excellent choices due to their audited privacy policies and strong performance. Proton VPN is a great starting point, though you will need a paid plan for reliable peer-to-peer support and port forwarding features.
Can the FBI track a VPN?
If you use an independently audited, strict no-logs provider, there is no historical data stored on the servers to hand over to authorities. For personal downloaders, the realistic risk is receiving a civil DMCA notice from an internet service provider, not federal tracking.
Is qBittorrent safe without a VPN?
No, it is not safe for privacy. Your real IP address is openly broadcasted to every peer you connect with, allowing copyright trolls and data brokers to log your activity easily.
12. Conclusion
Protecting your identity while downloading files requires a proactive approach. You now know exactly how to use a VPN with qBittorrent securely.
For most users, the optimal setup is combining Method 1 and Method 2: enable the kill switch in your VPN app for system-wide protection, then bind qBittorrent to the VPN interface for application-level redundancy. Use Method 3 only if download speed is your top priority and you accept the trade-off of no encryption.
If your current provider does not support port forwarding or lacks a verified no-logs policy, you should consider switching to a more robust service. Always remember to run the ipleak.net verification test after applying any major updates to your system.
To dive deeper into protecting your online privacy, explore our extensive collection of VPN guides. For more straightforward, easy-to-follow tech advice, visit Safelyo and discover our latest tutorials.