Your computer is filled with important documents – from financial records and work projects to private family photos. So, how do you ensure those files are safe from prying eyes, whether it’s on a shared computer or a stolen laptop? The answer is encryption.
As a security expert, I always stress that protecting your stored data is just as important as protecting your online activity. Learning how to encrypt a folder is one of the most fundamental and effective skills you can master to take control of your digital privacy.
I’ve personally helped people recover after a laptop theft where an unencrypted folder led to significant personal data exposure. This isn’t a complex tool for corporations; it’s a vital measure for anyone with sensitive files on their computer.
In this comprehensive guide, you will discover:
- How to choose the right encryption method for your specific needs.
- The easiest way to password-protect a folder on Windows is to use the built-in tools.
- A step-by-step guide for creating a secure “digital vault” on your Mac.
- How to use powerful free software to encrypt any folder for sharing.
Don’t wait for a lost laptop to take your data security seriously. Let me guide you through turning your most important folders into impenetrable digital safes.
1. Before you start: Choosing the right encryption method for your needs
Before we dive into the step-by-step guides, let’s make sure you choose the right tool for your specific goal. Not all encryption methods are created equal, and from my experience, picking the correct one from the start saves a lot of headaches later on.
First, it’s important to understand the difference between simple “password protection” and true “encryption.”
- Password protection is like putting a simple lock on a bedroom door. It will stop a casual visitor, but someone with the right tools or skills could potentially bypass it.
- Encryption is like taking that entire room and placing it inside a steel bank vault. The contents aren’t just locked; they are scrambled into an unreadable code. Without the correct key (your password), the data is just meaningless noise. All the methods in this guide use true, strong encryption.
To find the perfect method for your situation, use this quick decision table:
| If your goal is to… | The best method is… | Platform |
| Quickly send a folder securely via email | Create a compressed archive (7-Zip / WinRAR) | Windows & Mac |
| Protect a folder from other users on your PC | Windows’ built-in encryption (EFS) | Windows (Pro/Enterprise) |
| Create a secure “digital vault” on your Mac | Mac’s Disk Utility (Encrypted Image) | macOS |
| Get the highest level of security | Dedicated folder encryption software | Windows & Mac |
Now that you’ve matched your goal to the right tool, simply find the corresponding method in the detailed step-by-step guides below.
2. How to encrypt a folder in Windows
Windows offers a couple of excellent ways to encrypt a folder, ranging from a built-in feature for protecting data on your local machine to more versatile options for sharing files securely.
2.1. Method 1: Using Windows’ built-in encryption (EFS)
Windows Pro and Enterprise editions include a feature called Encrypting File System (EFS). This is the quickest way to protect a folder from other user accounts on the same computer.
Best for:

Securing your personal folders on a shared family or work computer.
The way EFS works is by tying the encryption key directly to your Windows user account. When you’re logged in, the files are accessible to you. If someone else logs in with their account, the folder’s contents will be completely unreadable to them.
Here’s how to encrypt a folder in Windows using EFS:
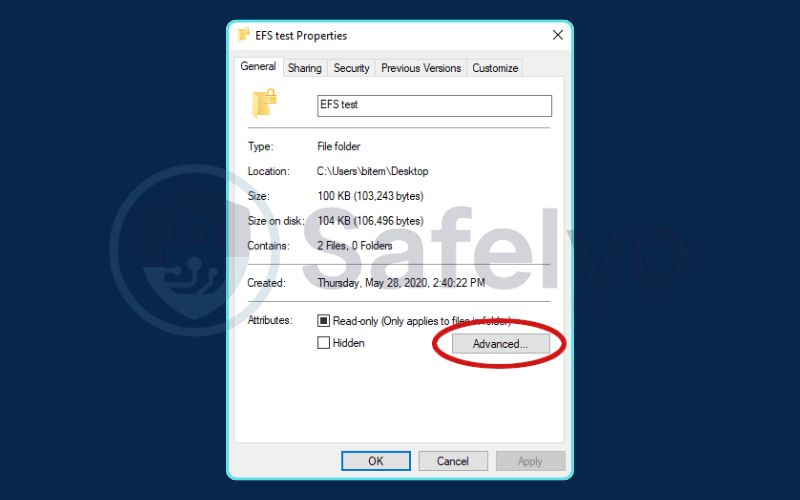
- Right-click the folder you want to protect and select “Properties.”
- In the “General” tab, click the “Advanced…” button.
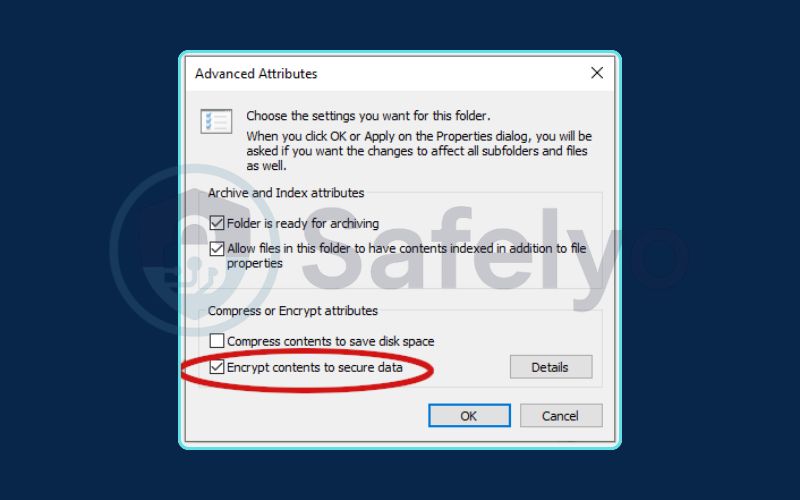
- In the “Advanced Attributes” window, check the box that says “Encrypt contents to secure data” and click OK.
- Click OK again on the Properties window. A confirmation dialog will pop up.
- Choose “Apply changes to this folder, subfolders, and files” and click OK.
You will now see a small padlock icon on the folder, indicating it’s encrypted. The first time you do this, Windows may prompt you to back up your encryption certificate and key. I cannot stress this enough: Do this immediately. Save the key to a separate USB drive or secure cloud storage. Without that key, if your user profile ever becomes corrupted, you could lose access to your own files.
2.2. Method 2: Using 7-Zip (free & versatile)
While EFS is great for local protection, it’s not useful for sending a folder to someone else. For that, my go-to tool is 7-Zip. It bundles all your files into a single, encrypted archive that you can easily send via email or upload to cloud storage.
Best for:

Creating a single, password-protected file to share securely or store on an external drive.
- Download and install 7-Zip from 7-zip.org. It’s completely free, open-source, and a must-have utility.
- Right-click on the folder you want to encrypt.
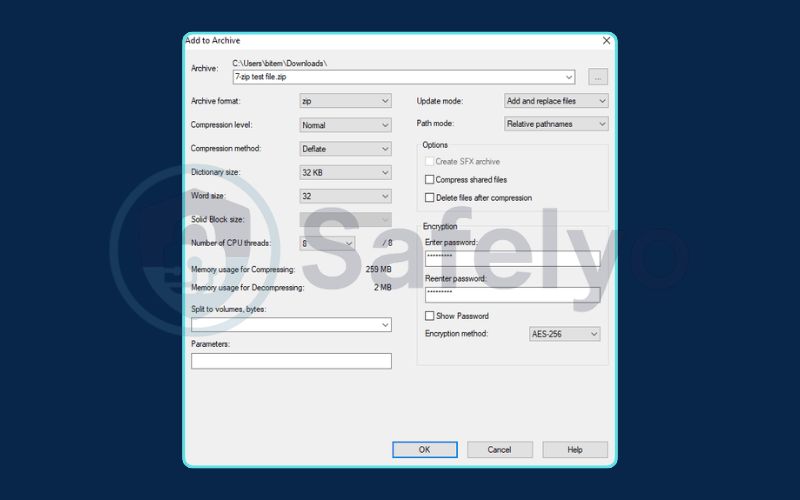
- Hover your mouse over the “7-Zip” option in the menu and select “Add to archive…”
- In the new window, look for the “Encryption” section on the right.
- Enter and re-enter a strong password. Make sure the “Encryption method” is set to AES-256, which is the gold standard for this type of encryption.
- Click OK.
7-Zip will create a new file (e.g., MySecretFolder.zip). This single file is now a locked container holding all the contents of your original folder, perfect for protecting sensitive information on the move.
2.3. How to decrypt a folder in Windows
Unlocking your folders is simple:
- For EFS: As long as you are logged into the same Windows account that encrypted the folder, you don’t need to do anything. You can open, edit, and save files within it just like any normal folder. The encryption is transparent to you, but a brick wall to everyone else.
- For 7-Zip: Double-click the archive file (the .zip or .7z file). The 7-Zip window will open and prompt you for the password. Enter it correctly, and you can then drag the files out of the archive or use the “Extract” button to save them to a new location.
3. How to encrypt a folder on Mac
macOS has a fantastic and robust built-in tool for folder encryption called Disk Utility. The approach is slightly different from Windows, but in my opinion, it’s even more powerful for creating a secure, portable “digital safe” for your files.
3.1. Method 1: Using Mac’s disk utility (the best built-in option)
Instead of encrypting a folder in place, this method creates what’s called an “encrypted disk image.” Think of it as a password-protected virtual USB drive that lives as a single file on your computer. When you “mount” it with your password, it appears on your desktop just like a real drive.
Best for:

Creating a secure, self-contained vault to store sensitive files and folders on your Mac or an external drive.
Here’s how to encrypt a folder on a Mac step-by-step:
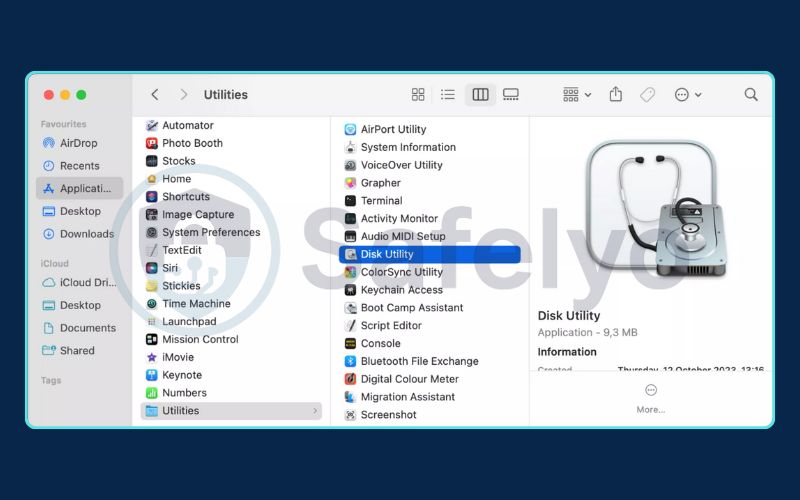
- Open Disk Utility. The quickest way is via Spotlight search (press Command + Spacebar, type “Disk Utility,” and hit Enter). You can also find it in your Applications > Utilities folder.
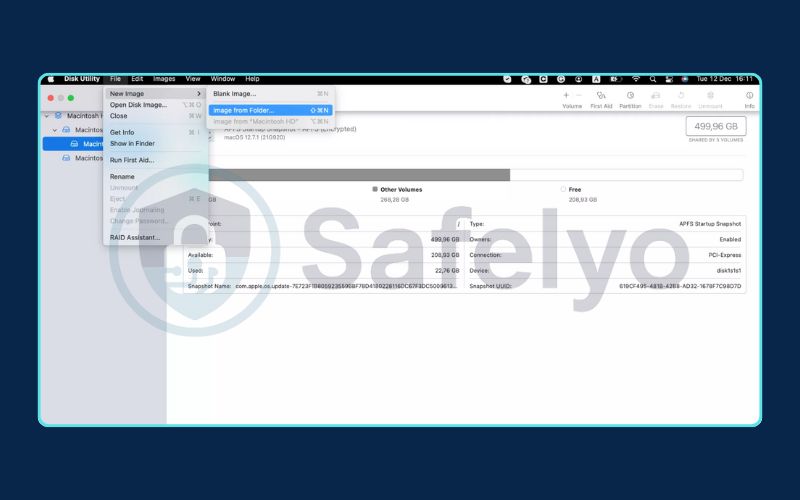
- With Disk Utility open, go to the menu bar at the top of your screen and click File > New Image > Image from Folder…
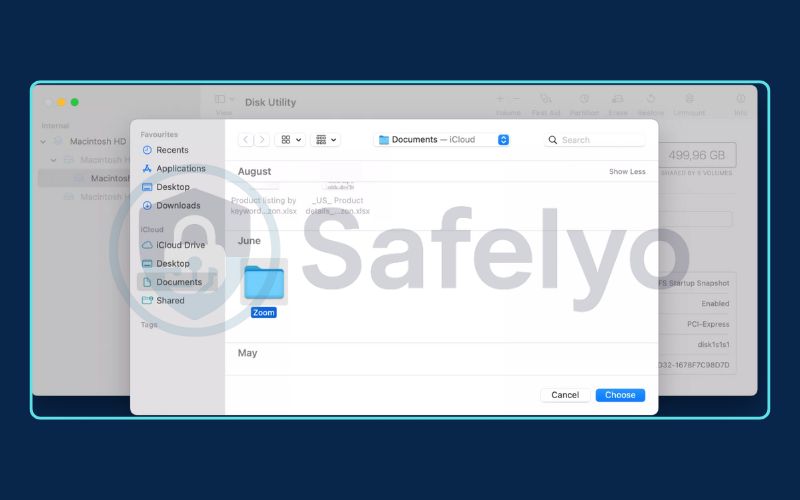
- A Finder window will appear. Select the folder you want to encrypt and click the “Choose” button.
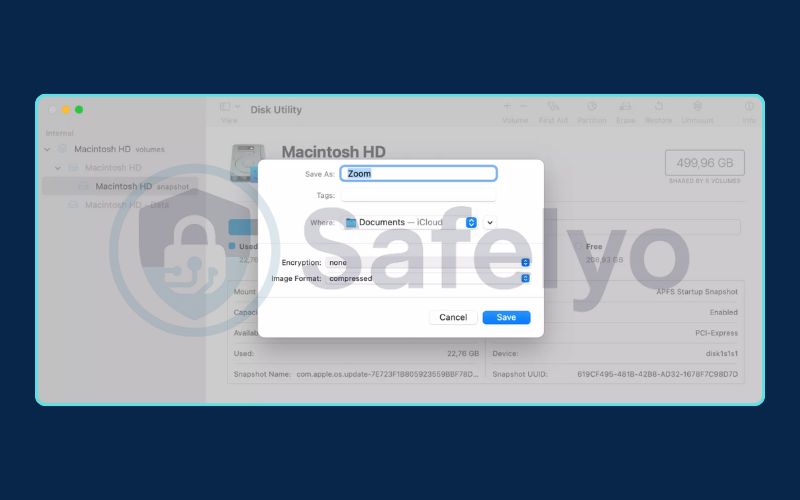
- The “Save” dialog box will appear. This is where you configure the encryption.
- Save As: Give your new encrypted file a name (e.g., “Private Documents”).
- Where: Choose where to save this new file.
- Encryption: This is the most important step. Click the dropdown and select either 128-bit or 256-bit AES encryption. 256-bit is technically stronger, but both are extremely secure for all practical purposes.
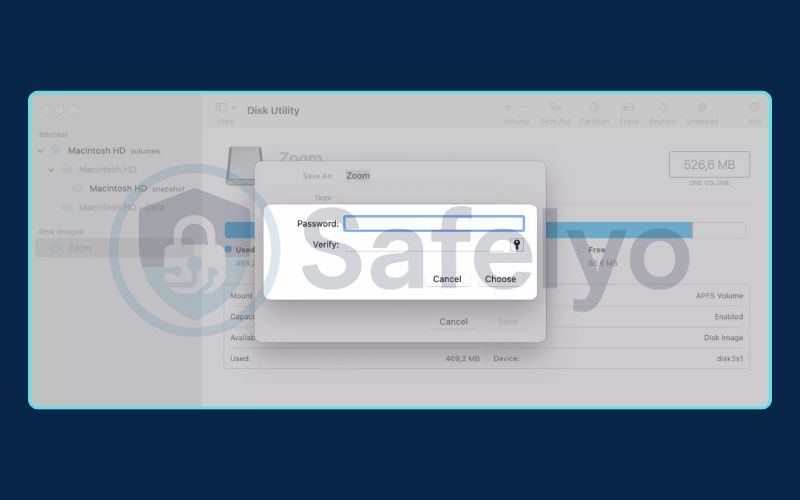
- After selecting an encryption level, you will be prompted to create and verify a strong password. I cannot stress this enough: if you forget this password, your data is gone forever. Uncheck the box to save the password in your Keychain for maximum security.
- Image Format: Set this to “read/write.” This allows you to add, edit, and delete files inside your secure vault later on.
- Click “Save.”
macOS will now process your folder and create a single .dmg file. This is your encrypted vault.
3.2. How to decrypt a folder on Mac
Accessing your files is as easy as unlocking a door.
- To open/decrypt: Find the .dmg file you created and double-click it. A window will pop up asking for the password. Enter it correctly.
- A new drive icon will appear on your desktop and in the Finder sidebar. This is your mounted, decrypted folder. You can now open it and work with your files just like any normal folder.
- To “re-lock” the folder: When you’re finished, simply eject the virtual drive. You can do this by dragging its icon to the Trash can in your Dock, or by right-clicking the icon and selecting “Eject.” The vault is now securely locked again until you enter the password next time.
4. Advanced option: Dedicated folder encryption software
While the built-in tools and 7-Zip are perfect for most everyday needs, there’s a class of dedicated folder encryption software designed for users who require the highest levels of security or more user-friendly features.
When colleagues in the security industry ask for my recommendations for ultra-sensitive data, these are the two names that consistently come up.
VeraCrypt (free, open-source, highly secure)
- What it is: VeraCrypt is the spiritual successor to the legendary (and now defunct) TrueCrypt. It’s a free, open-source tool that is heavily audited and trusted by security professionals worldwide. Like Mac’s Disk Utility, it creates encrypted virtual disks or “volumes,” but it works across Windows, macOS, and Linux and offers more advanced features.
- Best for: Tech-savvy users, journalists, and privacy advocates who prioritize the absolute highest level of verifiable security and are comfortable with a more technical interface. A standout feature is “plausible deniability,” which allows you to create a hidden encrypted volume inside another one – a powerful tool for protecting data under duress.
NordLocker (freemium, user-friendly)
- What it is: From the trusted team behind NordVPN, NordLocker is a modern, drag-and-drop encryption tool designed for ease of use. It allows you to create secure “lockers” (essentially encrypted folders) on your computer. You simply drag files into the locker, and they are automatically encrypted.
- Best for: Users who want a very simple, modern interface and the option for secure cloud storage. NordLocker’s paid plans allow you to seamlessly and securely sync your encrypted lockers across your devices, combining the benefits of local encryption with the convenience of the cloud. The free version gives you a generous amount of local encryption to get started.
Both Veracrypt / NordLocker offer a step up from the basic tools, either in raw security features or in user-friendly design and cloud integration.
5. FAQ about encrypting a folder
Securing your folders is a crucial step in digital hygiene. Here are quick answers to some of the most common questions about the process.
How to encrypt a folder?
The best method depends on your operating system and needs. On Windows, you can right-click the folder, go to ‘Properties’ > ‘Advanced,’ and check ‘Encrypt contents to secure data.’ On a Mac, use the Disk Utility app to create a password-protected, encrypted disk image from your folder. For sending folders securely, the best free tool on both platforms is 7-Zip, which creates a password-protected archive.
What is the best encryption algorithm?
For most users, AES-256 is the gold standard and the algorithm you should look for. It is used by 7-Zip, Mac’s Disk Utility, VeraCrypt, and NordLocker, and is considered virtually unbreakable by today’s computing standards.
Can I encrypt a folder on a USB drive?
Yes, absolutely. The 7-Zip method (creating an encrypted archive) and the Mac Disk Utility method (creating an encrypted disk image) are both perfect for this. You can create the encrypted file directly on your USB drive, making your data portable and secure.
What if I forget my password?
This is the most critical point to understand: with strong encryption, there is no “forgot password” option. If you lose the password, your data is permanently and irrecoverably lost. This is why securely managing your password in a password manager or another safe place is the most important step of all.
6. Conclusion
Learning how to encrypt a folder is a simple yet incredibly powerful step you can take to safeguard your digital life. Whether you’re protecting family photos, financial documents, or sensitive work files, encryption provides a robust defense against unauthorized access, giving you peace of mind.
Here’s a quick summary of your best options:
- For quick, portable encryption: The free tool 7-Zip is your best friend for creating a single, secure file from any folder to send or store anywhere.
- For everyday protection on your OS: Leverage the powerful built-in tools. Use Windows built-in encryption (EFS) to protect against other users on your PC, and Mac Disk Utility to create secure digital vaults.
- For ultimate security: Consider dedicated tools. VeraCrypt offers unparalleled security for advanced users, while NordLocker provides a user-friendly experience with cloud sync options.
The most important part of this process is choosing a method you’re comfortable with and using it consistently. And remember the golden rule: Always, always keep your password safe! Losing your password means losing your data forever.
To find more tips and guides on protecting your data, explore the other articles in the Tech How-To Simplified section here on Safelyo.


