
If you want to learn how to use NordVPN on Xfinity router, you will quickly realize that it is not as straightforward as installing the VPN directly into the Xfinity gateway. Many users run into confusion because the router’s interface does not allow third-party VPN clients.
This article explains:
- Whether Xfinity routers can support VPN connections
- What “VPN support” actually means for your home network
- Different ways to connect NordVPN with Xfinity, including apps, bridge mode, and separate routers
Let’s start by looking at what Xfinity actually allows when it comes to VPN usage.
1. Does Xfinity support VPN on the router?
Xfinity routers do not have a built-in VPN client, so you cannot directly install NordVPN in the gateway. What they do allow is VPN passthrough, which means encrypted traffic from protocols like OpenVPN or IKEv2 can travel through the router without being blocked. This allows your devices to connect to NordVPN apps normally.
However, you cannot add NordVPN directly inside the Xfinity router’s admin interface. The control panel only gives options for Wi-Fi, DHCP, and security settings, with no place to configure third-party VPN services. If you want full-home coverage, you need to either install NordVPN on each device or put the Xfinity gateway in bridge mode and use a separate router that supports VPN clients.
2. How to use NordVPN on Xfinity router
Since the Xfinity gateway itself cannot run NordVPN directly, you have several alternative ways to protect your network. Each option has pros and cons depending on whether you want full-home coverage or just device-level protection.
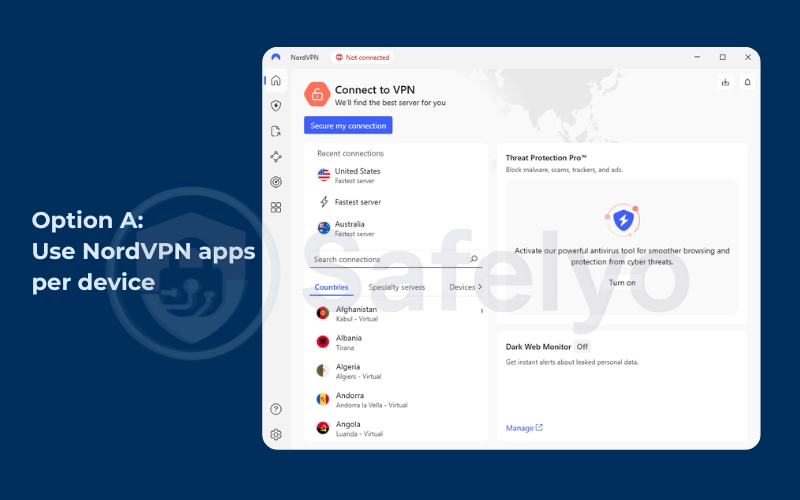
2.1. Option A: Use NordVPN apps per device
This method works best if you only want VPN protection on a few devices like phones, laptops, or tablets. It requires no router changes but does mean each device must be configured separately.
Steps to set it up:
- Sign up for NordVPN and download the app for your device (Windows, macOS, iOS, Android, Linux, or supported smart TVs).
- Install the app and log in with your Nord Account.
- Tap “Secure my connection” for an automatic server or manually choose a location.
- Turn on features like Kill Switch or Split Tunneling if needed.
Pros:
- Quick and simple to set up
- Full access to NordVPN features
- Each device can choose its own server
Cons:
- Must install and manage VPN on every device
- Devices without app support (some TVs, consoles) are left unprotected
2.2. Option B: Enable bridge mode on Xfinity
Bridge mode disables the routing functions of your Xfinity gateway so you can connect a secondary router that supports NordVPN. This option is great for users who want full-home VPN coverage, but it disables certain Xfinity features.
Steps to set it up:
- Connect your computer to the Xfinity gateway.
- Open a browser and go to http://10.0.0.1.
- Log in with your admin credentials.
- Go to Gateway > At a Glance and enable Bridge Mode.
- Restart the gateway.
- Connect a VPN-compatible router behind the gateway.
- Configure NordVPN on the new router.
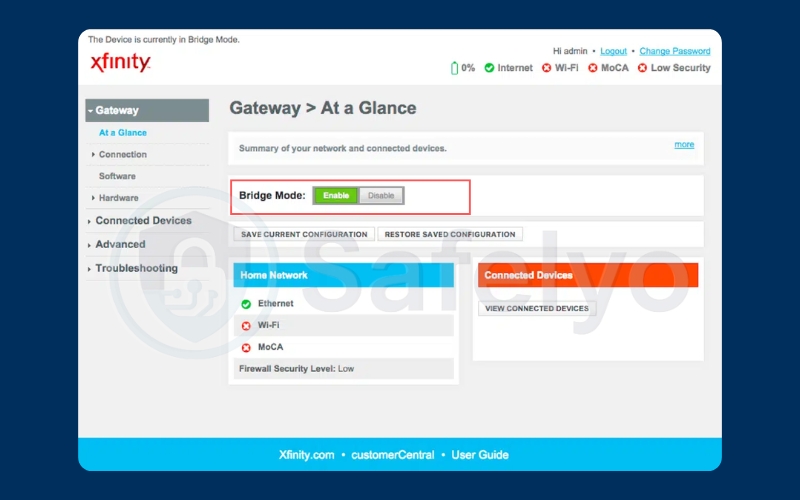
When Bridge Mode is enabled, the Xfinity gateway functions only as a modem. The secondary VPN-compatible router then takes over as the main router for your home network. This is where you set up NordVPN, ensuring all devices connected to it are protected automatically.
Pros:
- VPN coverage for all devices in your home
- Strong security without managing apps individually
Cons:
- Disables parental controls, xFi Advanced Security, and some voice features
- Requires buying and setting up an extra router
2.3. Option C: Add a VPN-capable router
Instead of disabling features on your Xfinity gateway, you can add a second router that supports VPN clients. This router will handle NordVPN while the gateway continues to function normally.
This means the Xfinity gateway stays in router mode, and the second router handles VPN traffic. You keep all Xfinity features active, but you may face double NAT issues that can affect speed or certain apps.
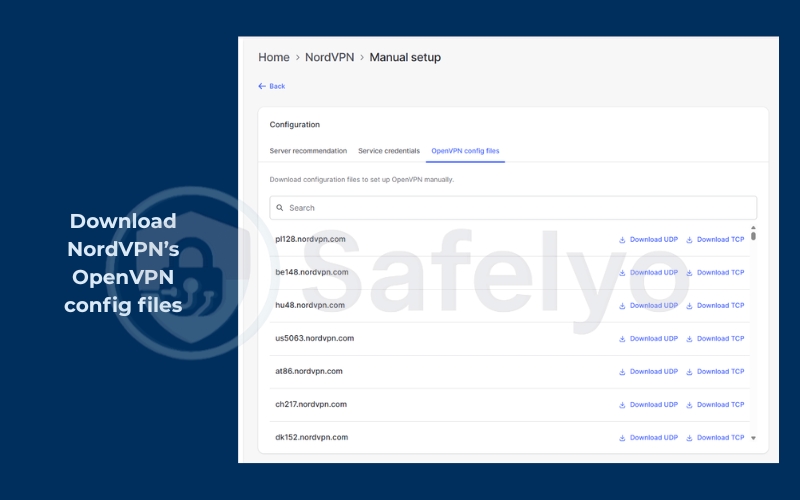
Steps to set it up:
- Purchase a VPN-capable router (Asus, TP-Link, Netgear, or custom firmware like DD-WRT).
- Connect it to your Xfinity gateway via Ethernet.
- Log into the router’s admin panel.
- Download NordVPN’s OpenVPN config files from your Nord Account. (https://my.nordaccount.com/dashboard/nordvpn/manual-configuration/openvpn/)
- Upload the .ovpn file and enter your NordVPN login credentials.
- Save and test your connection by checking your IP address.
Pros:
- VPN protection for all connected devices
- Keeps Xfinity features active since the gateway stays in router mode
- More flexibility and control
Cons:
- Some setups may create “double NAT” issues if bridge mode is not used
- Requires technical knowledge to configure correctly
Read more: How to set up a VPN on a router
2.4. Option D: Preconfigured NordVPN routers
Preconfigured routers are sold with NordVPN already set up, making them a true plug-and-play solution.
Unlike option B or C, you don’t need to handle any manual configuration. They’re ideal for non-technical users who want full-home VPN coverage, though they are usually more expensive and less customizable.
Steps to set it up:
- Buy a preconfigured NordVPN router from a trusted vendor. (e.g., Privacy Hero)
- Connect it to your Xfinity gateway using Ethernet.
- Power it on and connect your devices to the new Wi-Fi network.
- Log in with your NordVPN account if prompted.
Pros:
- Easiest full-home VPN setup
- No manual configuration needed
- Optimized performance out of the box
Cons:
- More expensive than standard routers
- Limited customization if you want advanced tweaks
2.5. Option E: Virtual router or hotspot fallback
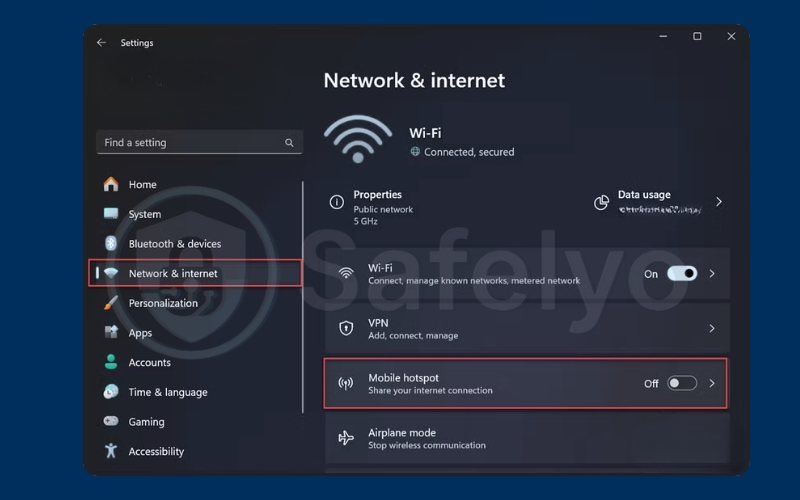
If you don’t want to buy new hardware, you can share a NordVPN-protected connection from your laptop. This option is slower but useful for temporary needs like protecting a console or smart TV.
Steps on Windows:
- Connect to NordVPN using the Windows app.
- Open Settings > Network & Internet > Mobile Hotspot.
- Enable “Share my Internet connection with other devices.”
- Choose your VPN connection as the source.
- Connect other devices to the hotspot.
Steps on macOS:
- Connect to NordVPN using the Mac app.
- Go to System Settings > Sharing > Internet Sharing.
- Select your VPN connection as the source and enable Wi-Fi sharing.
- Connect your devices to the shared Wi-Fi.
Note: Not all laptops or Wi-Fi adapters support the Mobile Hotspot or Internet Sharing feature. If you don’t see the option in settings, you may consider one of the other options above.
Pros:
- Free option with no new hardware
- Quick to set up for temporary needs
Cons:
- Relies on your computer staying on and connected
- Slower speeds than router-based solutions
- Not ideal for large households
3. Troubleshooting and speed tips
Even after you set up NordVPN with your Xfinity router, you may run into slow speeds or random connection drops. These issues are common because Xfinity gateways use extra security layers and may not always handle VPN traffic smoothly. Below are the most common problems and how to fix them.
3.1. Disable xFi Advanced Security if it interferes
Xfinity’s built-in xFi Advanced Security sometimes blocks or slows down VPN connections. If your NordVPN app connects but browsing is unstable, this feature may be the cause.
How to fix it:
- Open the Xfinity app on your phone.
- Tap More > My Services.
- Find xFi Advanced Security and turn it off.
- Reconnect NordVPN and check if the speed improves.
3.2. Switch protocol: UDP/TCP or use obfuscation
Sometimes VPN traffic is throttled or blocked by certain ISPs. Switching protocols can help. UDP is faster but less stable, while TCP is slower but more reliable. If your network is aggressively filtering VPN traffic, NordVPN’s obfuscated servers may also help.
How to change protocol in the NordVPN app:
- Open the app and go to Settings > VPN Protocol.
- Switch between NordLynx, OpenVPN (UDP), or OpenVPN (TCP).
- If you suspect your ISP is blocking VPN, enable Obfuscated Servers.
3.3. IPv6 and MTU issues
Some routers, including Xfinity’s, don’t handle IPv6 well with VPN tunnels. Incorrect MTU (Maximum Transmission Unit) size can also cause slow speeds or dropped packets.
How to fix it:
- Disable IPv6: Go into your device or router network settings and switch off IPv6, keeping only IPv4 active.
- Adjust MTU: Start with a value of 1500 and lower it gradually (e.g., 1472 or 1400) until connections stabilize.
4. FAQs about how to use NordVPN on Xfinity router
Many Xfinity users have the same questions when trying to set up NordVPN. Here are clear answers to the most common ones.
Can I install NordVPN on Xfinity gateway?
No, you cannot install NordVPN directly on an Xfinity gateway. The admin panel only supports Wi-Fi, parental controls, and basic security settings. If you want VPN coverage across your whole home, you need to use bridge mode with a secondary router or choose a different method such as VPN apps on individual devices.
Which routers work with NordVPN?
NordVPN works with most routers that support OpenVPN or WireGuard (through NordLynx). Popular choices include Asus, TP-Link, and Netgear models, as well as routers with custom firmware like DD-WRT, Tomato, or OpenWrt. NordVPN also lists recommended models on their official website to ensure compatibility.
Is bridge mode safe and reversible?
Yes, enabling bridge mode is safe. It simply turns your Xfinity gateway into a modem so another router can handle VPN and network functions. You can switch back anytime by logging into the admin panel and disabling bridge mode.
Will NordLynx work on a router?
At the moment, NordLynx (NordVPN’s WireGuard-based protocol) is supported on some routers, but not all. Most off-the-shelf consumer routers only support OpenVPN. To use NordLynx, you’ll need either a NordVPN preconfigured router or a compatible firmware that allows WireGuard integration.
5. Conclusion
Learning how to use NordVPN on Xfinity router is all about choosing the right setup for your needs. Since the Xfinity gateway cannot run VPN clients directly, you have to rely on alternatives. The main paths include:
- Installing the NordVPN app on each device for quick protection
- Enabling bridge mode and connecting a VPN-ready router
- Buying a dedicated VPN router or even a preconfigured NordVPN router
- Using a temporary fallback like a virtual router or hotspot
When I tested NordVPN with an Xfinity gateway, I found that using bridge mode with a secondary router gave me the most stable coverage across all devices. For quick setups while traveling, the app-based method was the easiest to use.
No matter which option you choose, you should also optimize your connection. Disabling xFi Advanced Security, switching VPN protocols, or adjusting MTU settings can make a big difference in speed and reliability.
If you are ready to explore more clear and practical tutorials on VPNs, antivirus, and online privacy, visit the Tech How-To Simplified section at Safelyo. It is designed to make complex tools easier for everyday users.