You have likely noticed the “VPN” section sitting in your iPhone’s settings menu and wondered if it automatically secures your daily browsing. In reality, this built-in feature remains completely inactive until you connect it to an external service. Understanding exactly what is a VPN on iPhone is the crucial step to transforming that basic setting into a robust privacy shield.
This guide will explain exactly what is a VPN on iPhone, compare it to Apple’s Private Relay, and show you how to set it up.
Key takeaways:
- A Virtual Private Network encrypts your internet traffic to keep your data safe from snooping.
- The tool hides your physical location by changing your IP address.
- You can easily install these applications directly from the App Store.
- The iPhone’s built-in settings require manual server details, whereas App Store apps provide instant, ready-to-use protection.
- The service protects all apps on your device rather than just the Safari browser.
1. What is a VPN in general terms?
Before we explore its role on your iPhone, let’s quickly define a VPN (Virtual Private Network).
Think of it as creating a secret, secure VPN tunnel for your internet connection. Instead of your data traveling openly, a VPN encrypts it (scrambles it up) and sends it through one of its private remote servers.
This does two main things:
- Keeps your online activities private from prying eyes (like your ISP or on public Wi-Fi)
- Hides your device’s true location (IP – Internet Protocol – address), making you appear as if you’re browsing from somewhere else.
For instance, imagine the internet is a busy public highway. Using a VPN is like driving your car through your own private, invisible tunnel that goes directly to your destination. Nobody on the main highway can see what kind of car you’re driving or exactly where you’re going inside that tunnel. This offers a basic shield for your online privacy.

2. What is a VPN on iPhone?
When you open your iPhone settings, you will see a dedicated VPN menu. Many users assume this is a ready-to-use security feature provided by Apple. However, this menu is essentially an empty framework. It gives your device the capability to connect to a secure network, but it does not provide the actual remote server.
To make that built-in setting work, you must connect it to an external service. Sometimes, employers provide specific server details for you to enter manually into this menu to access a private company network. For everyday personal privacy, manually configuring these settings is usually too complicated.
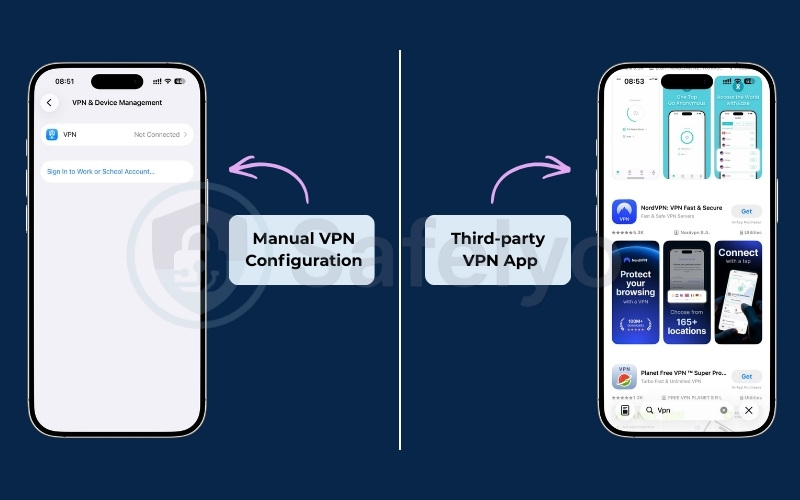
This brings us to the most common way people secure their mobile connection. Instead of typing in manual network details, you simply download a dedicated privacy application from the App Store. Once installed, the application automatically communicates with your iPhone’s built-in framework. You tap a connect button inside the app, and it handles all the complex setup behind the scenes.
Once connected, the software integrates directly with the iOS operating system. This protection extends far beyond your Safari browser to shield all network traffic entering and leaving your device. If you check a banking application or refresh a social media feed on a public network, the software works silently in the background to encrypt every piece of data.
3. How to use a VPN on your iPhone or iPad
Alright, you’re convinced that a VPN is a great idea for your iPhone or iPad. The good news? Figuring out how to use a VPN on iPhone is actually very straightforward, fitting right in with Apple’s user-friendly philosophy. Let me walk you through the two main ways to get up and running. Most people will find the first method incredibly simple.
3.1. Using dedicated VPN applications from the App Store
Honestly, for about 99% of iPhone users, including myself most of the time, this is the way to go. It’s quick, easy, and you get all the cool features.
In short:
You’ll open the App Store > download your chosen VPN app > open it>> allow permissions > and tap “Connect.”
Here’s how simple it is to turn on VPN on an iPhone using an app:
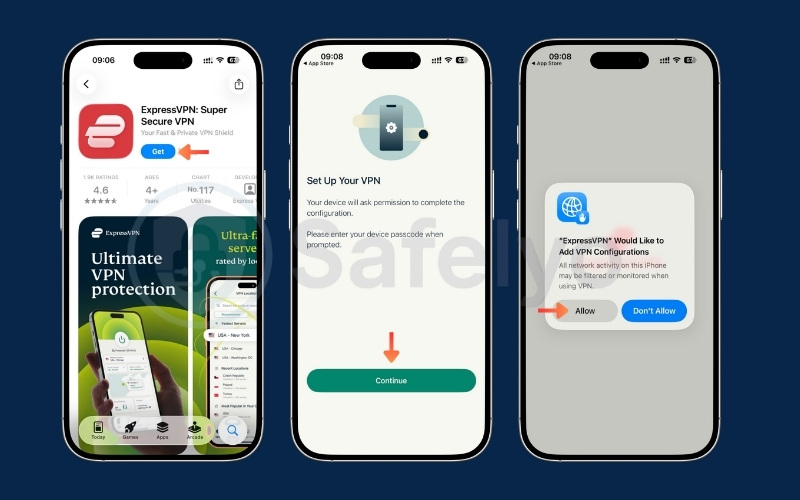
- Open the App Store: Tap that familiar blue App Store icon on your iPhone’s home screen.
- Search for a VPN: Use the search bar (magnifying glass icon) and type in the name of a reputable VPN provider you’ve chosen.
- Download and Install: Tap the “Get” button (or the cloud icon if you’ve downloaded it before). Your iPhone will download and install the app, just like any other.
- Open the App & Sign Up/In: Find the new VPN app icon on your home screen and tap to open it.
- If it’s a paid service, you’ll likely need to create an account and subscribe, or log in if you already have an account.
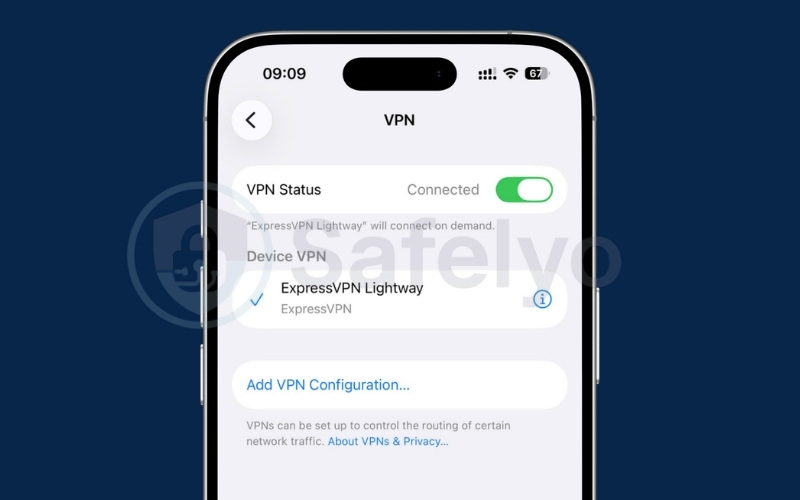
- Crucial Step: The app will then ask for permission to add a VPN configuration to your iPhone. You must tap “Allow.” This is iOS making sure you’re okay with the app managing your VPN settings.
- Pick a Server (or let the app choose): Many apps have a “Quick Connect” button. It picks the best server for a fast, stable connection. Or, you can browse a list of countries and cities to connect to a specific location. I often pick a server closest to me for speed, unless I need to appear from another country.
- Tap “Connect”: There’s usually a big, obvious button. Tap it, and within seconds, you should see the VPN icon appear in your iPhone’s status bar!
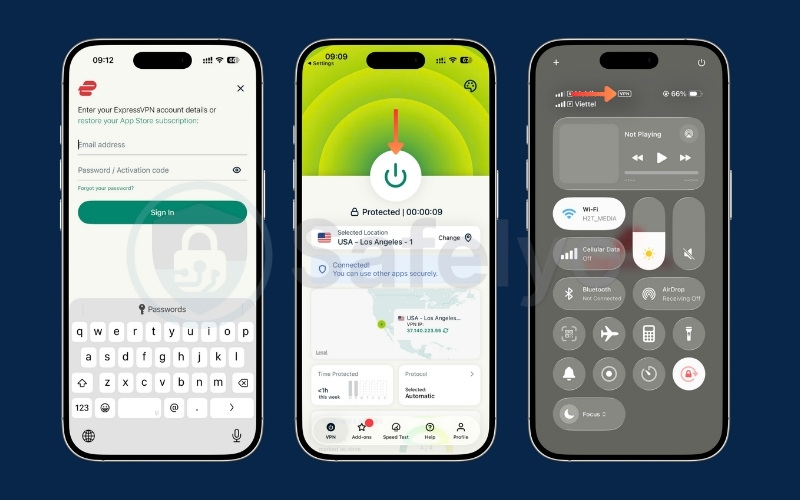
That’s it! The beauty of these apps is their sheer convenience, sleek interfaces, and extra goodies like a Kill Switch (which cuts your internet if the VPN drops, protecting your data) or different protocol options.
3.2. Manually configuring VPN in iPhone Settings
Your iPhone also lets you set up a VPN connection manually, directly within your iPhone VPN settings. This is less common for everyday users and is typically for:
- Work/Corporate VPNs: Your company’s IT department might give you specific details to connect to their private network.
- Tech-Savvy Users: If you run your own personal VPN server or use a service that doesn’t have a dedicated iOS app (which is rare these days).
In short:
You’ll go to your iPhone’s Settings > navigate to the VPN section > tap “Add VPN Configuration” > input the specific details provided by your VPN service or IT admin.
If you need to go this route, here’s the path:
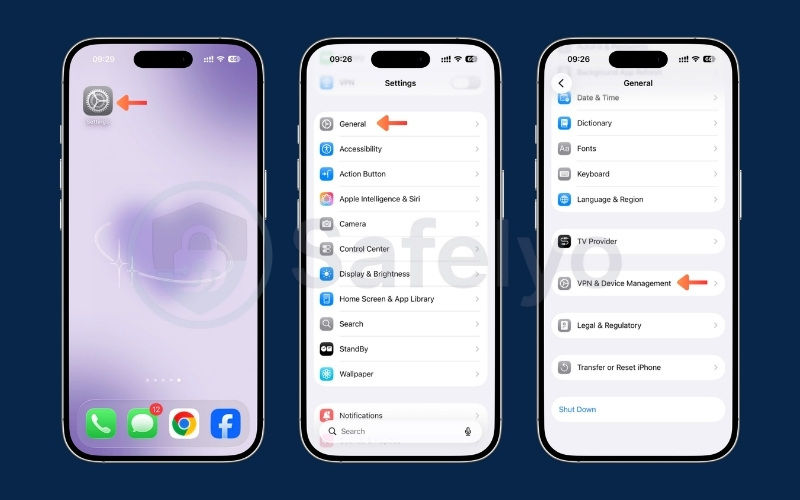
- Open the Settings app (the grey gear icon).
- Tap on General.
- Scroll down and tap on VPN & Device Management.
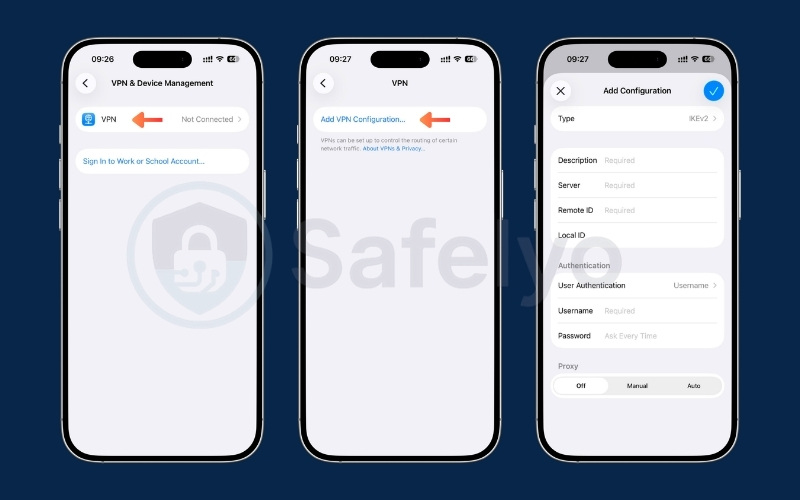
- Tap on VPN.
- Tap Add VPN Configuration…
- Here, you’ll need to select the VPN Type (like IKEv2, L2TP, or IPSec – your provider will tell you which) and then meticulously fill in all the details: Description (a name for this connection), Server (the server address), Account (your username), Password, and potentially a “Secret” or other fields. All this info must come from your VPN provider or IT admin.
>> Read more: How to set up a VPN on any device in 3 simple steps
4. How does a VPN work on your iPhone?
Understanding how VPN work on iPhones doesn’t need to be complicated; Apple’s ecosystem is all about smooth operation, and VPNs generally follow suit. Let me break down the magic behind it from a user’s point of view.

Imagine you’ve just opened your favorite VPN app on your iPhone and tapped “Connect”, or perhaps you’ve enabled a manually set up iOS VPN configuration in your Settings. Here’s what happens next, almost instantaneously:
The secure connection handshake
Your iPhone, guided by the VPN app or your settings, immediately reaches out and establishes a highly secure, encrypted connection to a VPN server. This server could be one you’ve specifically chosen (say, a server in London if you want to appear as if you’re browsing from the UK) or one the app intelligently picks for optimal speed.
From my experience, iOS handles these connections very efficiently, often using modern and secure VPN protocols like IKEv2/IPsec or WireGuard, which are well-supported by Apple.
All aboard the encrypted tunnel
Once that connection (often called a “tunnel”) is live, all the internet data leaving your iPhone gets rerouted through it. I mean everything – whether I’m browsing in Safari, checking my flight details in an airline app, listening to Apple Music, or sending a message on WhatsApp. It all goes through this protected pathway.
The VPN server as your proxy
The VPN server then acts as your iPhone’s representative on the internet. It takes your encrypted requests, decrypts them, and sends them out to the websites or online services you want to reach. When those sites send data back (like a webpage loading), it goes to the VPN server first.
Safe return journey
Finally, the VPN server encrypts this incoming data and sends it securely back to your iPhone through the same protected tunnel.
It’s a bit like how Apple seamlessly manages your Wi-Fi and cellular connections without you having to think much about it. A VPN just adds an extra layer of private, encrypted passage for all that data. The beauty of it on an iPhone is that once it’s on, it just works quietly in the background.
5. Why use a VPN on your iPhone? Key benefits for iOS users
Okay, so a VPN integrates nicely with your iPhone, but why use a VPN on an iPhone in the first place? What specific benefits of VPN on iPhone make it a smart addition, even with Apple’s strong focus on security?
As an iPhone user myself, I’ve found that a VPN doesn’t just replicate existing protections; it adds distinct layers of protection and freedom. Let’s explore what does a VPN do on an iPhone to truly secure your iPhone with a VPN and enhance your iPhone’s internet security VPN.
Here are some of the primary advantages you’ll experience:
- Boosted security on public Wi-Fi: Makes those convenient but risky public networks safe for your iPhone.
- Greater online privacy: Keeps your browsing habits on Safari and other app activity more confidential.
- Access to a world of content: Helps bypass geo-restrictions as an iPhone VPN can unlock apps and services.
- Enhanced protection for mobile transactions: Adds protection when using Apple Pay or banking apps.

Let’s break these down.
5.1. Enhanced security on public Wi-Fi networks
We all connect our iPhones to public Wi-Fi at cafes, airports, or hotels. While iOS is secure, these networks can be hunting grounds for cybercriminals and data thieves. A VPN encrypts all data leaving your iPhone, acting like a shield.

I often check work email or my Apple Wallet while grabbing coffee. Without a VPN on public Wi-Fi, sensitive information like my Apple ID or credit card details could be exposed. With a VPN, that data is scrambled and unreadable to hackers, protecting you from risks like identity theft.
>> You may also be interested in:
5.2. Stronger online privacy and anonymity in Safari & apps
Even though Safari has excellent anti-tracking features, your iPhone’s IP address can still reveal your general location. A VPN masks your iPhone’s true IP address. This makes it significantly harder for your ISP (Internet Service Provider), advertisers, and websites to build a profile based on your browsing.

Apple champions privacy, but a VPN adds direct control. It gives you an extra layer of protection for your digital footprint on iPhone.
During a security review with a frequent traveler, I discovered his iPhone was leaking DNS requests on airport Wi-Fi, even though Apple’s protections were enabled. A properly configured VPN instantly fixed the issue. Since then, he’s relied on it for every international trip.
5.3. Accessing geo-restricted content, apps, and services
Have you tried downloading an app only to see “not available in your country/region”? Or wanted to watch an Apple TV+ show limited to another area? A VPN helps you bypass geo-restrictions on iPhone VPN capabilities by allowing your iPhone to connect through a server in a different country.

I’ve personally used this to access specific news apps or even different game versions available only in certain App Stores. Just remember to respect the terms of service of the platforms you use.
5.4. Protecting sensitive data during mobile banking and shopping
Using banking apps or shopping online with Apple Pay on your iPhone feels secure, and it generally is. However, a VPN adds an extra layer of encryption, especially vital against potential “man-in-the-middle” attacks, even on your cellular connection. Considering that cybersecurity firms like McAfee frequently report on evolving mobile threats, this additional safeguard for your financial data is a prudent step.

6. Key differences between VPN vs. iCloud Private Relay
One of the most common questions from iPhone users is how a virtual private network compares to Apple’s native iCloud Private Relay. Both tools aim to enhance your privacy, but they operate differently and serve distinct purposes.
Private Relay is an excellent feature included with paid iCloud subscriptions. It automatically protects your Safari browsing traffic and prevents websites from tracking your precise IP address.
However, a dedicated privacy application provides a much broader scope of protection. It encrypts all network traffic leaving your device across every application, not just Safari. Furthermore, a dedicated application allows you to manually choose your server location to bypass regional restrictions.
Here is a quick comparison of their core capabilities:
| Feature | iCloud Private Relay | VPN (Virtual Private Network) |
|---|---|---|
| Primary Protection | Safari browsing, DNS queries | All internet traffic from all apps |
| App Coverage | Limited to Safari & some app data | System-wide (all apps) |
| IP Masking | Yes, shows the approximate region | Yes, shows the IP of the chosen server |
| Choose Location? | No (only general region choice) | Yes (specific cities/countries worldwide) |
| Bypass Geo-blocks? | Not its primary function, limited | Yes, a core feature |
| Cost | Included with iCloud+ (paid) | Free (limited/risky) or Paid (various) |
While Private Relay offers great baseline protection for casual browsing, a dedicated application gives you complete control over your digital footprint.
For a deeper dive into how these two tools stack up against each other, check out our comprehensive guide on VPN vs. iCloud Private Relay.

7. How to choose the right VPN for iPhone
Finding the ideal service for your iOS device requires looking beyond basic encryption claims. When evaluating your options, you should prioritize the following criteria to ensure a seamless experience:
- Smooth iOS integration: A reliable application must work perfectly with the Apple ecosystem without excessively draining your battery or slowing down your device.
- Audited no-logs policy: Prioritize providers that have their privacy claims strictly verified by independent third parties to ensure your browsing history remains entirely private.
- Fast connection speeds: High performance is essential, especially if you plan to stream high-definition videos or use cellular data frequently without experiencing frustrating lag.
- Intuitive interface: Look for an application that makes securing your connection as simple as a single tap, avoiding overly complex technical menus.
Based on our practical testing against these criteria, ExpressVPN, NordVPN, and Surfshark consistently stand out as excellent choices for iPhone users.
8. FAQ about VPN on iPhone
Do I really need a VPN on my iPhone if I already use iCloud Private Relay?
While iCloud Private Relay boosts Safari’s privacy, a VPN offers more. It protects all your iPhone’s apps, lets you choose specific server locations worldwide (great for accessing different content), and provides a comprehensive security layer, especially on public Wi-Fi.
If those features matter to you, then yes, a VPN is still very beneficial. The answer to “Do I need a VPN on my iPhone?” often comes down to your specific needs beyond basic Safari browsing.
Will using a VPN significantly drain my iPhone’s battery?
Modern VPN apps for iOS are pretty well-optimized. While any app running in the background can use some power, the impact on battery life and connection speed from a quality VPN is usually not dramatic for most users. Some apps even have battery-saving modes or use efficient protocols to minimize drain.
Can I use a free VPN on my iPhone? Is it truly safe?
You can find free VPNs on the App Store, but I strongly advise extreme caution. Many come with big limitations on connection speed, data, or server choice. Worse, some free VPNs might engage in activity logging, show intrusive ads, or even sell your data. For the best security and peace of mind on your iPhone, Safelyo generally recommends investing in a reputable paid VPN service.
How do I know if my VPN is active and working on my iPhone?
The easiest way is to look for the small “VPN” icon in the status bar at the top of your iPhone screen. Most VPN apps also clearly display a “Connected” status. For an extra check, search “what is my IP address” in Safari before and after connecting. This shows if your IP has switched to a IP address VPN or not.
Is it legal to use a VPN on an iPhone?
In most parts of the world, including the US, Canada, and most of Europe, using a VPN is perfectly legal. However, a few countries have restrictions or outright bans. It’s always a good idea to be aware of local laws, and remember that using a VPN for illegal activities is, of course, still illegal.
Does Apple have its own VPN?
Apple doesn’t offer a traditional, standalone VPN service. They have iCloud Private Relay (part of paid iCloud+ subscriptions), which enhances privacy for Safari traffic, but it’s not a full-featured VPN that covers all apps or lets you choose server locations.
Should I turn on VPN on my iPhone all the time?
It depends on your preference and activity. I’d say definitely turn it on when using public Wi-Fi, accessing sensitive accounts, or wanting to unblock content. On your secure home Wi-Fi, if you’re just doing casual browsing and battery life is a top concern, you might choose to turn it off. Many users, however, prefer the “always-on” peace of mind.
Do iPhones have VPN built in?
iPhones have the capability to configure a VPN manually in the Settings app (Settings > General > VPN & Device Management). However, there isn’t a pre-installed Apple VPN service ready to go. Most people download a dedicated VPN app from the App Store for ease of use and more features.
Is VPN on iPhone free?
You can find many free VPN apps for iPhone, but as mentioned, they often come with significant drawbacks like data limits, slow speeds, fewer server options, and potential privacy risks. Paid VPN services generally offer a much safer, faster, and more reliable experience.
How do I turn on VPN on my iPhone?
If you’re using a VPN app, simply open the app and tap the “Connect” button. If you’ve set up a manual configuration, go to Settings > General > VPN & Device Management > VPN, and toggle the switch next to your VPN configuration to the “on” position.
Is VPN on iPhone free?
The built-in VPN settings on your iPhone are free to access, but you still need a remote server connection to make them work. You usually have to pay a provider or use a corporate network to get those necessary server details.
When browsing the App Store, you will find both free and paid applications. We advise extreme caution with entirely free applications. They often impose strict data limits, offer slow speeds, and may even sell your browsing data to cover their operational costs.
Premium subscriptions generally provide a much safer and more reliable experience without these hidden privacy risks. Alternatively, if you already pay for an iCloud subscription, you have access to iCloud Private Relay at no extra cost for basic Safari protection.
9. Conclusion
Understanding what is a VPN on iPhone, and crucially, how it differs from features like iCloud Private Relay. It helps you make informed choices to protect your Apple device and digital life. It’s clear that a VPN offers a significant upgrade in security and versatility for iPhone users.
Here are the key points to remember:
- A VPN on your iPhone encrypts all your internet traffic, securing you on any network, especially public Wi-Fi.
- It effectively masks your real IP address, boosting your online anonymity and allowing you to choose your virtual location.
- VPNs offer broader protection and more features than iCloud Private Relay, covering all apps and enabling geo-unblocking.
- Choosing a reputable VPN provider is paramount for a safe, fast, and private experience.
With this knowledge, you’re now better equipped to enhance your iPhone’s security and enjoy greater freedom online. To discover the top VPN applications tailored for iOS or to learn more about advanced setup options, explore more articles in the VPN Guides category on Safelyo.