
You cannot download VPN applications directly from the PlayStation Store or Microsoft Store onto your hardware. To set up VPN on gaming console devices like the PS5 or Xbox, you must connect through a VPN router, share an encrypted connection from your PC, or configure Smart DNS directly on your system.
Setting up an external connection shields your home IP address from rival players in peer-to-peer lobbies and bypasses poor routing paths that cause evening latency spikes. Router and PC setups encrypt all outbound game data, while Smart DNS reroutes queries strictly to access foreign streaming catalogs.
This guide walks you through configuring each option step-by-step, helping you choose the right setup for low-latency multiplayer defense or buffer-free streaming.
Key takeaways:
- Consoles lack native VPN app stores, requiring router setups, PC network bridging, or Smart DNS workarounds.
- Wired Ethernet connections from a PC bridge provide 40% to 60% better throughput stability than wireless hotspots.
- Smart DNS offers zero encryption overhead and maintains full baseline connection speeds for streaming apps, but cannot hide your IP from gaming DDoS attacks.
- Lowering console MTU settings or forwarding specific network ports prevents strict NAT Type errors and broken party chats.
This article is for informational purposes only. Please use VPNs responsibly and legally.
1. Why set up VPN on gaming console connections
Connecting your console to a VPN masks your public home IP address and shields outbound data. In peer-to-peer multiplayer games, communication packets travel directly between players, exposing your residential IP address to everyone in the match.
Malicious opponents can record this address and flood your home network with automated traffic, knocking your console offline. Routing your traffic through an encrypted VPN server exposes only the provider’s data center IP address, deflecting automated flood traffic away from your home connection.
Encryption also shields your gaming habits from local network providers. Many ISPs deploy deep packet inspection algorithms during evening peak hours to detect bandwidth-heavy gaming and video streams. When network congestion peaks, strong VPN encryption conceals the nature of your traffic, preventing automated network filters from identifying and throttling your gameplay.
Beyond competitive security, network tunneling unlocks international media catalogs on entertainment applications like Netflix, Disney+, and BBC iPlayer. Connecting through a remote server alters your virtual location for streaming applications, letting you stream foreign content libraries directly on your living room television.
However, before expecting a VPN to turn your connection into a zero-lag pipeline, you must understand a fundamental networking reality. Encrypting data packets and rerouting them through an extra intermediary server typically adds between 5 ms and 20 ms of physical latency. A VPN only improves your ping if your internet provider uses an inefficient routing path to the game server and the VPN provider offers a direct, optimized route.
A side-by-side comparison outlines how both methods handle encryption, ping, and streaming access on consoles
| Feature | Router VPN | Smart DNS |
|---|---|---|
| Traffic encryption | Yes (Full data protection against DDoS) | No (Leaves game packets unencrypted) |
| Impact on ping | Adds 5 ms to 20 ms due to encryption | None (Retains full baseline connection speed) |
| Best for | Competitive online gaming and privacy | Streaming movies on regional apps |
| Setup difficulty | Moderate to Advanced | Beginner-friendly (Manual DNS entry) |
2. Method 1: Connect through a VPN router
Installing a VPN directly on your physical home router protects every connected device automatically, including your PlayStation and Xbox consoles. When your router manages the encrypted tunnel, your console connects to your local network as it normally would, without requiring custom network profiles.
You can connect your console to a VPN-enabled router using either a physical cable or wireless credentials:
- Wired connection: Plug an Ethernet cable from a spare LAN port on your VPN router into the network port on the rear of your console.
- Wireless connection: Open the network menu on your PS5 or Xbox, select your VPN router’s Wi-Fi network name, and enter your password.
If you need step-by-step instructions to configure your gateway from scratch, check our complete router VPN setup guide for DD-WRT, OpenWrt, and Asuswrt-Merlin firmware.
However, basic consumer routers with weak processors often struggle with VPN encryption, choking gigabit connections down to roughly 100 Mbps. If your home router lacks the processing power to handle heavy cryptographic calculations, you can skip buying new hardware and use your computer as a connection bridge instead.
3. Method 2: Share a VPN connection from your computer
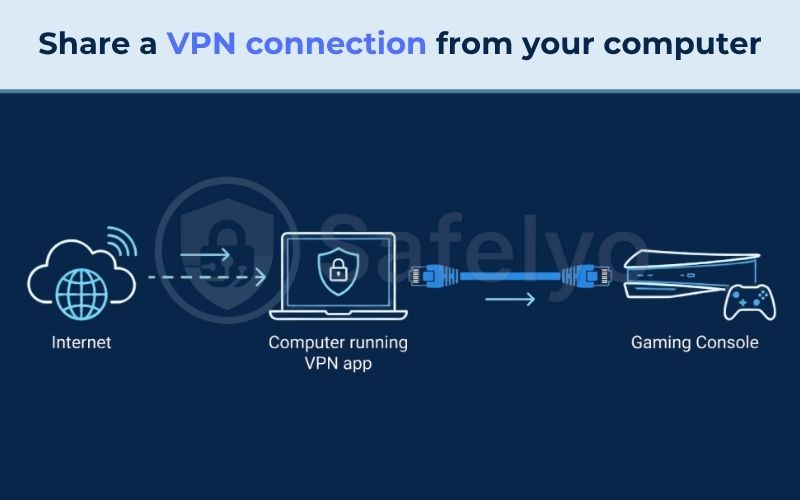
Using your desktop or laptop computer as an encrypted virtual router allows you to protect your console without purchasing specialized networking hardware. This bridge approach routes console packets through your computer’s VPN software before sending them across the internet.
You can share this connection using a wired Ethernet cable for maximum stability, a wireless hotspot for convenience, or native macOS sharing tools. Regardless of the setup you choose, your computer must stay powered on and keep the VPN app connected during your entire gaming session.
3.1. On Windows 11 via Ethernet cable
Bridging your Windows 11 PC to your console with an Ethernet cable provides 40% to 60% better throughput stability than a Wi-Fi hotspot. This wired setup bypasses local radio interference and prevents packet loss during high-stakes multiplayer matches.
Follow these steps to configure wired sharing on Windows 11:
- Plug an Ethernet cable from your Windows 11 PC network port into the LAN port on your PS5 or Xbox.
- Launch your desktop VPN client and connect to a server close to your actual location for minimal latency.
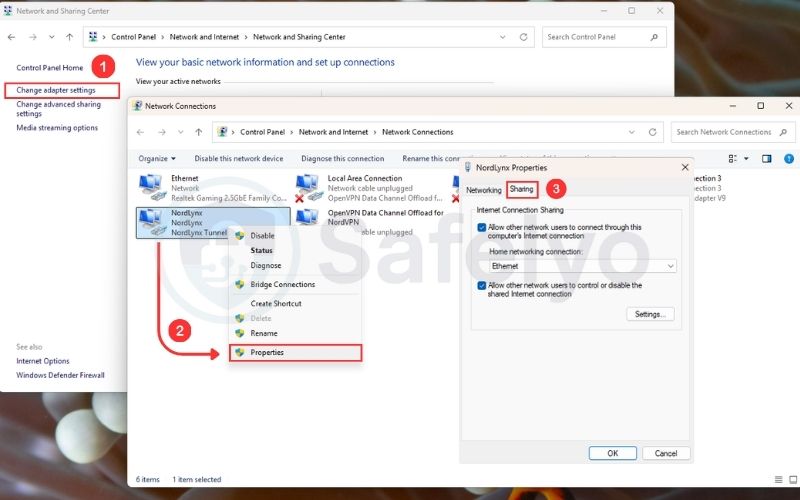
- Open Control Panel > Network & internet > Network and Sharing Center > Look at the left-hand column and click on “Change adapter settings.”
- Right-click your active VPN virtual adapter (commonly labeled as a TAP adapter or WireGuard adapter), select Properties, and click the Sharing tab.
- Check the box labeled Allow other network users to connect through this computer’s Internet connection.
- Select your physical Ethernet adapter from the dropdown list, then click OK to save the changes.
- Turn on your console, enter its network settings menu, and configure a wired connection using automatic settings.
3.2. On Windows 11 via Wi-Fi hotspot
Sharing your Windows 11 VPN over a Wi-Fi hotspot lets you protect your console wirelessly when running a physical cable between rooms is impossible. This configuration turns your PC wireless network card into an encrypted virtual access point.
Follow these steps to establish a wireless hotspot on Windows 11:
- Open your PC settings and navigate to Settings > Network & internet > Mobile hotspot.
- Toggle the switch to On, select Edit to establish your network name and password, and confirm the changes.
- Open Control Panel > Network & Internet > Network and Sharing Center > Look at the left-hand column and click on “Change adapter settings.”
- Right-click your active VPN adapter, select Properties, open the Sharing tab, and check the connection sharing box.
- Select the virtual Wi-Fi adapter associated with your active hotspot from the dropdown menu, then click OK.
- Open the network settings on your PS5 or Xbox, scan for wireless networks, select your new hotspot, and enter the password.
Always turn on the Windows hotspot before configuring adapter sharing in the Control Panel. Enabling the hotspot first ensures that Windows creates the virtual Wi-Fi adapter before you assign routing permissions.
3.3. On macOS via Internet sharing
Sharing a VPN connection from a Mac requires two separate network interfaces because a standard Wi-Fi chip cannot simultaneously receive a Wi-Fi signal and broadcast a new Wi-Fi hotspot.
To bridge this connection wirelessly or via cable, your Mac can either receive internet over Wi-Fi and broadcast it through a physical Ethernet cable (or USB-C LAN adapter) connected directly to your console, or receive internet over Ethernet and broadcast it via Wi-Fi.
Crucially, macOS Internet Sharing does not natively support third-party VPN apps using proprietary virtual adapters (like WireGuard or Lightway protocols). To make your VPN visible in system sharing settings, you must configure a native macOS VPN profile (such as IKEv2) manually inside the macOS Network Settings using the server credentials provided by your VPN provider.
Follow these steps to configure Internet Sharing on modern macOS:
- Connect your Mac to your home Wi-Fi network and connect an Ethernet cable from your Mac to your gaming console.
- Manually connect to your native VPN profile (e.g., IKEv2) via System Settings > Network instead of using a third-party VPN app.
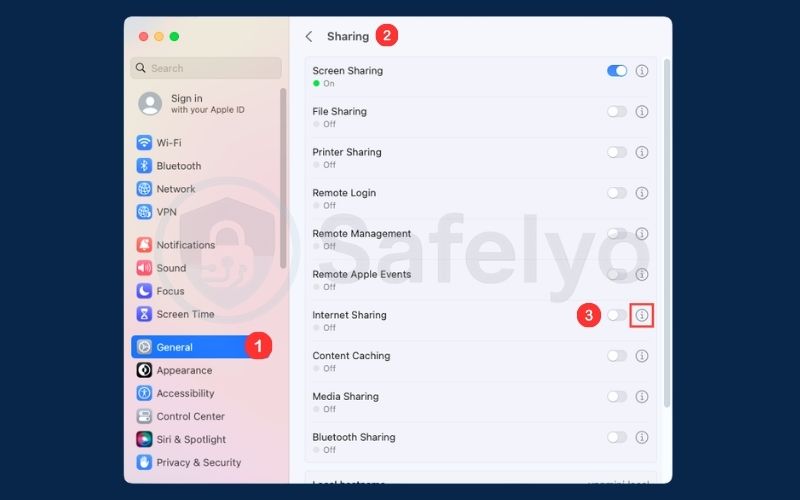
- Navigate to System Settings > General > Sharing on your Mac.
- Click the information icon next to Internet Sharing to open the configuration panel.
- Set the Share your connection from dropdown menu to your manually configured IKEv2 VPN connection
- Check the box for Ethernet (or your USB-C LAN adapter) under the To devices using list.
- Turn on the toggle for Internet Sharing, click Start to confirm, and set your console network connection to wired automatic.
4. Method 3: Configure Smart DNS on your console
Smart DNS offers a simple alternative if configuring a router or running a PC feels inconvenient. It reroutes only DNS queries to unlock regional streaming apps, maintaining your full baseline speed with zero encryption overhead.
However, Smart DNS does not hide your IP address during peer-to-peer matches, offering no defense against targeted DDoS attacks. It also relies on IP whitelisting, meaning you must update your registered IP on your provider dashboard whenever your home modem restarts.
4.1. Configure Smart DNS on PS5
Configuring Smart DNS on the PlayStation 5 requires manually adjusting your DNS addresses within your existing network connection settings. You can complete this setup entirely using your DualSense controller.
Follow these steps on your PS5:
- Log into your VPN account dashboard on a computer or phone, activate Smart DNS, and note the assigned Primary DNS and Secondary DNS addresses.
- Turn on your PS5 and navigate to Settings > Network > Settings > Set Up Internet Connection.
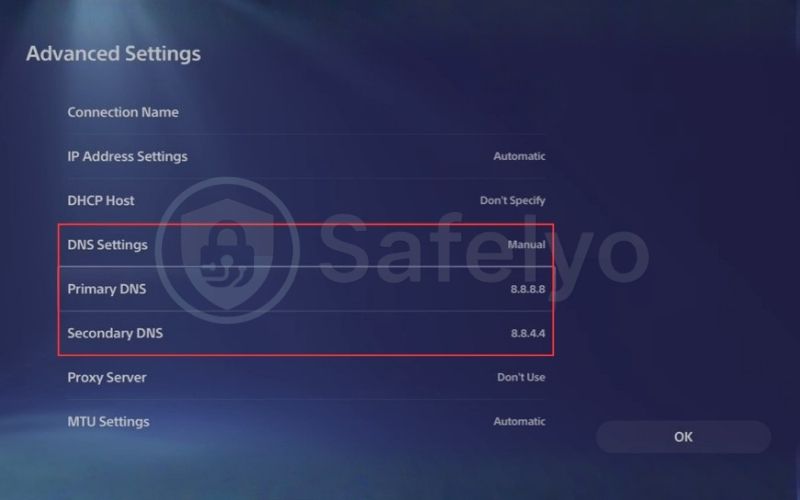
- Highlight your active network connection, press the Options button on your controller, and select Advanced Settings.
- Set IP Address Settings to Automatic and ensure DHCP Host Name is set to Do Not Specify.
- Change DNS Settings from Automatic to Manual.
- Enter your provider’s numerical addresses into the Primary DNS and Secondary DNS fields.
- Set Proxy Server to Don’t Use, keep MTU Settings on Automatic, select OK, and restart your console.
4.2. Configure Smart DNS on Xbox
Setting up Smart DNS on Xbox Series X, Series S, or Xbox One involves modifying the manual IPv4 DNS fields in the network dashboard. The Xbox operating system immediately validates these addresses upon saving.
Follow these steps on your Xbox:
- Obtain your verified DNS addresses from your VPN account portal after confirming that your home IP address is whitelisted.
- Press the Xbox button on your controller, then navigate to Profile & system > Settings > General > Network settings.
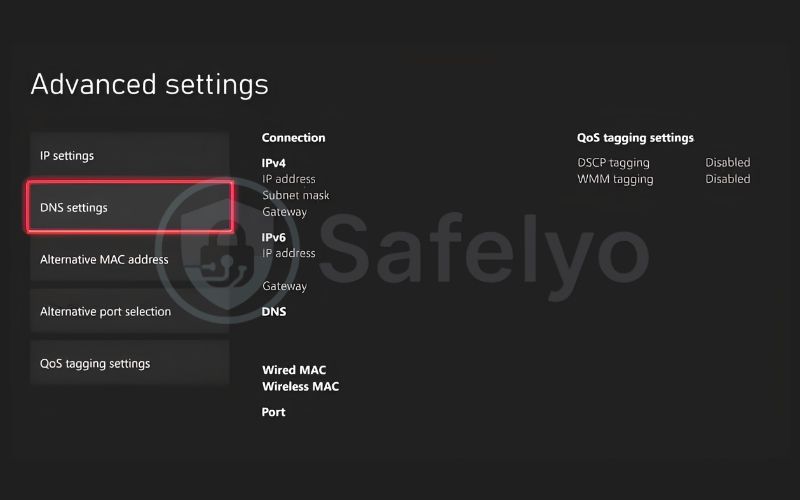
- Select Advanced settings from the options on the right side of the screen.
- Select DNS settings, then choose the Manual option.
- Enter your assigned primary address into the Primary IPv4 DNS field and press Enter.
- Enter your secondary address into the Secondary IPv4 DNS field and press Enter.
- Press the B button on your controller to save the settings, prompting the Xbox to run an automatic network connection test.
5. Fix common console VPN and NAT errors
After getting your console connected, the biggest obstacle players encounter is a restrictive NAT status.
Routing console traffic through an encrypted VPN tunnel often alters your Network Address Translation status, pushing your console into NAT Type 3 on PlayStation or Strict NAT on Xbox. A strict NAT state restricts inbound traffic, which blocks party voice chat, stops you from hosting multiplayer lobbies, and lengthens matchmaking queues.
You can resolve these connection issues by repairing desktop adapter bindings, enabling UPnP, configuring manual port forwarding, or adjusting packet sizes. The following steps restore open communication channels across your network.
5.1. Fix Windows network adapter sharing errors
Re-binding the Windows Internet Connection Sharing service resolves the common error where a console connects to a PC bridge but cannot reach the internet.
When your computer restarts, switches network adapters, or reconnects its VPN tunnel, Windows often loses synchronization with the virtual network adapter. The console receives a local IP address from the PC, yet fails the internet connection test.
Follow these steps to restore the adapter sharing link:
- Disconnect the VPN connection inside your desktop application.
- Open Network Connections, right-click your VPN adapter, select Properties, uncheck the sharing option on the Sharing tab, and click OK.
- Reconnect your desktop VPN application to reinitialize the virtual network adapter.
- Return to the adapter Sharing tab, check the box to allow connection sharing again, and select the specific network port connected to your console.
- On your PlayStation or Xbox, run the network connection test to establish communication with the refreshed gateway.
5.2. Enable UPnP on your router
Enabling Universal Plug and Play (UPnP) allows your console to automatically request open communication ports on your router, resolving NAT conflicts without manual rules. This automated negotiation helps your console establish direct communication channels with game servers.
Follow these steps to turn on UPnP:
- Open a web browser on any home device, enter your router gateway address (typically 192.168.1.1 or 192.168.0.1), and log in with your administrative credentials.
- Navigate to Advanced Settings, then locate the NAT & Port Forwarding or UPnP submenu.
- Toggle the UPnP setting to Enabled and save your configuration changes.
- Restart your router and your console, then run a network test on your console to confirm that your NAT status has shifted to Moderate (NAT Type 2) or Open.
5.3. Forward network ports manually
Forwarding specific network ports directly to your console IP address ensures reliable inbound traffic flow when UPnP fails to open the necessary gaming channels. You must assign a static local IP address to your console in your router settings before creating forwarding rules so the router directs traffic to the correct hardware.
Input these specific port ranges into your router forwarding menu to maintain open communication for the PlayStation Network:
| Service | Protocol | Port Range |
|---|---|---|
| PlayStation Network (PSN) | TCP | 3478, 3479, 3480 |
| PlayStation Network (PSN) | UDP | 3478, 3479 |
If you play on an Xbox console, configure this dedicated port forwarding matrix to establish an Open NAT status across Xbox Live services:
| Service | Protocol | Port Range | Primary Function |
|---|---|---|---|
| Xbox Live Core | UDP | 88 | Kerberos authentication |
| Xbox Live Core | UDP | 500, 3544, 4500 | IPSec and Teredo tunneling |
| Xbox Live Gaming | UDP & TCP | 3074 | Multiplayer and matchmaking |
5.4. Adjust MTU values on PS5
Lowering the Maximum Transmission Unit (MTU) on your PlayStation 5 prevents packet fragmentation caused by VPN encryption headers. Standard home networks use an MTU setting of 1500 bytes. When a VPN adds encryption headers to your gaming packets, the combined size often exceeds this 1500-byte limit, causing routers to break packets apart and trigger connection drops.
Follow these steps to optimize your packet size:
- Open your PS5 menu and navigate to Settings > Network > Set Up Internet Connection.
- Highlight your connection, press the Options button, and select Advanced Settings.
- Change the MTU Settings option from Automatic to Manual.
- Lower the numerical value from 1500 to 1473, save your changes, and run a connection test.
This small reduction leaves ample room for VPN overhead, preventing packet fragmentation without reducing transmission speed. If you are playing on an Xbox Series X/S or Xbox One, the console dashboard automatically negotiates packet sizing with your network gateway, meaning manual MTU adjustments are rarely required on Microsoft systems.
6. Platform rules and account ban risks
Once your encrypted connection is running smoothly, a critical question remains: could routing your console through a VPN get your profile banned?
Using a VPN on your gaming console to protect your network privacy, defend against DDoS attacks, or stabilize routing does not violate Sony or Microsoft terms of service. Platform operators permit security tools that defend your connection against malicious third parties. However, using a VPN to falsify your geographic location to purchase games at lower foreign prices or redeem out-of-region digital codes violates platform policies.
Sony permanently locks the geographic region of your PlayStation Network account when you create it. The PlayStation Store rejects payment methods that do not match the account’s registered country, and providing false residential information can trigger a permanent account suspension. Microsoft Community Standards similarly classify geographic spoofing for financial benefit as commercial fraud, which can lead to license revocation and permanent Xbox Live profile bans.
7. FAQs
Can you install a VPN app on consoles?
No. Sony and Microsoft operate closed operating systems and strictly ban third-party network-tunneling apps from the PlayStation Store and Xbox Store. To secure your console, you must encrypt your traffic externally using a configured router or a PC network bridge, or configure Smart DNS for unencrypted media streaming.
Will a console VPN reduce your ping?
Usually not. Under normal network conditions, rerouting and encrypting your data packets adds between 5 ms and 20 ms of physical latency. A VPN only reduces your ping if your internet service provider uses inefficient international routing to the game server or actively throttles your connection during peak hours.
Can your console account get banned?
No, platform providers do not ban accounts for using a VPN to defend against DDoS attacks or stabilize network traffic. You only risk a permanent account ban if you use a VPN to spoof your location to buy discounted games or bypass regional payment restrictions on digital storefronts.
Does Smart DNS protect against DDoS?
No, Smart DNS does not encrypt your connection and does not hide your public IP address during online multiplayer sessions. Peer-to-peer multiplayer games still reveal your real home IP address to other players, leaving you vulnerable to DDoS floods.
Can you share a VPN via mobile phone?
You can set up a connection, but we do not recommend mobile hotspots for competitive online gaming. Standard mobile operating systems do not route active VPN tunnels through their Wi-Fi hotspot feature, and cellular data connections introduce significant latency and jitter during multiplayer matches.
Can you set up a console VPN without a PC?
Yes. You can route console traffic without a computer using these standalone options:
- Pre-configured routers: Hardware like ExpressVPN Aircove uses Device Groups to tunnel your console through a VPN while keeping other household devices on your regular home network.
- On-device Smart DNS: Entering addresses directly into your console network settings requires no extra hardware, maintaining full connection speeds for streaming apps.
8. Conclusion
Learning how to set up VPN on gaming console systems gives you complete control over your network privacy and streaming flexibility without waiting for native console apps. Use Smart DNS if your main goal is streaming movies on Netflix or Disney+ with full baseline speeds. Connect an Ethernet cable to your PC bridge for immediate DDoS defense during competitive matches, or configure a VPN router for permanent whole-home protection.
Always test your NAT Type after connecting to verify that party chat and matchmaking remain functional. Forwarding essential ports or adjusting packet sizes resolves most connection drops, keeping your gaming sessions smooth and secure.
Explore our comprehensive VPN Guides on Safelyo to find step-by-step router walkthroughs, security tips, and proven network optimization strategies for modern gamers.