
A single dropped VPN connection can instantly expose your home IP address to thousands of peers in a torrent swarm. Even if your VPN includes a built-in kill switch, software glitches can still trigger silent data leaks.
Learning how to bind qBittorrent to VPN fixes this vulnerability. By locking the client directly to your encrypted virtual interface, all downloads freeze instantly if the tunnel disconnects.
In this guide, you will learn how to find your virtual adapter, configure Windows, macOS, and Linux in under five minutes, and verify your fail-closed setup with a live test.
-
Windows configuration
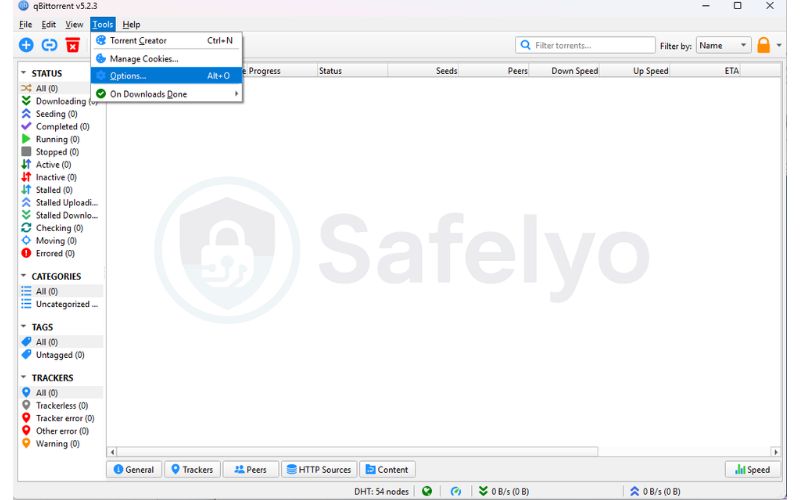
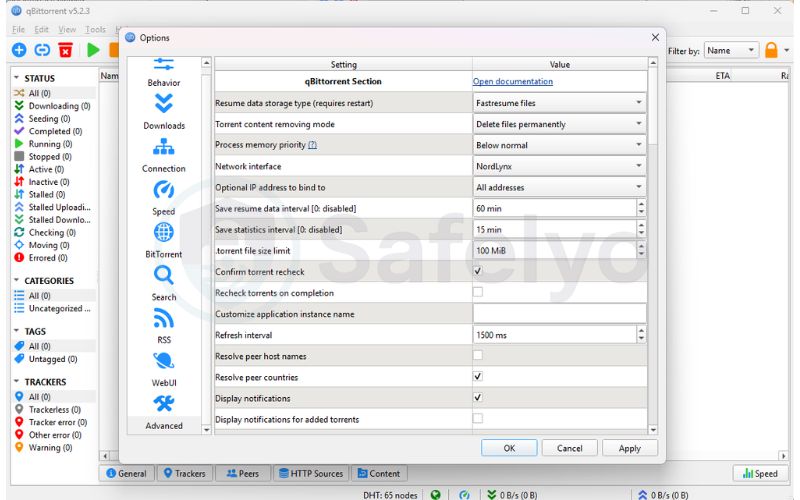
Open ncpa.cpl to note your VPN adapter name → select it in qBittorrent under Tools > Options > Advanced > Network Interface → restart the client.
-
macOS configuration
Run ifconfig in Terminal to spot your active utun number → select that interface under Preferences > Advanced → restart the client.
-
Linux configuration
Run ip link in Terminal to locate your tun0 or wg0 tunnel → select it under Tools > Options > Advanced → restart the client.
This article is for informational purposes only. Please use VPNs responsibly and legally.
1. How to find your VPN network interface name
To bind qBittorrent, you must know the exact name of the virtual network adapter created by your VPN software. Use the platform-specific instructions below to locate your active interface before adjusting your client settings.
1.1. How to find your VPN interface name on Windows
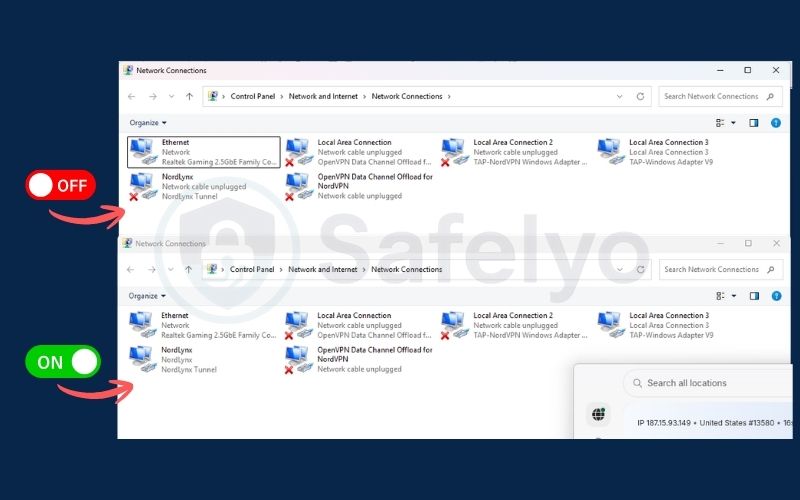
Windows lists all physical and virtual network adapters inside the Network Connections menu. Follow these steps to spot your active VPN adapter:
- Disconnect your VPN, press Win + R, type ncpa.cpl, and press Enter to open Network Connections.
- Connect to your VPN, then watch the window refresh. Look for the new network adapter that appears or changes its status to active.
- Check the device description underneath the adapter name. It usually mentions your VPN provider or protocol (such as NordLynx, WireGuard Tunnel, or TAP-Windows). Take note of the main adapter name displayed in bold (e.g., Ethernet 2 or NordLynx).
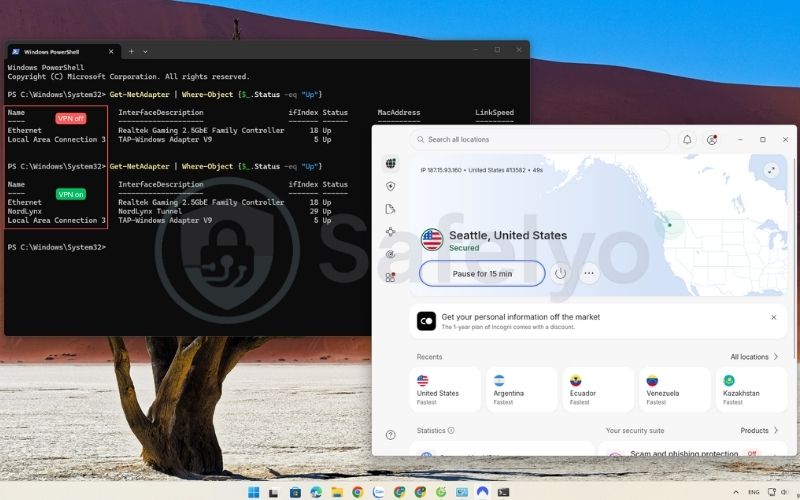
If you prefer using PowerShell, compare your connection states with a simple command:
- With your VPN disconnected, open PowerShell and run: Get-NetAdapter | Where-Object {$_.Status -eq “Up”}
- Connect to your VPN and run the exact same command again.
- Identify the newly added entry under the Name column. That exact string is your active VPN network interface.
Pro tip: In ncpa.cpl, right-click your identified VPN adapter, select Rename, and change it to something instantly recognizable like VPN-Binding. This custom name makes it effortless to select inside qBittorrent without guessing between generic labels like Ethernet 2 or Ethernet 3.
1.2. How to find your VPN interface name on macOS
macOS manages VPN tunnels through virtual system interfaces labeled as utun. However, your Mac already creates several internal utun interfaces for system features like iCloud Private Relay.
Follow these steps to pinpoint exactly which utun belongs to your active VPN:
Method 1: Find the new interface by comparing states (Recommended):
- With your VPN disconnected, open Terminal, run the following command, and note the existing numbers: ifconfig | grep -o “utun[0-9]*” | sort -u
- Connect to your VPN app.
- Run the exact same command again: ifconfig | grep -o “utun[0-9]*” | sort -u
- Identify the newly added utun number (for example, utun3). That new entry is your VPN tunnel interface.
Method 2: Check your active default gateway
- If your VPN is already running, type this command and press Enter: route get default | grep interface
- The output will directly display the interface handling your internet traffic (e.g., interface: utun3).
- Take note of this identifier for the qBittorrent setup.
1.3. How to find your VPN interface name on Linux
You can quickly find your active VPN tunnel on Linux using standard Terminal network commands. Follow these steps to locate your active VPN interface:
- Open your Terminal window.
- Run the command ip a (or ip addr show) while disconnected from your VPN.
- Connect to your VPN and run the same command again.
- Compare the two outputs to spot the newly added interface name:
- wg0 / wg-interface: Widely used as WireGuard has become the industry standard protocol.
- tun0 / tun1: Used if your provider still falls back to OpenVPN.
- proton0 / custom names: Used by specific official Linux VPN CLI clients.
2. How to bind qBittorrent to VPN step by step
Once you have identified your VPN adapter name from the steps above, you can lock qBittorrent directly to that specific network device. Configuring network interface binding requires adjusting two core preferences within the advanced settings menu of qBittorrent. The following walkthroughs guide you through the setup steps for Windows 11, macOS, and Linux.
2.1. Windows 11 configuration
Windows 11 routes traffic across multiple physical and virtual network adapters simultaneously. Follow these steps to lock qBittorrent to your VPN:
- Open qBittorrent, click Tools in the top navigation bar, and select Options (or press Alt + O).
- Click the Advanced tab located at the bottom of the left sidebar.
- Scroll down to the Network Interface setting and select your VPN adapter (or your custom renamed adapter) from the dropdown list.
- Set “Optional IP address to bind to” to All addresses.
- Click Apply, click OK, and restart qBittorrent so the new connection settings take effect.
2.2. macOS configuration
Binding qBittorrent on macOS forces the app to route all torrent traffic exclusively through your active VPN tunnel:
- Open qBittorrent on your Mac, click qBittorrent in the upper menu bar, and select Preferences (or press Command +).
- Select the Advanced category in the settings window.
- Click the Network interface dropdown and choose your active tunnel interface, such as utun2 or utun3.
- Set “Optional IP address to bind to” to All addresses.
- Click Apply, close the preferences pane, and restart qBittorrent.
Note for Mac users: macOS automatically reassigns virtual tunnel numbers (such as switching from utun2 to utun3) whenever your computer wakes from sleep or reconnects to the VPN. If your torrents suddenly stall at 0.0 KiB/s, open Terminal, run ifconfig to check your latest utun number, and update the selection inside qBittorrent settings.
2.3. Linux configuration
Follow these steps to lock qBittorrent to your active WireGuard or OpenVPN tunnel on Linux:
- Launch qBittorrent, click Tools, and select Options.
- Click the Advanced icon in the sidebar.
- Find the Network interface line and select your active virtual interface, typically tun0 for OpenVPN tunnels or wg0 for WireGuard connections.
- Set “Optional IP address to bind to” to All addresses.
- Click Apply, confirm with OK, and restart the client.
Pro tip: Always leave the optional IP setting on All addresses. VPN servers assign dynamic internal IP addresses that change with every reconnection; locking to a specific numerical IP will break your connection the next time you connect.
3. How to verify the binding actually works
Once you save your changes, do not start downloading files immediately. Taking sixty seconds to test your configuration ensures that qBittorrent actually stops data transfers when your VPN drops.
Here is how to safely run a quick pull-the-plug test:
- Download a legitimate, open-source torrent file, such as an official Ubuntu Desktop installation image from ubuntu.com.
- Add the torrent into qBittorrent and wait until the download speed stabilizes at several megabytes per second.
- Open your VPN software and click Disconnect while the download is actively running.
- Observe the speed indicators in qBittorrent immediately:
- Successful binding: Both download and upload speeds plunge to 0.0 KiB/s within seconds, and the torrent state switches to Stalled.
- Failed binding: The file continues downloading over your physical Wi-Fi or Ethernet connection, indicating that you bound the wrong network adapter.
- Click Connect in your VPN application. The download should resume automatically within a few seconds without manual restarts.
To cross-verify your external visibility, you can also use an online tracker check service such as ipleak.net. Loading their test torrent inside qBittorrent displays the public IP address seen by swarm peers. The detected IP must match your active VPN server rather than your residential internet provider.
4. Binding vs. kill switch: Why you need both
A software kill switch and network interface binding handle connection drops through two completely different technical mechanisms. According to official qBittorrent GitHub Wiki documentation written by project maintainer Chocobo1, interface binding functions as an extra layer of protection. We recommend running both features side by side rather than relying on one alone.
A VPN kill switch operates reactively. The software monitors the active tunnel, detects when the connection fails, and alters system routing tables or firewall rules to block outgoing traffic. If the VPN application crashes, freezes, or encounters an operating system sleep error, the kill switch can fail to trigger, creating a brief window for data leaks.
Interface binding works at the core system level by locking the app directly to your VPN hardware adapter. When you bind qBittorrent to a specific virtual network adapter, the client requests a communication socket tied exclusively to that network device. If that virtual adapter disappears because the VPN drops, the operating system cannot route packets through any other interface, halting traffic instantly.
Running both safeguards gives you complete coverage. The kill switch shields your web browser and background applications, while qBittorrent interface binding keeps torrent traffic isolated even if the VPN software crashes.
5. How to fix qBittorrent VPN binding issues
Interface mismatches, sleep events, and protocol changes can cause stalled transfers or connection errors after configuring network binding. You can resolve these technical issues with four quick checks:
- Torrents remain stalled while connected (Windows, macOS, and Linux): The operating system renamed your virtual adapter after an app update, a protocol switch, or a macOS sleep cycle. Verify your new active interface identifier using ncpa.cpl on Windows or route get default | grep interface in macOS Terminal, then select that updated name under Tools > Options > Advanced > Network Interface.
- Torrents continue downloading after disconnecting your VPN: The client is accidentally bound to your physical network card (Ethernet or Wi-Fi) or left on Any interface, causing data to leak across your home connection. Check your system network connections to confirm your virtual VPN adapter name, then re-bind qBittorrent strictly to that virtual interface.
- Network status icon shows yellow or orange: qBittorrent has no open incoming port because your VPN service has not enabled or configured port forwarding. Check whether your VPN provider supports port forwarding on your plan, enable it in your account dashboard, and enter the assigned port into Tools > Options > Connection.
- Only specific torrent files download slowly: The torrent swarm contains very few active seeders, or available peers sit behind strict NAT firewalls. Choose torrents with a higher seeder count in your transfer list, or enable VPN port forwarding to connect directly with firewalled peers.
6. Port forwarding with a VPN: What you need to know
If you noticed a yellow or orange status icon in the troubleshooting steps above, your client is likely struggling with incoming connections. Here is why standard router port forwarding will not help while your VPN is active and how to set it up correctly.
Forwarding ports in your home router does not improve torrent performance while connected to an active VPN tunnel. When your traffic routes through an encrypted tunnel, swarm peers communicate directly with the VPN server’s public IP, bypassing your home router’s NAT and port-forwarding tables entirely.
Incoming peer connections hit the VPN server firewall first. If that server does not forward an incoming port to your client, other peers behind strict firewalls cannot initiate direct transfers with you.
To accept incoming peer connections while using a VPN, you must configure port forwarding directly through your VPN provider dashboard or client application.
Below is several reputable VPN providers support native port forwarding for BitTorrent users:
- Private Internet Access (PIA): Best for beginners, allowing one-click dynamic port forwarding directly inside the app.
- Proton VPN: Ideal for high speeds, supporting port forwarding across WireGuard and OpenVPN on paid plans.
- AirVPN: Best for power users who want permanent port reservations managed via a web panel.
- PrivateVPN: A simple plug-and-play choice with dedicated server ports that skip router hassle.
While an open port improves connection stability on strict swarms, it is not mandatory for regular downloading. If you are deciding whether your setup truly needs it, read our guide on Port Forwarding vs No Port Forwarding for Torrenting to compare the speed differences and security trade-offs.
7. FAQs
Does binding qBittorrent to a VPN slow down download speeds?
Binding does not introduce any performance penalty or speed reduction. The client transfers data at the full rate permitted by your VPN tunnel and local internet bandwidth. Any speed drop you experience stems from VPN encryption overhead, server congestion, or physical distance to the VPN server rather than the interface binding setting.
Does binding qBittorrent to a VPN replace the kill switch?
No. Interface binding only protects qBittorrent. If your VPN drops, unencrypted traffic from your browser, Discord, or background apps will still leak over your home connection unless an active VPN kill switch blocks them system-wide.
What happens if I pick the wrong network interface?
Selecting the wrong interface exposes your traffic or cuts off transfers completely. If you pick your physical Wi-Fi or Ethernet card, qBittorrent will download files across your unencrypted home connection without warning if the VPN fails. If you choose an inactive virtual adapter, all torrent transfers will simply stall at 0.0 KiB/s.
Do I need to re-bind qBittorrent after updating my VPN app or operating system?
You should verify your binding settings whenever your VPN software or operating system installs major updates. Updates can recreate virtual network adapters, generating a new interface identifier, such as switching from utun2 to utun4 on macOS or refreshing a Wintun device on Windows.
Running a quick pull-the-plug test after system updates confirms your connection remains bound.
Is using a SOCKS5 proxy in qBittorrent as safe as binding a VPN?
No, a SOCKS5 proxy is significantly less secure than binding your client to a VPN. SOCKS5 proxies do not encrypt your traffic, leaving payloads readable by your internet service provider. Furthermore, proxy setups in torrent clients frequently leak DNS queries and peer-to-peer data over your physical connection during server timeouts.
8. Conclusion
Configuring interface binding provides a dependable fail-closed safety barrier that stops torrent traffic instantly whenever your encrypted tunnel drops. Rather than relying solely on reactive software monitors, binding fixes qBittorrent communication strictly to your virtual network card. Pairing this configuration with an active VPN kill switch and validating the setup with a pull-the-plug test eliminates guesswork.
Taking the time to master how to bind qBittorrent to VPN ensures your personal IP address stays protected against silent network drops, system sleep transitions, and application crashes. Always complete all three stages by locating your interface name, applying the binding settings, and verifying transfer halts before adding sensitive downloads.
Explore our comprehensive library of VPN guides on Safelyo to discover more technical tutorials, performance optimization tips, and router security walkthroughs.