
If you are wondering why is my VPN not connecting, the app may be unable to reach its server, verify your account, or establish an encrypted tunnel. The problem may appear as an endless “Connecting” screen, an authentication error, or an immediate disconnection.
Most VPN connection problems come from a small number of causes, including an unstable internet connection, an unavailable server, an incompatible protocol, or conflicting software. Follow the fixes below in order, beginning with simple checks before changing advanced network settings.
Key takeaways
- Check the basics first: Confirm that your internet works without the VPN and that your subscription is active.
- Try another server or protocol: This can resolve temporary outages, routing problems, and compatibility issues.
- Look for software conflicts: Firewalls, antivirus tools, proxies, and other VPN apps may interfere with the tunnel.
- Test the current network: Public, workplace, and school networks may require a captive portal login or restrict VPN traffic.
- Save advanced changes for last: Reset network settings or test IPv6 only after simpler fixes have failed.
1. Why is my VPN not connecting?
A VPN fails to connect when the app cannot reach the server, authenticate your account, or create an encrypted tunnel. The cause usually comes from one of three areas: the local network, the VPN service, or software and account settings on your device. Identifying the visible symptom first can help you choose the most relevant fix instead of changing several unrelated settings. The table below provides a quick starting point based on what you see in the app.
1.1. Internet or local network problems
A VPN requires an active internet connection before it can establish a secure tunnel. If your Wi-Fi is unstable, a public network requires a captive portal login, or a managed network blocks VPN traffic, the connection attempt may time out. Testing the same VPN connection on another network, such as a mobile hotspot, can help determine whether the current Wi-Fi network is responsible. If the VPN works on the hotspot, the app and account are less likely to be the main cause.
1.2. VPN server or protocol problems
A VPN server may be temporarily unavailable because of maintenance, congestion, or a routing problem between your network and the selected location. Changing to another nearby server is often the quickest way to determine whether the problem is limited to one location. The selected VPN protocol may also be incompatible with the current network. A network that restricts UDP traffic may work with a TCP-based connection, while a network that actively identifies VPN traffic may require a stealth or obfuscation feature.
1.3. Account, application, or security software problems
Authentication may fail when your password is incorrect, your VPN subscription has expired, or your account has reached its simultaneous-device limit. Outdated app files, missing permissions, and damaged VPN profiles can also prevent the tunnel from forming.
Firewalls, antivirus programs, proxy tools, and other VPN applications may interfere with the VPN service or its virtual network adapter. Temporarily testing these components can help identify a conflict, but any disabled protection should be restored immediately afterward.
| Symptom | Likely cause | The first fix to try |
|---|---|---|
| Stuck on “Connecting” | Server or protocol problem | Change the VPN server |
| Authentication failed | Credentials, subscription, or device limit | Sign in again |
| Works on mobile data but not on Wi-Fi | Network restriction | Complete the captive portal or try TCP |
| Connected but no internet | Kill switch, DNS, or routing problem | Check the kill switch |
| The app freezes or crashes | App or operating-system conflict | Update the VPN app |
2. Try these 11 VPN connection fixes
Before changing firewall rules, network adapters, or system settings, rule out the most common connection problems. These four checks can help determine whether the issue comes from your internet connection, device, VPN provider, or outdated software.
2.1. Fix 1: Check your internet connection
A VPN builds its encrypted tunnel over your existing internet connection. If Wi-Fi, Ethernet, or cellular data is unavailable, changing VPN servers or protocols will not resolve the problem.
- Step 1: Disconnect the VPN completely, then open two or three websites or another online application.
- Step 2: If nothing loads, reconnect to Wi-Fi and restart the router if you control the network.
- Step 3: Next, test Ethernet, mobile data, or another Wi-Fi connection if one is available.
- Step 4: Once normal internet access returns, reopen the VPN and try a standard nearby server.
If the internet works on another network but not on the original Wi-Fi, focus on the router or local network rather than the VPN app. You can return to the VPN settings after the underlying connection has been restored.
Public Wi-Fi networks at hotels, airports, and cafés may also require a captive portal login before they allow regular internet traffic. The VPN should remain disconnected until this local sign-in process is complete.
- Step 1: Turn off the VPN and join the public Wi-Fi network.
- Step 2: Open the sign-in page, then enter the required information or accept the network terms.
- Step 3: Afterward, open a normal website to confirm that internet access is active.
- Step 4: Finally, reopen the VPN and connect to a standard nearby server.
If the sign-in page does not appear, disconnect from the network and join it again. You can also look for a Sign In or Join Network option in the Wi-Fi details.
2.2. Fix 2: Restart the VPN app and device
A frozen background service or an unresponsive network adapter can leave the VPN stuck on “Connecting.” Restarting the app and device reloads these components without changing your saved configuration.
- Step 1: Cancel the connection attempt and quit the VPN app completely instead of minimizing it.
- Step 2: Reopen the app, then test a standard nearby server.
- Step 3: If the same error returns, restart the device and try the connection once more.
- Step 4: Continue with the server and protocol checks if restarting does not help.
Avoid repeating the restart several times because it will not resolve a persistent account or network restriction. If the error appears immediately after a clean reboot, another setting or service is probably responsible.
2.3. Fix 3: Check the VPN service status
The connection problem may originate from the VPN provider rather than your device. Authentication systems, apps, and individual server locations can experience temporary outages or scheduled maintenance.
- Step 1: Open the provider’s official status page, support page, or in-app notification area.
- Step 2: Check whether the incident affects authentication, the VPN app, or a specific server region.
- Step 3: If only one location is affected, try two or three servers in another nearby region.
- Step 4: If several locations fail, test the VPN on another device or network before changing system settings.
When the provider confirms a wider outage, avoid reinstalling the app or resetting your device. Wait until the service status changes, then test the connection again.
2.4. Fix 4: Update the VPN app and operating system
An outdated VPN app may no longer work correctly with current operating-system permissions, network drivers, or server configurations. Updates can also correct known connection bugs and replace unsupported components.
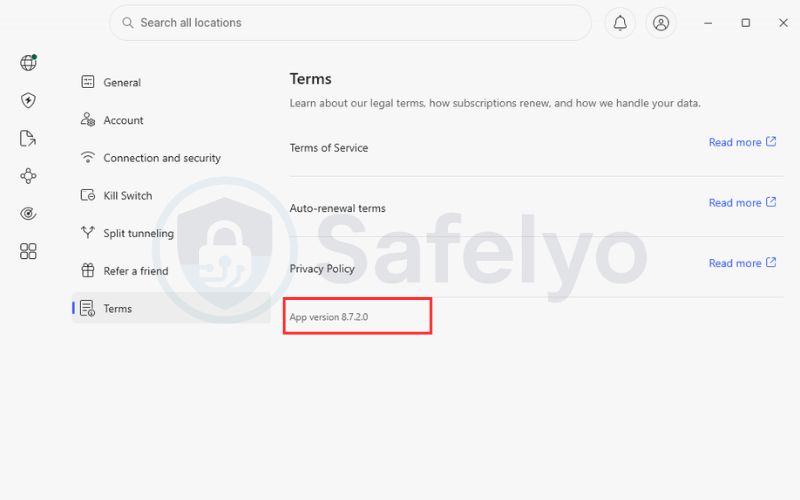
- Step 1: Open the app’s About or Help section and record the installed version.
- Step 2: Compare it with the latest version on the provider’s official website or app store.
- Step 3: Install any available update, then check for operating-system updates as well.
- Step 4: Restart the device if required before testing the VPN again.
Download updates only from the provider’s official website or your device’s app store. Third-party installers may be outdated, modified, or incompatible with the latest service configuration.
2.5. Fix 5: Try another VPN server
A VPN server may be temporarily unavailable because of maintenance, congestion, or a routing problem. Before changing advanced settings, test several standard servers to determine whether the issue is limited to one location.
- Step 1: Cancel the current connection attempt, then open the server or location list.
- Step 2: Choose a standard server near your physical location and allow the app enough time to complete the connection.
- Step 3: If the first location fails, test two or three other nearby servers rather than repeatedly retrying the same one.
- Step 4: Turn off Multihop or Double VPN temporarily, then try a normal, single-server connection.
- Step 5: If none of the standard servers work, continue to the protocol settings in the next section.

If another server connects successfully, the original location was probably unavailable or experiencing a temporary routing problem. You can return to it later without changing the rest of your device settings.
2.6. Fix 6: Change the VPN protocol
A VPN protocol determines how the app establishes the tunnel and transports encrypted traffic. Switching protocols may resolve a failed handshake when the current option is unavailable or incompatible with the network. Use the following sequence rather than changing several options at once. Testing one setting at a time makes it easier to identify which protocol works.
- Step 1: Open the VPN settings and find the VPN Protocol, Connection, or Network section.
- Step 2: Start with Automatic or Recommended, then reconnect to a standard server.
- Step 3: If the connection still fails, try WireGuard or the provider’s modern protocol.
- Step 4: When the network appears to block UDP, switch to OpenVPN TCP if available.
- Step 5: If standard protocols work on another network but not on the current one, test a supported stealth or obfuscation feature.
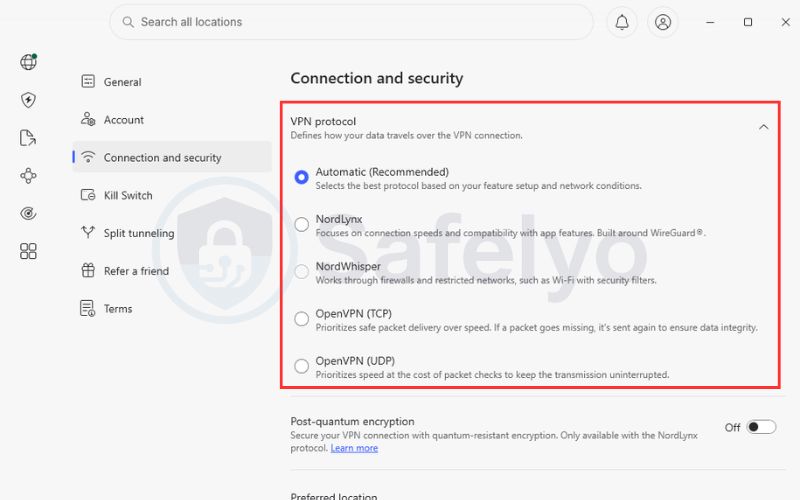
Once testing is complete, return to Automatic unless another option consistently performs better on the current network. This prevents the app from remaining locked to a protocol that may not work elsewhere.
Start with Automatic or Recommended
Most VPN apps offer an Automatic or Recommended mode that selects a protocol based on the device, server, and network conditions. This is usually the safest starting point for users who do not need a specific manual configuration. If you previously selected a protocol manually, return the setting to Automatic and reconnect. This can undo a configuration that stopped working after an app or operating-system update.
Try WireGuard or the provider’s modern protocol
If Automatic fails, try WireGuard or a provider-specific option such as Lightway, NordLynx, or another modern protocol available in the app. These protocols often use lightweight designs, but actual performance still depends on the provider’s implementation. They can work well on home and mobile networks, although reliability varies by server, device, and network. Because WireGuard operates over UDP, it may fail on networks that heavily restrict UDP traffic.
Try OpenVPN TCP if UDP is blocked
OpenVPN TCP may work in schools, workplaces, hotels, or public networks that restrict UDP. TCP prioritizes reliable packet delivery, although it can introduce more overhead and lower performance. Some providers configure OpenVPN TCP to use port 443, which is commonly used by HTTPS traffic. However, this is not automatic in every app, so the available port depends on the provider’s configuration.
Use stealth or obfuscation on restricted networks
Changing protocols is not the same as using traffic obfuscation. A standard protocol changes how the VPN tunnel communicates, while obfuscation attempts to make VPN traffic harder for a filtering system to identify.
Look for provider-specific options such as Stealth, Obfuscated, Camouflage, NoBorders, or Anti-censorship mode. These features may help on certain restricted networks, but their effectiveness varies by provider, platform, and blocking method.
2.7. Fix 7: Fix VPN authentication and account errors
An “Authentication Failed” message means the VPN server could not verify the connection request. Incorrect credentials and an inactive subscription are common causes, but expired sessions, account limits, manual configuration details, and an incorrect system clock may also interfere. Work through the account checks before changing firewall, DNS, or adapter settings. This prevents unnecessary system changes when the issue is tied to the account itself.
Sign out and enter your credentials again
A saved login session may expire or become out of sync with the provider’s authentication system. Signing in again creates a new session and confirms whether the stored credentials remain valid.
- Step 1: Open the account or profile menu, then sign out of the VPN app completely.
- Step 2: Close and reopen the app, then enter the email address and password manually.
- Step 3: If the login still fails, reset the password through the official website.
- Step 4: Confirm that the new credentials work in the web dashboard before returning to the VPN app.
Typing the password manually helps rule out an outdated autofill entry. It also confirms that a password manager has saved the latest version.
Check your subscription and device limit
A valid password will not help if the account is inactive or has reached its simultaneous-device limit. Check both conditions through the provider’s official account dashboard.
- Step 1: Sign in to the dashboard and confirm that the VPN subscription is active.
- Step 2: Review the payment history for a failed renewal, expired payment method, or cancelled plan.
- Step 3: Next, check the simultaneous-device limit and disconnect any unused sessions.
- Step 4: Sign back into the VPN app and test the connection again.
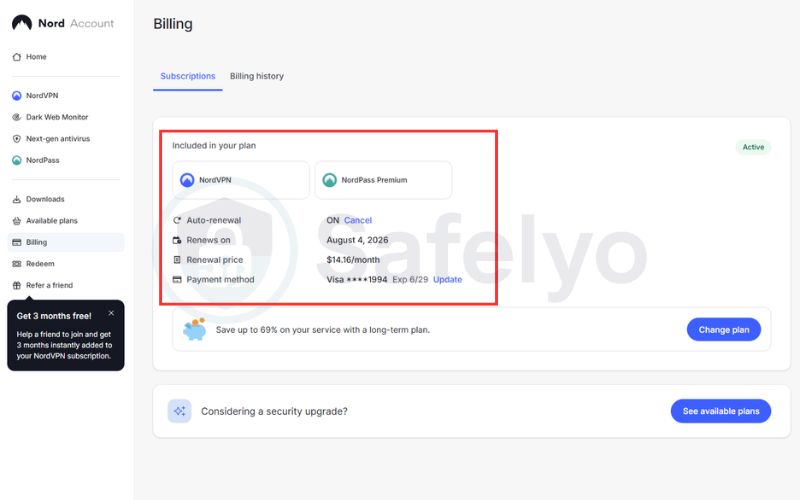
If the dashboard shows an active account but the app still reports an authentication error, contact support with the exact message and server details. The provider may need to inspect the account or authentication service.
Verify manual configuration credentials
A manually configured OpenVPN, IKEv2, WireGuard, or router connection may require credentials that differ from those used for the provider’s regular app. These service credentials are often generated separately in the account dashboard.
- Step 1: Confirm that the connection was created manually, not through the official VPN app.
- Step 2: Open the provider’s manual setup page and locate the service username, password, or configuration key.
- Step 3: Download a current configuration file, then replace the old credentials and settings.
- Step 4: Save the configuration and reconnect.
Manual credentials can be regenerated or changed independently of the main account password. Always use the current values shown in the provider’s official setup documentation.
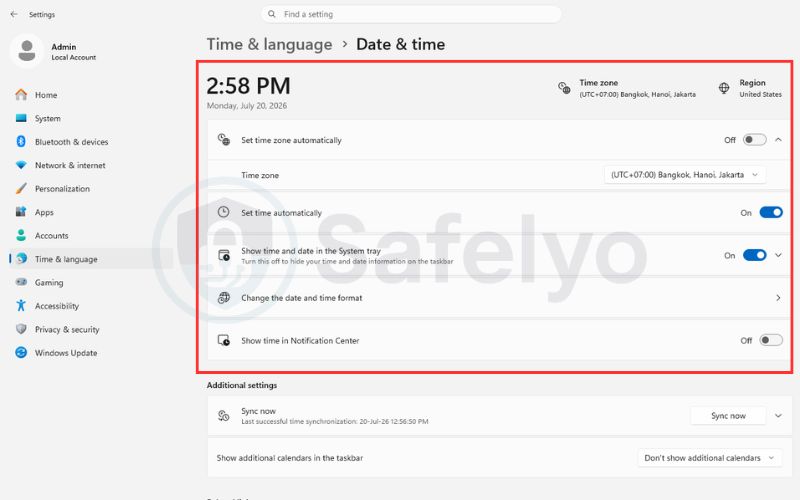
Set the system date and time automatically
VPN authentication may rely on digital certificates that are valid only within specific time periods. If the device clock is significantly incorrect, the operating system may treat a valid certificate as expired or not yet valid.
| Device | How to open the settings |
|---|---|
| Windows | Open Settings, select Time & language, then choose Date & time |
| macOS | Open System Settings, select General, then choose Date & Time |
| Android | Open Settings, select System or General management, then choose Date & time |
| iPhone or iPad | Open Settings, select General, then choose Date & Time |
Enable automatic date, time, and time-zone settings. After the clock synchronizes, restart the VPN app and test the connection again.
2.8. Fix 8: Remove conflicting VPNs, proxies, and network apps
Multiple network tools can create routing, proxy, or adapter conflicts when they attempt to manage the same connection. The goal is to disable them temporarily, then restore each one until the conflicting tool becomes clear.
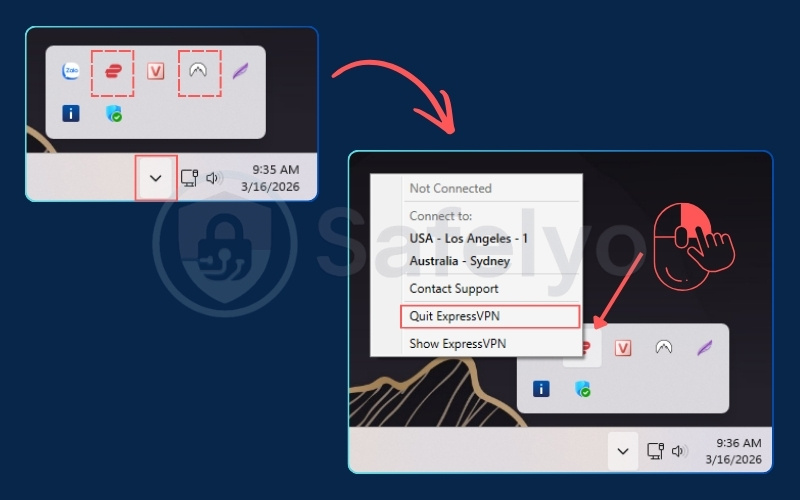
For Windows:
- Step 1: Click the up arrow in your system tray (bottom right corner of your taskbar).
- Step 2: Right-click on the icon of any competing VPN application.
- Step 3: Select Quit or Exit to close the program completely.
- Step 4: Open Windows Settings, go to Network & Internet, select VPN, and ensure that no other profiles are shown as connected.
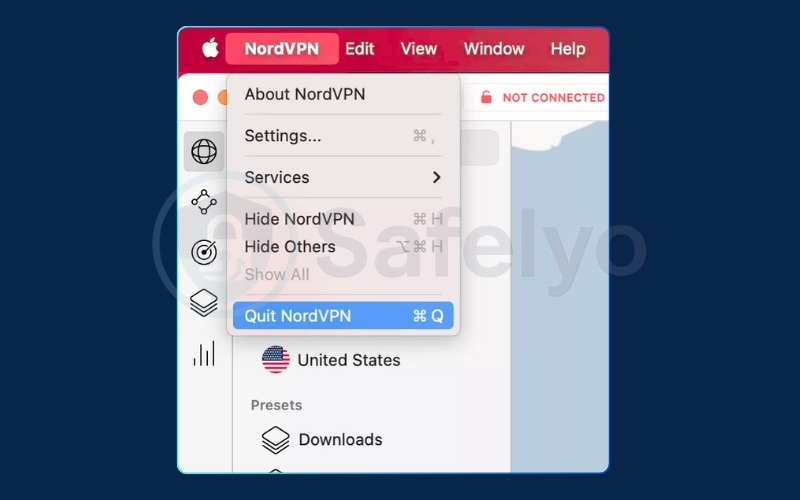
For macOS:
- Step 1: Look at the menu bar at the top right of your screen.
- Step 2: Click on the icon of any other active VPN.
- Step 3: Select Quit or Disconnect from the dropdown menu.
- Step 4: Open System Settings, click on Network, and verify no other VPNs are currently active.
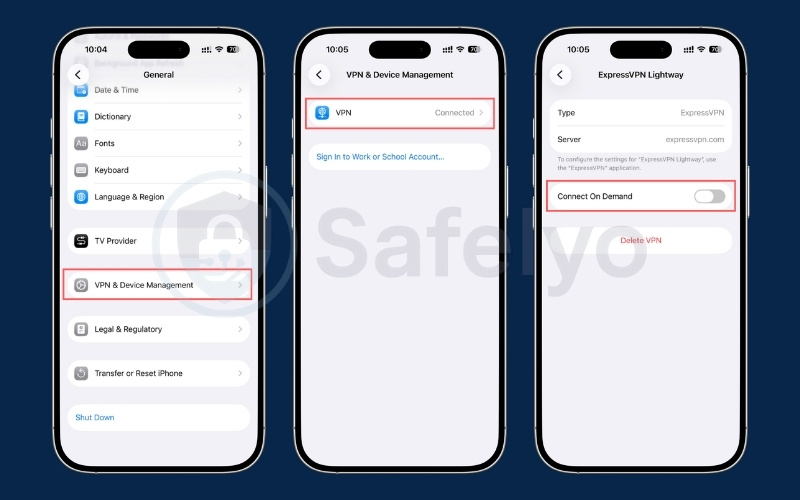
For iOS (iPhone and iPad):
- Step 1: Open the Settings app and tap on General.
- Step 2: Select VPN & Device Management, then tap on VPN.
- Step 3: Tap the info (i) icon next to the competing app and turn off Connect On Demand.
- Step 4: Ensure the main status switch is toggled off so it says “Not Connected“.
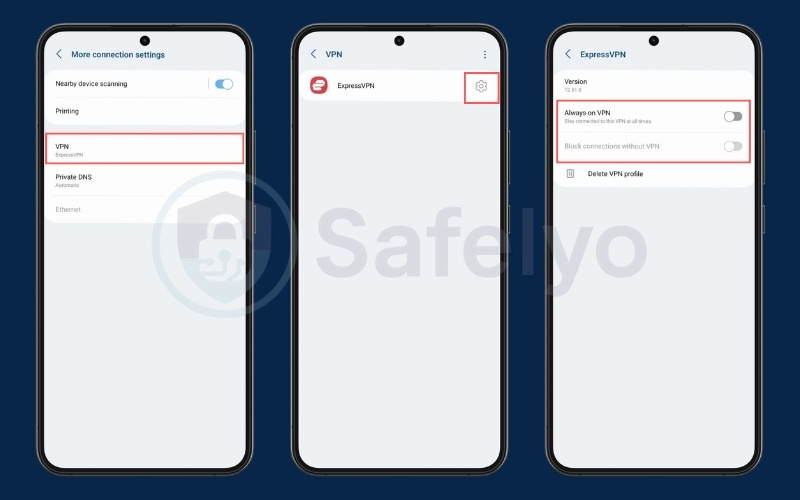
For Android:
- Step 1: Open the Settings app and tap on Network & internet (for Samsung devices, tap Connections, then More connection settings)
- Step 2: Select VPN to view your installed profiles.
- Step 3: Tap the gear icon next to any competing app and toggle off the Always-on VPN and Block connections without VPN settings.
2.9. Fix 9: Check your firewall and antivirus
A firewall, antivirus suite, or web-protection tool may block the VPN application, its background service, or its virtual network adapter. Conflicts can come from application-control rules, HTTPS inspection, web shields, or network-filtering drivers. Do not leave security software disabled after testing. Use a brief check to identify the conflict, then create a narrow exception if necessary.
Temporarily test for a security-software conflict
Pausing the relevant protection component can reveal whether it is blocking the VPN connection. Keep the test brief and avoid unrelated online activity while protection is reduced.
- Step 1: Disconnect the VPN, then open the third-party firewall or antivirus.
- Step 2: Pause only the firewall, web shield, or network-protection component if the software allows it.
- Step 3: Choose the shortest available pause period, reopen the VPN, and test one standard server.
- Step 4: Re-enable the security software immediately after recording whether the connection succeeded.
Avoid downloading files or visiting unfamiliar websites while protection is paused. If the VPN still fails, the security software is unlikely to be the main cause.
Add the VPN app as an exception
If the VPN connects only while the security software is paused, create a limited allow rule rather than leaving protection off. The exception should cover only the application and components required by the VPN.
- Step 1: Open Exceptions, Exclusions, Allowlist, or Application Control.
- Step 2: Add the VPN application executable and, only when required, its background service.
- Step 3: Allow the app on the appropriate network profile, then save the rule.
- Step 4: Confirm that the firewall and antivirus are active before testing the VPN again.
Avoid excluding an entire drive or installation directory unless the provider specifically requires it. Broad exclusions can weaken protection beyond what is necessary to run the VPN.
2.10. Fix 10: Reset advanced VPN settings
Advanced features change how the VPN routes, filters, or blocks traffic. A misconfigured kill switch, DNS rule, split tunneling setting, or Multihop connection may prevent a standard tunnel from working. Change one feature at a time and test the same server after each adjustment. Otherwise, you may restore the connection without learning which setting caused the problem.
Temporarily disable the kill switch
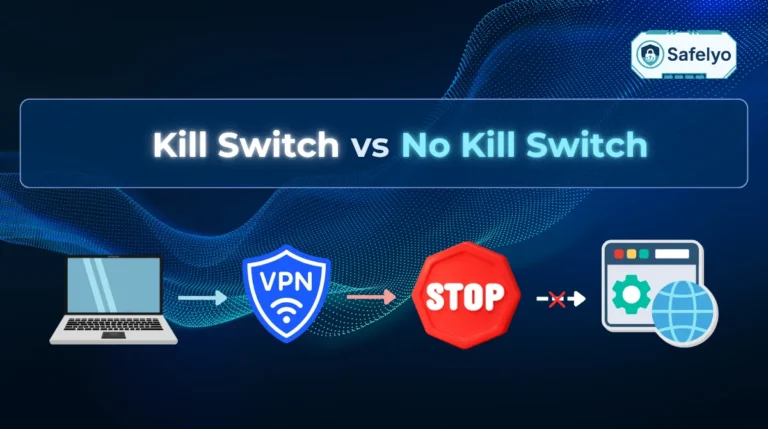
A kill switch blocks internet traffic when the VPN tunnel is unavailable. A stuck service or firewall rule may cause it to continue blocking traffic during troubleshooting.
- Step 1: Open the VPN settings and turn off the kill switch temporarily.
- Step 2: Reconnect to a standard server, then test several websites or online apps.
- Step 3: If the connection works, reset the app settings or reinstall the VPN before enabling the feature again.
- Step 4: Re-enable the kill switch once troubleshooting is complete.
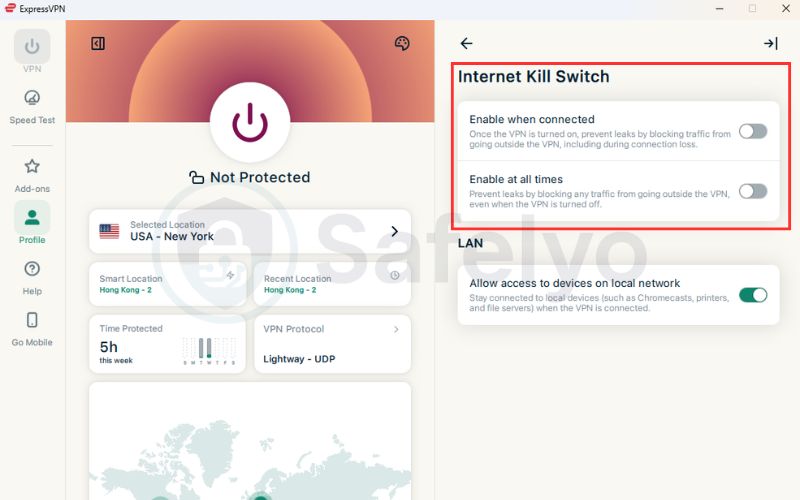
Leaving the kill switch off removes protection against traffic leaving outside the tunnel after a disconnection. It should remain disabled only for the time needed to complete the test.
Turn off Multihop or Double VPN
Multihop or Double VPN routes traffic through more than one server. This creates another connection stage that must work correctly before the tunnel becomes active.
- Step 1: Open the VPN server or security settings and switch back to a standard single server.
- Step 2: Test the connection using the same protocol as before.
- Step 3: If the standard server works, try Multihop again with a different server pair.
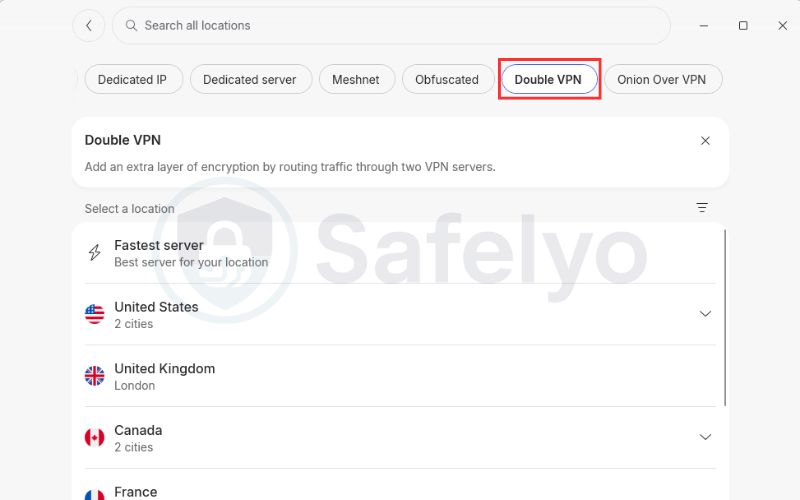
A failed Multihop connection does not necessarily mean the entire VPN service is unavailable. One server or route within the selected pair may be causing the problem.
Disable custom DNS and split tunneling
A custom DNS resolver or split tunneling rule can change how applications and requests leave the device. Incorrect values may therefore interrupt name resolution or send traffic through the wrong interface.
- Step 1: Record the current DNS address and split tunneling rules before changing them.
- Step 2: Return DNS settings to Automatic and disable split tunneling.
- Step 3: Disconnect and reconnect the VPN, then test the affected browser or app.
- Step 4: If the connection returns, restore each setting separately to identify the conflict.
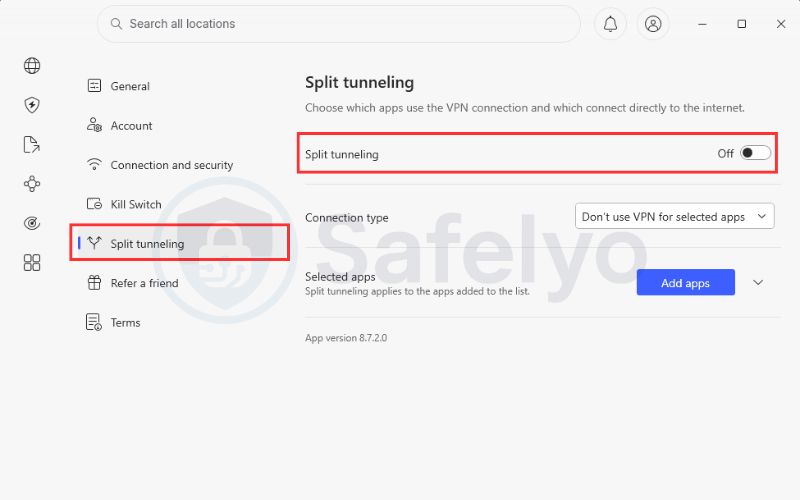
Avoid restoring all custom settings at once because that makes the cause harder to identify. Re-enabling them individually helps reveal an outdated DNS address or incorrect app rule.
Restore the VPN app’s default settings
If you have changed several protocols, ports, DNS options, or security features, restoring the default configuration may be faster than reviewing every setting. Record anything important before resetting the app.
- Step 1: Save any custom settings that you may need later.
- Step 2: Open the Help section and go to Run diagnostics.
- Step 3: Choose “Reset network” or “Reset app”
- Step 4: Connect to a standard nearby server and test the result.
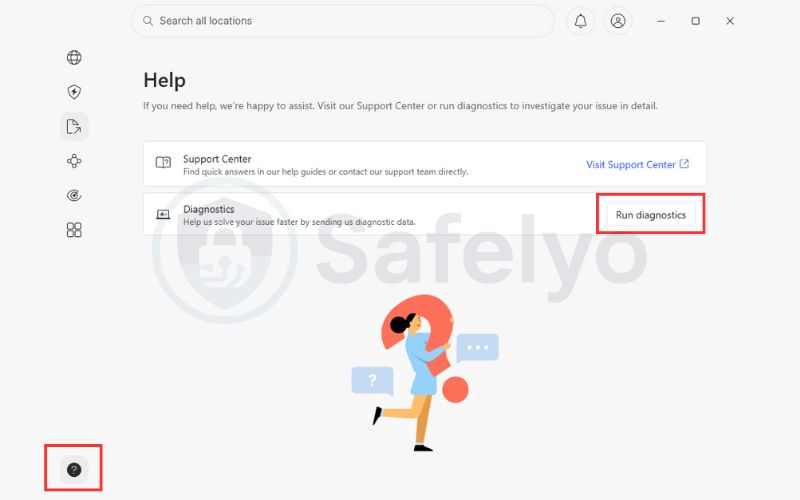
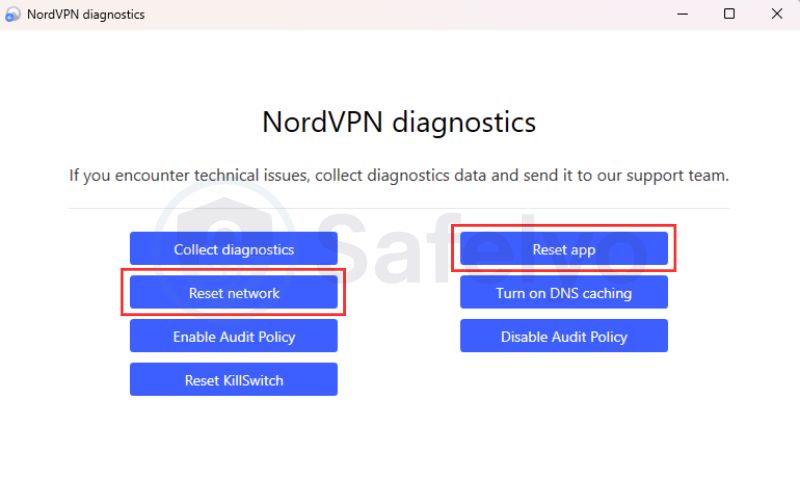
Not every VPN app provides a reset option. When it is unavailable, restore the settings manually or continue to the reinstall section.
2.11. Fix 11: Reinstall the VPN app or network configuration
An interrupted installation, operating-system update, or application error can leave behind an outdated profile, permission, service, or virtual network driver. Reinstalling the app may replace these components and recreate the required permissions. Use this method only after trying the less disruptive fixes above. Reinstalling can erase custom settings, so record them before removing the app.
- Step 1: Record any custom server, protocol, DNS, or split tunneling settings before removing the app.
- Step 2: Sign out if possible, then uninstall the VPN through the device settings or the official uninstaller.
- Step 3: Restart the device so active VPN services and drivers can close completely.
- Step 4: Download and install the latest version from the official provider or app store.
- Step 5: Approve the requested VPN profile, network extension, or virtual adapter.
- Step 6: Sign in, select Automatic or Recommended, and test a standard nearby server.
On Android, iPhone, and iPad, remove any obsolete profile that still belongs to an older installation. On Windows or macOS, follow the provider’s driver-repair instructions if the app still cannot detect its network component.
3. Fix VPN connection problems by device
Operating systems manage VPN connections through different profiles, permissions, services, and network adapters. If the general fixes do not work, follow the instructions for your device.
3.1. VPN not connecting on Windows
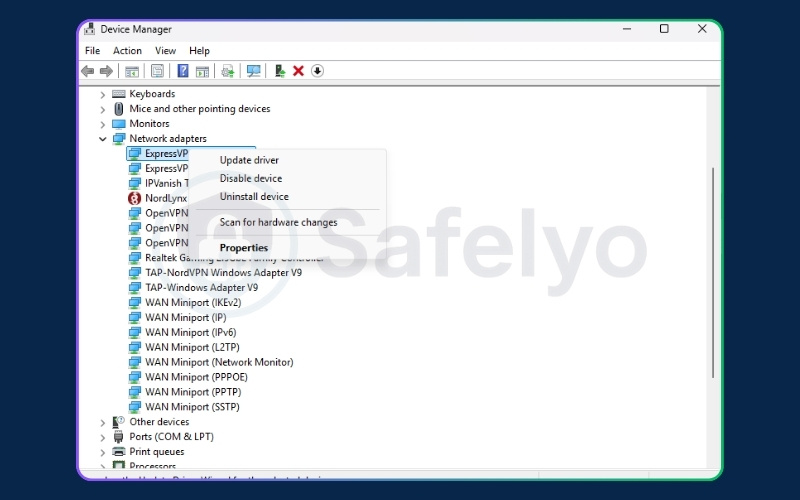
Windows VPN applications may depend on a TAP, TUN, or WireGuard adapter. Restarting that adapter can resolve a temporary driver failure without resetting the entire network.
- Step 1: Close the VPN app, then open Device Manager and expand Network adapters.
- Step 2: Locate the adapter associated with the VPN, right-click it, and select Disable device.
- Step 3: After a few seconds, enable the adapter again and reopen the VPN app.
- Step 4: If the adapter is missing or continues to fail, reinstall the VPN
You should also confirm that Windows Defender Firewall allows the VPN to communicate. A blocked application or background service may prevent the adapter from creating a working tunnel.
- Step 1: Open Windows Security and select Firewall & network protection.
- Step 2: Choose “Allow an app through the firewall,” then locate the VPN app.
- Step 3: Enable the appropriate network permission, save the change, and reconnect.
Do not disable Windows Defender Firewall permanently. If the VPN remains blocked, review Section 7 or follow the provider’s firewall instructions.
3.2. VPN not connecting on macOS
A VPN app on macOS may require permission to install a network extension or create a system-level configuration. These permissions may need to be approved again after an application or macOS update.
- Step 1: Open System Settings, select Privacy & Security, and look for a request to approve software from the VPN provider.
- Step 2: Approve the extension if the provider is trusted; then restart the Mac if prompted.
- Step 3: Reopen the VPN app and test the connection.
If the extension is approved but the connection still fails, recreate the VPN configuration. This replaces an outdated profile without affecting unrelated network services.
- Step 1: Open System Settings, select Network, and choose the provider’s VPN configuration.
- Step 2: Remove the old configuration, then reopen the VPN app.
- Step 3: Approve the request to create a new profile and test a standard server.
Do not remove unrelated certificates or passwords from Keychain Access. Only make keychain changes when the provider identifies a specific credential or certificate error.
3.3. VPN not connecting on Android
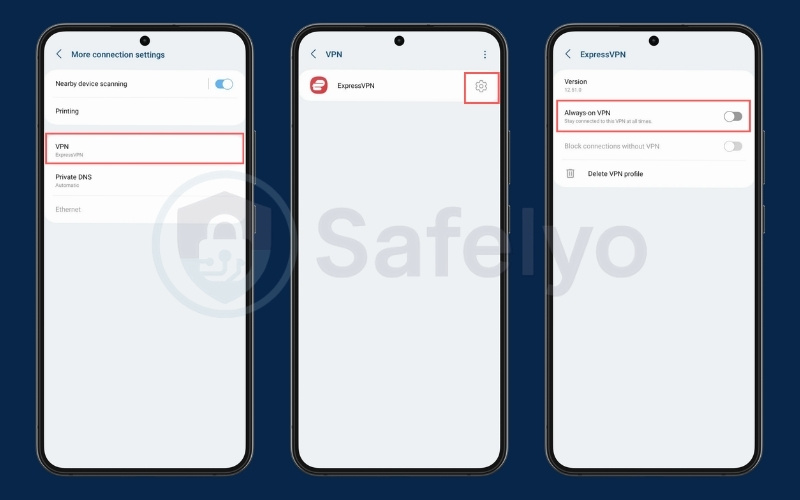
Android normally allows only one active VPN service at a time. An old always-on VPN profile may prevent another app from connecting.
- Step 1: Open Settings, select Network & internet or Connections, then open VPN.
- Step 2: Select the old or conflicting profile and disable Always-on VPN or “Block connections without a VPN.”
- Step 3: Remove the profile if you no longer use it, then reopen your primary VPN app.
3.4. VPN not connecting on iPhone or iPad
An outdated VPN configuration may no longer match the current app installation. Removing and recreating the profile can restore the required permissions.
- Step 1: Open Settings, select General, then choose VPN & Device Management.
- Step 2: Tap VPN, select the provider’s configuration, and choose Delete VPN.
- Step 3: Restart the iPhone or iPad, then reopen the VPN app.
- Step 4: Approve the request to add a new configuration.
- Step 5: Finally, connect to a standard server and test the result.
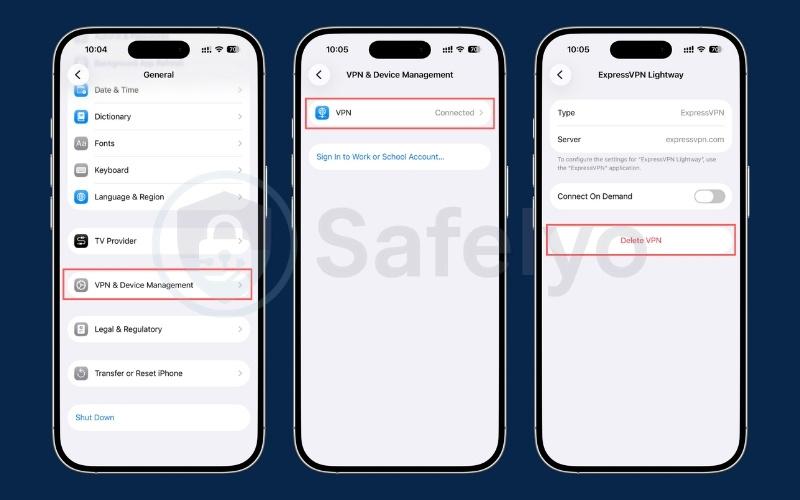
Removing the old profile may temporarily disable Connect On Demand. The VPN app should recreate that option when it installs the new configuration.
3.5. VPN not connecting on a router
A router VPN connection can fail because of incorrect credentials, an outdated configuration file, unsupported settings, or firmware compatibility problems. Check the configuration before resetting the entire router.
- Step 1: Sign in to the router administration panel and open the VPN client, OpenVPN, WireGuard, or a similar section.
- Step 2: Confirm that the router supports the selected protocol, then verify the manual configuration credentials.
- Step 3: Replace the old configuration file with a current version from the provider.
- Step 4: Save the settings, restart the router, and review the VPN client log for authentication or certificate errors.
- Step 5: Once the router reports a connection, verify the public IP address from a connected device.
Older routers may provide slower VPN performance because encryption requires additional processing. Reduced speed alone does not prove that the router caused a complete connection failure.
4. Fix VPN problems on Wi-Fi and restricted networks
Public Wi-Fi, workplaces, schools, and other managed networks may require a login or restrict certain VPN protocols. The following checks can help determine whether the current network is preventing the connection.
4.1. VPN not connecting on public Wi-Fi
Hotels, airports, cafés, and similar networks often use a captive portal before allowing general internet access. The VPN may fail until you complete this sign-in process.
- Step 1: Disconnect the VPN, then join the public Wi-Fi network through the device settings.
- Step 2: Wait for the sign-in page or notification and complete the required login.
- Step 3: Open a normal website to confirm that the network is active.
- Step 4: Reopen the VPN and connect to a standard nearby server.
If the login page does not appear, disconnect from the Wi-Fi network and rejoin it. You can also open a plain HTTP page or use the network’s Sign In option.
4.2. VPN blocked at work or school
A workplace or school network may restrict UDP traffic, known VPN server addresses, or recognizable VPN connections. Check the organization’s acceptable-use policy before changing protocols or using obfuscation.
- Step 1: Confirm that VPN use is permitted on the network.
- Step 2: Start with Automatic or Recommended, then try OpenVPN TCP if UDP appears restricted.
- Step 3: Test another server before enabling a stealth or obfuscation feature.
- Step 4: Contact the network administrator when VPN access is required for work or study.
Do not attempt to bypass a network policy that explicitly prohibits personal VPN use. An administrator may provide an approved business VPN or another secure access method.
4.3. VPN not connecting on a restricted network
Some networks actively identify and block standard VPN traffic. In this situation, switching between normal protocols may not be enough.
- Step 1: Open the protocol settings and select Stealth, Obfuscated, Camouflage, or another supported anti-censorship mode.
- Step 2: Choose a standard nearby server unless the provider recommends another location.
- Step 3: Reconnect and test several websites.
- Step 4: If the connection still fails, try another network or contact the provider for current instructions.
Obfuscation may make VPN traffic harder to identify, but its effectiveness varies by provider, device, network, and blocking method. It cannot guarantee access on every restricted connection.
4.4. Test the VPN with a mobile hotspot
A mobile hotspot test can identify whether the problem comes from the current Wi-Fi network or from the VPN app and device. Use the same server and protocol on both networks to make the comparison meaningful.
- Step 1: Disconnect from Wi-Fi and enable a hotspot on a phone with active cellular data.
- Step 2: Connect the affected device to the hotspot.
- Step 3: Use the same VPN server and protocol that failed on Wi-Fi.
- Step 4: Compare the result with the original network.
If the VPN works through the hotspot but not through Wi-Fi, the router, captive portal, firewall, or network policy is the likely cause. If it fails on both, investigate the app, account, device profile, or provider service instead.
5. Reset network settings as a last resort
A network reset can remove damaged VPN profiles, proxy rules, custom DNS settings, and other network configurations. It may also erase saved Wi-Fi networks, so use it only after the previous fixes have failed. Before starting, save your Wi-Fi passwords and record any custom DNS, proxy, static IP, or manual VPN settings. You may need to re-enter these details after the reset.
| Device | How to reset network settings |
|---|---|
| Windows | Open Settings, select Network & internet, choose Advanced network settings, then select Network reset |
| Android | Open Settings, select System or General management, choose Reset options, then select Reset Wi-Fi, mobile & Bluetooth |
| iPhone or iPad | Open Settings, select General, choose Transfer or Reset, select Reset, then choose Reset Network Settings |
| macOS | Remove and recreate the affected network service or VPN configuration |
After the reset, reconnect the device before restoring advanced settings. Test the VPN using its default configuration first.
- Step 1: Restart the device if it does not restart automatically.
- Step 2: Reconnect to Wi-Fi or Ethernet, then reopen or reinstall the VPN app.
- Step 3: Approve any new VPN configuration request.
- Step 4: Select Automatic or Recommended and test a standard server.
Do not perform a full factory reset of the device or router unless official support specifically recommends it. A network reset is less destructive and should be attempted first.
6. When should you contact VPN support?
Contact the provider when the VPN still fails after you have tested several servers, protocols, devices, or networks. The issue may involve your account, a provider-side outage, an unsupported configuration, or an error that requires diagnostic information.
Gather the following details before contacting support. Providing accurate information can reduce the need to repeat basic troubleshooting.
- Device and operating system: Include the platform and version.
- VPN app version: Record the version or build number.
- Exact error message: Copy the full message or error code.
- Server and protocol: Record the server location and protocol.
- Networks tested: Mention Wi-Fi, Ethernet, cellular data, and hotspot results.
- Troubleshooting attempted: List the fixes you completed.
- Time of the error: Note approximately when the failure occurred.
- Screenshot: Capture the error if possible.
- Diagnostic logs: Look under Help, Support, Diagnostics, or Troubleshooting.
Diagnostic logs may help identify the stage at which the connection fails. Send them only through the provider’s official support channel because they may contain technical information about your device and connection.
7. FAQs about VPN connection problems
Why is my VPN stuck on connecting?
The selected server may be unavailable, the protocol may be incompatible with the network, or a firewall may be blocking the connection. Try another server first, then change the protocol if multiple locations fail.
Why won’t my VPN connect when my internet works?
A working internet connection does not guarantee that the VPN tunnel can be established. The server, account, protocol, firewall, or local network may still prevent the connection.
Can a Wi-Fi network block a VPN?
Yes, schools, workplaces, hotels, and public networks may restrict VPN protocols, UDP traffic, or known server addresses. Complete any captive portal login first and try alternative protocols only when VPN use is permitted.
Why does my VPN say authentication failed?
The server could not verify your connection request. Check your password, subscription, simultaneous-device limit, manual configuration credentials, and system time before changing network settings.
Can my ISP block VPN traffic?
An ISP may restrict known VPN server addresses or identify some types of VPN traffic. A stealth or obfuscation feature may help on certain networks, but it cannot guarantee a successful connection against every blocking method.
Should I force a VPN to connect?
No, repeatedly selecting Connect does not solve the underlying server, protocol, account, or network problem. Cancel the attempt, change the server, and then test another protocol.
Does reinstalling a VPN fix connection problems?
Reinstalling can replace damaged app files, permissions, profiles, and some virtual network components. However, it does not guarantee a fix or reset of every operating-system network setting.
8. Conclusion
If you are still asking why is my VPN not connecting, start by confirming that your internet connection and account are working. Server availability, protocol compatibility, conflicting software, and network restrictions are more common causes than a permanent VPN failure. Try the least disruptive fixes first and save network resets or IPv6 testing for the end. For more setup and troubleshooting advice, explore the VPN Guides section of Safelyo.